In this tutorial we will be resizing a Holder battler sheet and using a plugin to make it work for MV. Things you will need: The first thing you will need is a Holder battler sheet. You can get a bunch of them all at once here: https://rpgmakermv.co/resources/holders-animated-battlers-1st-gen.158/ You will need to create an account to download them, but that part is painless. Alternatively you can just search in a search engine and find one.
In this tutorial we will be resizing a Holder battler sheet and using a plugin to make it work for MV.
Things you will need:
The first thing you will need is a Holder battler sheet. You can get a bunch of them all at once here:
https://rpgmakermv.co/resources/holders-animated-battlers-1st-gen.158/
You will need to create an account to download them, but that part is painless. Alternatively you can just search in a search engine and find one.
You will also need Yami's [TEST] Side View Battler Enhancements plugin which you can find in a bundle here:
Unzip the files and install the two plugins to your game's plugin directory. Never change the names of plugins.
Now we can let the fun begin. (Note: this tutorial will assume basic knowledge of Photoshop but you can use any image editor that supports "layers". I will not be going into detail about how to do things in Gimp, unless there is some demand for this, in which case... Oh, alright, I'll add it, but only if you REALLY need me to.)
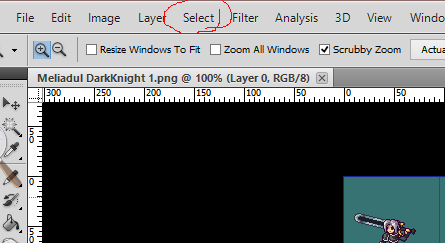
Part 1. Open a Holder's sprite sheet in Photoshop. Make sure the layer is NOT LOCKED and navigate the menu bar to "Select>Color Range".
Protected download
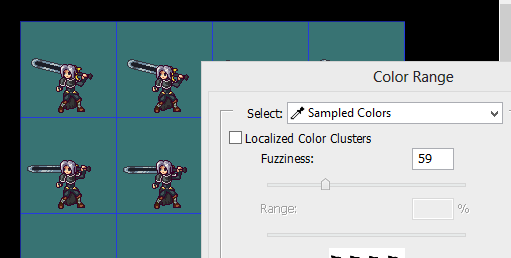
Use the eye drop cursor to select the muddy green behind the character.
Protected download
Press Delete. You should now have a completely transparent background. this is what we want.
Now we want to change the size, or else your battler is going to look tiny... we don't want that.
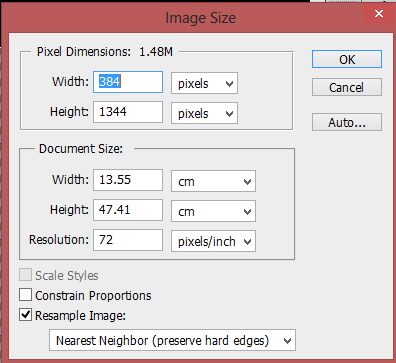
You can do this by navigating the menu bar to "image>image size..."
A menu will pop up with the following dimensions:
Protected download
Make sure Nearest Neighbor is selected before you continue on to the next bit. If it is not, you will likely get a blurry battler. You could do some fancy math, but I've done it for you and here you go:
Next change the width to:512 and the Height to:1792. This will give you a pretty good sized battler. Press okay.
Note:
The individual frames will measure 128x128 which will be important later.
Advanced users can set width and height to their liking, just keep things in proportion and divide the width by 4 to get your frame size.
Save this bigger battler into your projects sv_actors folder and choose a name that will be easy to remember. Mine is named 123.png. (alternatively you could use the resource manager.)
Let's move on to part 2
Protected download(<= this is us moving on...)
Part 2: Using the plugin, and making everything work.
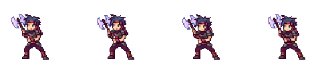
First let us discuss the term "index" and how it applies to the plugin. Look at your battler sheet. the very first 4 frames from right to left is considered index 0.
Protected download
The next row down is considered index 1, then 2, then 3, and so forth.
So now that we've defined what an "index" is let's move on.
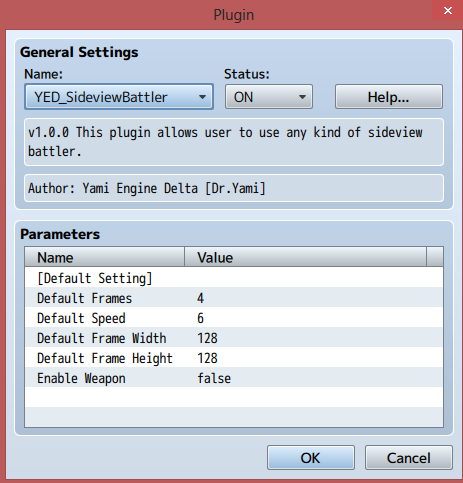
Open Mv and go to your plugins in the editor. Turn on both plugins that came with the download and double click YED_SideviewBattler. Please take time to read the help file to understand more about the plugin. If you are still kind of lost, don't feel too bad, I'm going to walk you through getting everything working for a Holder battler, then you can go from there.
First thing here is to set the frame dimensions. This is where that "128" from earlier is important.
Protected download
These sprites come with weapons so change that to "false".
My default speed was 12, but all the attack animations wouldn't change speed unless I set it to six. I'm pretty sure this is a bug, as we will be setting individual movement speeds shortly. Hey the plug in is labeled TEST, so what can you do. See, now my "guard" (or one of the idle animations) movement is way too fast, but I'll let you play around with the details.
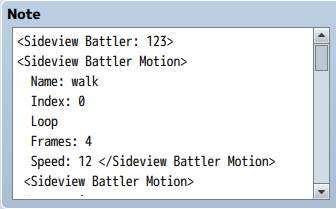
Now, we need to set up all our lovely animations in the database. We will add some note tags to the Actors "note" box under traits to the far right.
Start with <Sideview Battler: whatever_you_named_your_file>
Remember that I named mine 123?
Protected download
Now you could do a bunch of trial and error, and back and forth checking, but I'll give you what I got, and you can go from there. If you copy this stuff from here and paste it under <Sideview Battler: whatever_you_named_your_file>, it should work out of the box. I just tried it and it worked for me. You're welcome... Use it as a template for all your "Holder" battlers.
<Sideview Battler Motion>
Name: walk
Index: 0
Loop
Frames: 4
Speed: 12
</Sideview Battler Motion>
<Sideview Battler Motion>
Name: wait
Index: 1
Loop
Frames: 4
Speed: 12
</Sideview Battler Motion>
<Sideview Battler Motion>
Name: chant
Index: 11
Loop
Frames: 4
Speed: 12
</Sideview Battler Motion>
<Sideview Battler Motion>
Name: gaurd
Index: 1
Loop
Frames: 4
Speed: 12
</Sideview Battler Motion>
<Sideview Battler Motion>
Name: damage
Index: 3
Frames: 4
Speed: 12
</Sideview Battler Motion>
<Sideview Battler Motion>
Name: evade
Index: 9
Loop
Frames: 4
Speed: 12
</Sideview Battler Motion>
<Sideview Battler Motion>
Name: thrust
Index: 4
Frames: 2
Speed: 2
</Sideview Battler Motion>
<Sideview Battler Motion>
Name: swing
Index: 4
Frames: 4
Speed: 2
</Sideview Battler Motion>
<Sideview Battler Motion>
Name: missile
Index: 4
Frames: 4
Speed: 2
</Sideview Battler Motion>
<Sideview Battler Motion>
Name: skill
Index: 6
Frames: 4
Speed: 2
</Sideview Battler Motion>
<Sideview Battler Motion>
Name: spell
Index: 7
Frames: 4
Speed: 6
</Sideview Battler Motion>
<Sideview Battler Motion>
Name: item
Index: 5
Frames: 4
Speed: 2
</Sideview Battler Motion>
<Sideview Battler Motion>
Name: escape
Index: 9
Loop
Frames: 4
Speed: 12
</Sideview Battler Motion>
<Sideview Battler Motion>
Name: victory
Index: 10
Loop
Frames: 4
Speed: 12
</Sideview Battler Motion>
<Sideview Battler Motion>
Name: dying
Index: 2
Loop
Frames: 4
Speed: 12
</Sideview Battler Motion>
<Sideview Battler Motion>
Name: abnormal
Index: 2
Loop
Frames: 4
Speed: 12
</Sideview Battler Motion>
<Sideview Battler Motion>
Name: sleeping
Index: 12
Loop
Frames: 4
Speed: 12
</Sideview Battler Motion>
<Sideview Battler Motion>
Name: dead
Index: 12
Loop
Frames: 4
Speed: 12
</Sideview Battler Motion>
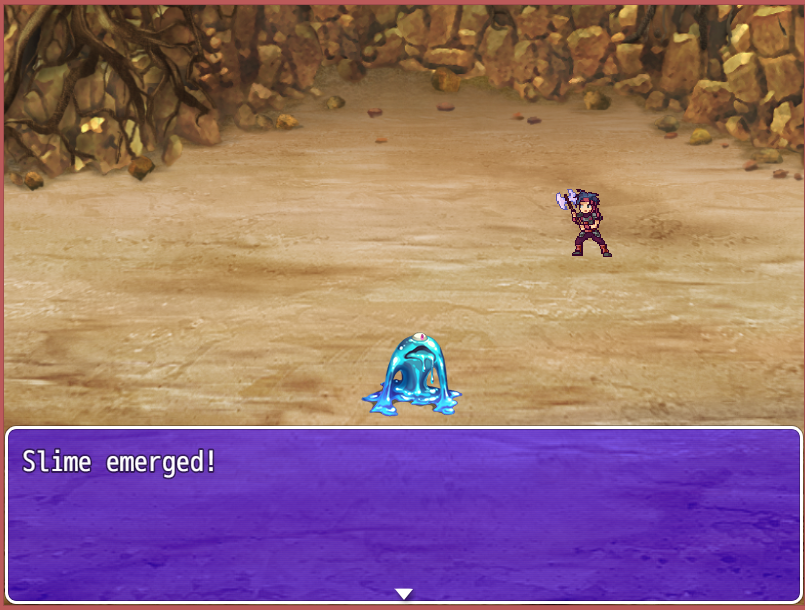
If you did everything correctly, your screen should look something like this when you play test a battle.
Protected download
Also note that my shadow is missing. I removed it manually so I could add my own later. If you want to do that also, just let me know and I will show you.
You can change the "index" of each pose to your liking. With this setup your "Gaurd" or one of the idle animations may look way too fast. I think there are still bugs, but play around with it... and be happy.
"Thanks for viewing my tutorial."
--Ashouse
Credits: Holder
https://rpgmakermv.co/resources/holders-animated-battlers-1st-gen.158/ , Dr. Yami, Victor Sant - his plug in actually helped me understand this plug in better. When I get his working, maybe I'll do a tutorial on that one too. Edit: Victor's plug in is working fine out of the box now. For some reason on my system it just wouldn't work at all. Then he fixed it. Now it's all good, and his video should be enough.
Credits: Holder https://rpgmakermv.co/resources/holders-animated-battlers-1st-gen.158/ , Dr. Yami, Victor Sant - his plug in actually helped me understand this plug in better. When I get his working, maybe I'll do a tutorial on that one too. Edit: Victor's plug in is working fine out of the box now. For some reason on my system it just wouldn't work at all. Then he fixed it. Now it's all good, and his video should be enough.







 Amaran Halo 100X COB LED Video Light
Compact bi-color studio light for YouTube, TikTok, product shots, and live streaming.
View on Amazon
Amaran Halo 100X COB LED Video Light
Compact bi-color studio light for YouTube, TikTok, product shots, and live streaming.
View on Amazon