Filter Controller v2.0.9
Tsukimi (cji3bp62000)
For anyone who is interested in this plugin but using RPG Maker MZ,
there is a MZ version right HERE!
last updated:
#0000ff">2018/03/13
minor update: update embedded PIXI.filters to v2.6.0
no any change on functionality.
old updates:
2018/03/13
Added displacement filter.
To use Displacement filter, one has to put the displacement image named 'DisplacementMap' under img/pictures/.
(If you want to use other names, you can change the default name from plugin's parameter)
Also, the image should be power-of-2 (such as 256x256, 512x512).
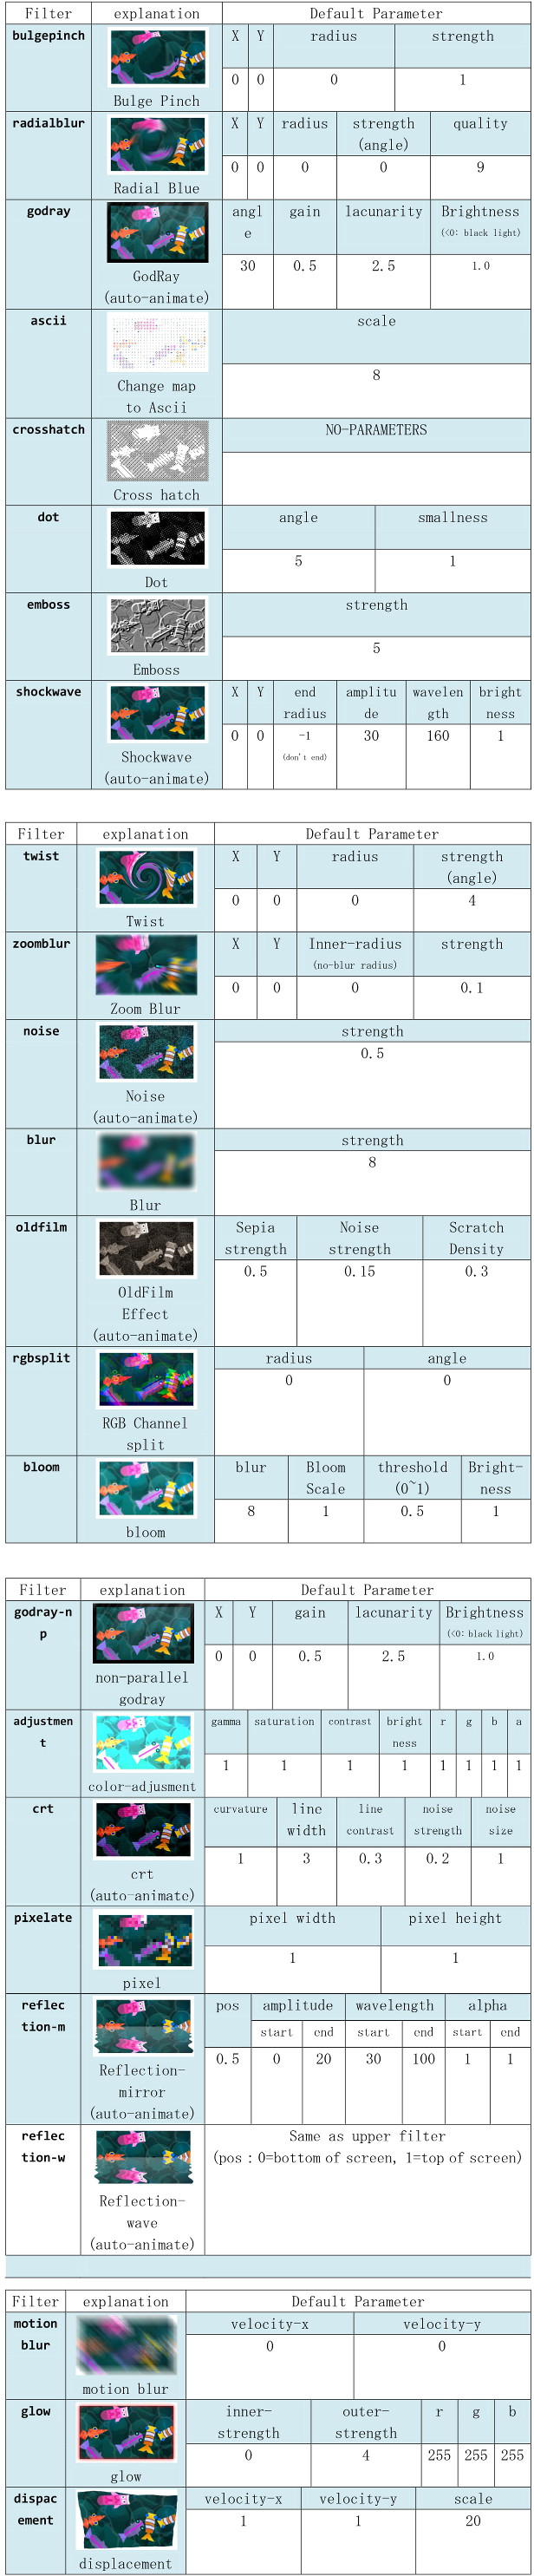
please also take a look at the filter-list, displacement filter's parameter is also in it.
2018/02/10
Fix character id shift bug (when using target: 4xxx) again.
if you face this bug, please download the plugin again.
2018/02/09
add motion blur filter, glow filter
2018/02/02
fix specific-character target index shift bug (ex. 4001 effects event#2 which should be #1)
2018/01/30
・add new target Object (target->specified char/pic only)
filter-target: what will be included in the effect.
0: screen(map+pictures)
1: whole-screen(including message window)
2: map(tiles+characters), 21: map+parallax
3: tiles, 31: tiles+parallax, 32: parallax
4: all characers
4000+id: specific character (id: -1->game Player, 0->this event, 1~->event#id)
5: all pictures
5000+id: specific picture (id: picture id(1~99))
example:
#0000ff"> createFilter eff#1 twist 3999
->the twist effect will only effects game player
#0000ff"> createFilter eff#1 twist 5001
->the twist effect will only effects picture #1
・add six new filter Controller(
godray-np, adjustment, crt, pixelate, reflection-m, reflection-w)
for the details, see the filter-list image(already updated)
・fix godray-filter iOS bug(temporarily. wait for pixi official update)
about the bug, see here:
https://github.com/pixijs/pixi-filters/pull/140
Introduction
PIXI has lots of filters and still adding them in progress, so I create such a plugin to use them in MV.
You can create and move these filters with only one plugin command.
#ff0000">*** Notice !!! ***
this is an webGL depending effect. If your RMMV version is below 1.5.0,
"and" your game will
release on website(html)/smartphone,
#ff0000">this effect may not work.
1.5.0 or upper version allows WebGL rendering for website/smartphone.
(
OK for desktop application, even with version below 1.5.0)
Features
- Simple Creating and setting parameters of PIXI.filters.
-
#0000ff">(require javascript skills) Easy adding your own customized Filter Controller with less than 20 lines of code,
most of witch are just copy & paste.
Screenshots
Demo
PIXI provides a good demo of PIXI.filters
here.
You can preview what filter can you use. (though not all filters are implemented in Filter Controller)
How to Use
- Open your project, add and turn this script on in plugin manager.
#0000ff">*** Create/Move filter by plugin command:
ignore all the <>.
createFilter <id> <filterType> <filter-target> (<character>)
create filter.
#4d4dff">id: id of this controller. choose a name you like!
#0000ff">filtertype: please look at the list of filter name.
#0000ff">filter-target: what will be included in the effect.
0: screen(map+pictures)
1: whole-screen(including message window)
2: map(tiles+characters), 21: map+parallax
3: tiles, 31: tiles+parallax, 32: parallax
4: all characers
4000+id: specific character (id: -1->game Player, 0->this event, 1~->event#id)
5: all pictures
5000+id: specific picture (id: picture id(1~99))
#0000ff">character: optional parameter. If set, make filter Location depend on character,
and will erase filter when leaving current map.
~-1: game Player (inBattle: enemy id)
0: this event (inBattle: current actor)
0~: event ID (inBattle: party member id)
screen: screen. (mostly used for restricting filter to current map only)
example:
createFilter tw#1 twist 0
createFilter GLOW godray 2 screen
eraseFilter <id>
erase the filter of controller name <id> immediately.
setFilter <id> <filter parameters ...>
set the filter<id> to the <parameters>.
please take a look at filter parameter list.
Take twist as example.
assume I created a twist filter named tw#1.
twist has 4 parameters: x,y,radius,angle;
so write:
setFilter tw#1 0 0 96 4
Besides numbers, you can also set:
x: Don't change from current parameter value
v<Number>: value of Game Variable<Number>
r<#1>~<#2>: Random value between #1 and #2.
#1 and #2 can also be variables.
example:
setFilter tw#1 v1 v2 rv3~50 x
x->var#1, y->var#2, radius->rand(var#3, 50), angle->no change
moveFilter <id> <filter parameters ...> <duration>
move filter<id> to <parameters> within <duration>.
example:
moveFilter tw#1 x x 96 4 60
moveFilterQ <id> <filter parameters ...> <duration>
push the movement to Queue. will execute next move after the last move is end.
example:
moveFilterQ tw#1 0 0 96 4 60
moveFilterQ tw#1 x x x x 120
moveFilterQ tw#1 x x 0 0 60
(2nd command: no param changing -> wait 120f between moves)
eraseFilterAfterMove <id>
erase Filter itself after move and moveQueue are end.
setFilterSpeed <id> <speed>
some filter has auto-animation(such as godray). Set the animation speed.
default value: godray, shockwave : 0.01
oldfilm, noise : 1
*** Create/Set filter by Map/Event tags(notes):
put the below commands to Map/Event notes:
<Filter:[id],[filterType],[filter-target]>
Basically same as createfilter.
Creating filter when entering map.
will automaticlly set character to the eventID(event tag) / screen(map tag).
example:
<Filter:GODRAY#1,godray,0>
<SetFilter:[id],[filter parameters ...]>
Basically same as setfilter.
Set the parameter created by <Filter:...>.
example:
<Filter:GODRAY#1,godray,0>
<SetFilter:GODRAY#1,-30,0.5,2.5,1>
<SetFilterSpeed:[id],[speed]>
Basically same as setfilterSpeed.
Set the parameter created by <Filter:...>.
example:
<Filter:GODRAY#1,godray,0>
<SetFilterSpeed:GODRAY#1,0.03>
*** Filter-List (and default parameters)
Download the below image would be convenient when adjusting filter effects.
※ In order to use Displacement filter, one has to
put the displacement image named 'DisplacementMap' under img/pictures/.
Also, the image should be
power-of-2 (such as 256x256, 512x512).
*** Make your own Filter Controller (need javascript skills)
If you see the filters documentation, you can notice that the
parameters are slightly
different from the parameters here.
Yes, I simplified the input parameter, for user convenience.
Take RGBSplitFilter as example.
in the Real RGBSplitFilter, there is each RGB channel shift(x,y) parameters, which have totally 3*2 = 6 parameters.
However I have just radius and angle here. Maybe not enough for somebody.
So, lets create new Filter Controller "rgbsplit2"!
You will need at least 3 things:
1. tie up "rgbsplit2" with PIXI.filters.RGBSplitFilter
2. your own custom parameter
3. the update function to assign your custom parameter to the real PIXI.filters.RGBSplitFilter object
Code:
var newFilterName = "rgbsplit2";
Filter_Controller.filterNameMap[newFilterName]        = PIXI.filters.RGBSplitFilter;
Filter_Controller.defaultFilterParam[newFilterName]   = [1,-1,-1,0,0,1];

Filter_Controller.updateFilterHandler[newFilterName]  = function(filter, param) {
    // filter: the PIXI.filters.RGBSplitFilter object
    // param: your own parameters
        filter.red   = [param[0], param[1]];
        filter.green = [param[2], param[3]];
        filter.blue  = [param[4], param[5]];
};
use
1. Filter_Controller.filterNameMap
2. Filter_Controller.defaultFilterParam
3. Filter_Controller.updateFilterHandler
to set them.
and... Done! You can copy the above code, put in a txt file and rename it to ***.js,
and activate it in your project. If you type in the below plugin command, you will see it works.
createFilter rgb2#1 rgbsplit2 0
setFilter rgb2#1 v1 v2 0 0 0 0
moveFilterQ rgb2#1 10 10 5 5 3 3 60
For the parameters of PIXI.filters.RGBSplitFilter or other filters, please look at PIXI's documentation.
Links are at the bottom of this post.
※The name of Filter Controller
has to be in lower case("rgbsplit2" in example),
you can't use 'RGBSplit2' as a name.
If there is a parameter that you
only want to set at the beginning and only once, use:
Code:
Filter_Controller.filterSpecialInit["rgbsplit2"] = function(filter) {
    // do something to filter ...
}
Filter_Controller.filterSpecialInit
to initialize it.
here is another example: (non-parallel GodRay)
Code:
Filter_Controller.filterNameMap["godray2"]        = PIXI.filters.GodrayFilter;
Filter_Controller.defaultFilterParam["godray2"]   = [408,312,30,0.5,2.5,1.0];
// parameters of godray2: x, y, [the rest is same as parameters of godray]

Filter_Controller.updateFilterHandler["godray2"]  = function(filter, param) {
    // location setting, because non-parallel GODRAY needs an origin
    var loc = this.getCharLoc();
    filter.center = [ (loc[0] + param[0]), (loc[1] + param[1]) ];

    // other parameter setting
    filter.angle = param[2];
    filter.gain = param[3];
    filter.lacunarity = param[4];
    filter.strength = param[5];

    // time setting
    filter.time = this._time;

};

Filter_Controller.filterSpecialInit["godray2"] = function(filter) {
    filter.parallel = false;
}
you can also copy the above script and test it in your project.
・The
this.getCharLoc() returns screen location [x,y] of the current filter's character. if no character, will return [0,0].
・The
this._time is the time for auto-animated filters.
Script Download
You can download(press ctrl+s) the script from
here, or from
my Github.
FAQ
Q: The plugin works, but some of the filters seem not to have effect. (such as Twist Filter, Bulge-Pinch Filter ...)
A: Some of the filters
have a default strength or radius of 0; so it is still working, but you can't visually see it.
Please use
#0000ff">setFilter to change it's strength or radius to a positive number.
Terms of use
Free to use in non-commercial/commercial games. Credits no need. (but I will be happy if you would write in your game!)
Do not reproduce or redistribute this script alone(without any game data).
Credit and Thanks
- Tsukimi (in this forum: cji3bp62000)
- Lots of Thanks to @Sigureya (しぐれん), giving me coding guidance
Author's Notes
#0059b3">current version of PIXI.filters Built in the plugin: v2.5.0
2018/01/24 released. (version numbering 2 because I released version 1 in another forum)
PIXI filters Documentation:
・
pix.js Built-in Filters
・
PIXI Independent Filters
・
PIXI Independent Filters source code(GitHub)Terms of use Free to use in non-commercial/commercial games. Credits no need. (but I will be happy if you would write in your game!) Do not reproduce or redistribute this script alone(without any game data). Credit and Thanks








 Keychron K2 QMK Wireless Mechanical Gaming Keyboard
Compact wireless mechanical keyboard for office work, gaming, and desk upgrades.
View on Amazon
Keychron K2 QMK Wireless Mechanical Gaming Keyboard
Compact wireless mechanical keyboard for office work, gaming, and desk upgrades.
View on Amazon