This is a beginner introductory guide. I also have another guide Advanced Features! What is Chrono Engine? Chrono Engine is a free, open-source suite of plugins used to make action games by adding on-map tools and battles for MV (and MZ compatible with FOSSIL (see MZ notes at bottom)). It can be confusing and overwhelming for beginners, especially since all the instructions are in Portuguese. This guide will simplify it. Chrono Engine has two modes: ABS (Action Battle System) and Chrono Mode.
This is a beginner introductory guide. I also have another guide
Advanced Features!
What is Chrono Engine?
Chrono Engine is a free, open-source suite of plugins used to make action games by adding on-map tools and battles for MV (and MZ compatible with
FOSSIL (see MZ notes at bottom)). It can be confusing and overwhelming for beginners, especially since all the instructions are in Portuguese. This guide will simplify it.
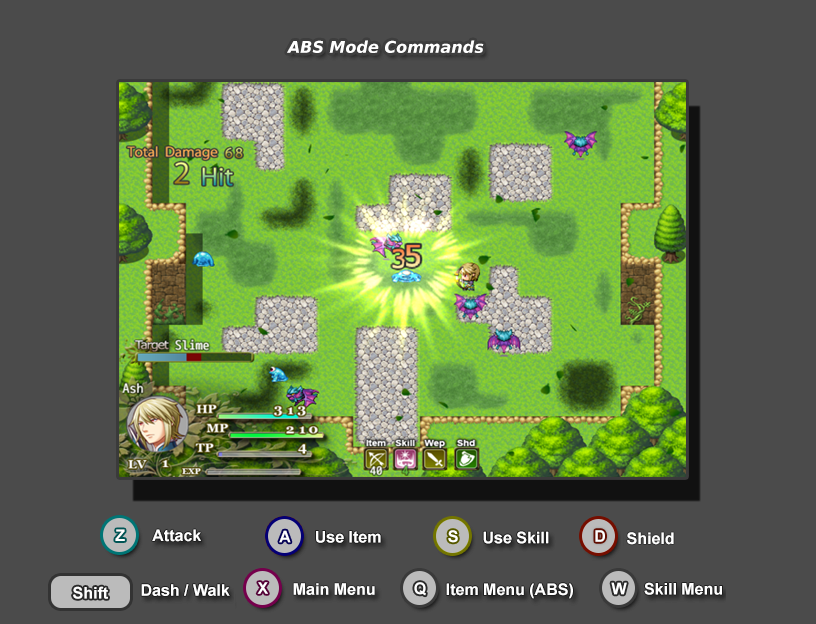
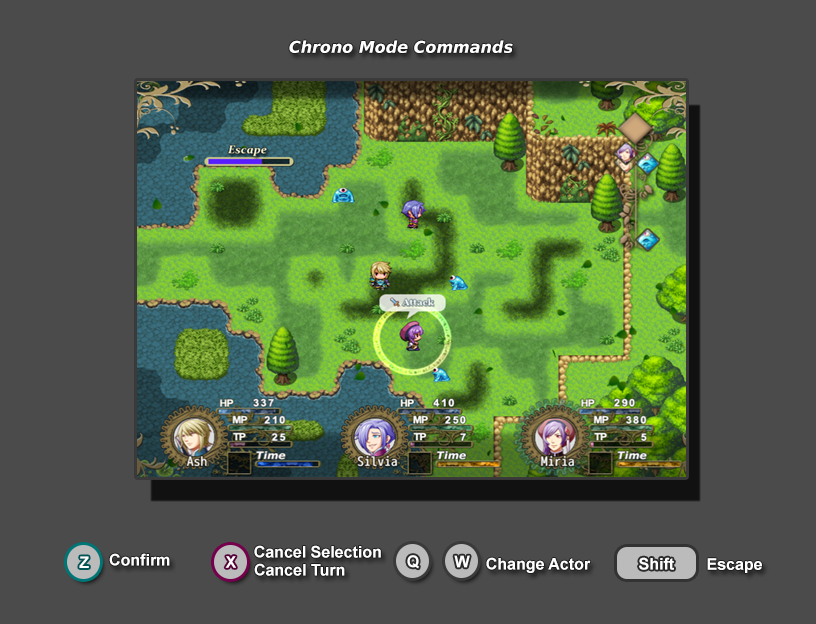
Chrono Engine has two modes:
ABS (Action Battle System) and
Chrono Mode.
ABS mode allows you to make a game like 2D Zelda where you fight enemies on the map and use tools or weapons to solve puzzles.
Protected download
Chrono Mode allows you to have a battle system like Chrono Trigger: an ATB or turn-based battle system on the map instead of cutting to the battle scene for battles.
Protected download
What else can I make in Chrono Engine?
Chrono Engine can be used to make any game that has on-map battles. Think tower defense games, RTSes, top-down shooters, etc.
Can I still use the regular battle scene as well as the on-map battles?
Yes, the regular battle scene is still usable, so you can have both in your game. You could have different sections of the game use different systems, or just use Chrono Engine for the map tools while using the regular battle scene for battles.
Can I use both the ABS and Chrono modes in the same game?
Yes, it's toggleable with the plugin command chrono_mode : true or false
Where do I get it?
https://mogplugins.com/mv-chrono-engine/
You can also get stock Chrono Engine as part of
Cross Engine (basically Chrono Engine on steroids)
Once downloaded, open the demo project. Go to Master_MV_23_1 > ChronoEngine> Game
(Note: There is another demo project in the download showcasing the rest of Moghunter's plugins, which you can look at later to see if there's anything you want to use).
You will want to play the demo first (press the green play button in the top right in the editor) to see all the features in action.
Chrono Mode will showcase a Chrono Trigger clone.
ABS Mode (Stage 1) will showcase a Zelda clone with an emphasis on puzzles and some light combat.
ABS Mode (Stage 2) will showcase a more action/battle-heavy ABS system with advanced features like combos and charged attacks.
Plugin Commands (Debug) is simply a testing map to show what the different plugin commands do.
Once you've played enough, go back to the project file.
This is the Tool Map. Even though it is a map, the player never goes to it. It is simply to store event templates for the tools, spells, and items the player uses on the active map. If you have used an event spawner plugin, this works much the same way. Whenever you use a tool, spell or item in game, its event is temporarily called from this template map and spawned on the active map the player is on, then unspawned when finished. After all, you only need an arrow, bomb or spell to show briefly after using it. Some of the events here are for ABS mode, some for Chrono Mode. Depending on the type of game you want to make, you only need some of them.
The first five events are non-ABS items.
The next six events are the Zelda tools.
The last four are the basic attacks of Ash and his party members in Chrono Mode. (However if you add the party members in ABS mode and switch the leader they'll use them there too.)
Lines 3 and 4 are Chrono mode spells. Note it's possible to use these in ABS mode, but you will have to add the note ABS mode in the database note box for them to show up in the skill list.
Line 6 is Chrono mode double and triple techs.
The last two lines are ABS mode skills used by the player, enemy and bosses.
Let's look at the tool event pages.
Each tool event will have a number of properties in its event page, like how long it takes to use it, how long it stays on the map, and what item/skill/weapon database entry to get its damage numbers/effects from. The tool willl also have a move route defining how the tool event moves, what sound it makes, etc when its spawned onto the current map. You can see this arrow just moves straight ahead. If there is no move route the tool may not move from the user's position and may not see it.
You'll notice on every event on the tool map there is a comment for tool_item_id, tool_skill_id, or tool_weapon_id. That id refers to the database ID and allows that event to use its corresponding database stats. Likewise, the entry in the database will have a Tool Id : X note in the note section to link it back to its tool map event so that when you select that item/skill/weapon from a menu, it knows which tool event to spawn when you use it.
The explanation of every comment can be found in the MOG_ChronoEngine plugin file.
Translation of the Comments instructions from ChatGPT
tool_item_id : ITEM_ID
- Defines damage based on the Item ID.
tool_skill_id : SKILL_ID
- Defines damage based on the Skill ID.
tool_item_cost : ITEM_ID
- Activates an item cost for the action. (*Bow and arrow)
tool_duration : X
- Definition of action duration.
tool_pose_suffix : NAME
- Definition of the suffix of the character image when using the action.
tool_pose_duration : X
- Definition of the duration of the action pose.
tool_area : MODE
- Definition of the type of action impact area.
- square (Square)
- front_square (Half of square)
- rhombus (Rhombus)
- front_rhombus (Half of rhombus)
- line (Frontal Line)
- wall (Lateral Line)
- cross (Cross)
tool_range : X
- Definition of the collision area size of the action.
tool_disable_collision
- Disables event collision.
tool_wait_collision : X
- Defines a time to activate action collision.
tool_disable_piercing
- Disables piercing mode through the target.
tool_damage_all
- Causes damage to all targets, enemies, and allies.
tool_position : MODE
- Defines the initial position of the action.
target - Target selection through cursor.
user - User's position.
move_to_target - Makes the character move to the target in Chrono mode.
tool_multihit : LAG_TIME
- Activates multi-hit mode, where X is the time between hits.
tool_action_times : TIMES : LAG_TIME
- Triggers the action X times.
tool_chain_action : ACTION_ID
- Activates an action after the character finishes the first action.
tool_chain_action_hit : ACTION_ID
- Activates an action when the first action hits the target.
tool_three_directions
- The action is activated in three directions.
tool_four_directions
- The action is activated in four directions.
tool_all_directions
- The action is activated in all directions.
tool_knockback_duration : X
- Time the target remains paralyzed after the hit.
tool_ignore_shield
- Collision ignores whether the target is using a shield.
tool_shield_reflect
- The action is reflected when the user is using a shield.
tool_unique
- The action is activated only once.
tool_diagonal
- Allows the action to be activated diagonally.
tool_diagonal_angle
- The sprite angle will be based on the event's direction.
tool_user_animation_id : X
- Defines an animation on the user when activating the action.
tool_cast_animation_id : X
- Defines an animation on the user during the action invocation phase.
tool_shake
- Makes the screen shake when hitting the target.
tool_boomerang : X
- Activates boomerang mode, where X is the action distance.
tool_hookshot : X
- Activates hookshot mode, where X is the action distance.
tool_user_zoom_effect
- Activates zoom animation when using the action. (Requires MOG_Character_Motion plugin)
tool_ignore_knockback
- Allows the action to hit the target regardless of the knockback state.
tool_combo : ACTION_ID : COMMAND_TYPE
- Activates the combo system for this action, where a different action will be activated each time the player presses the required button.
- COMMAND TYPE - Command type.
- 0 Weapon Command/Button
- 1 Skill Command/Button
- 2 Item Command/Button
tool_charge_attack : ACTION_ID : CHARGE_TIME
- Activates the charge system for this action, where the action will be activated when the player holds down the normal attack button (Weapon Command) for a certain CHARGE_TIME.
Next let's look at the database. The tabs we're interested in are Skills, Items, Weapons, and Armors:
The database stores all the battle data for the items, skills, weapons and enemies. The icon is what will show in your inventory or skill list and the tool item HUD in ABS Mode, or when it's obtained from a treasure chest or enemy loot drop. The image on the tool's event on the tool map is what shows up when you use the tool on the active map.
Adding your own tools/skills
To create a new tool or skill, the best way is to copy and paste the event of a similar existing tool on the tool map. Here I create a new skill on the tool map (in an empty water tile).
I called the skill event Teleport and gave it the tool_skill_id : 5 as it was the first empty slot in the skill database. Then I copied some of the comment tags from the other self-cast magic spells since they were the most similar to what I wanted to do and tweaked the duration numbers so it wouldn't take long to cast. Then I put in an event command that will transfer the player to the starting map of ABS Mode 1 (where you get the sword). Make note of the event ID in the top left (70 here).
Next I create a new database entry for the skill under skills. In the notebox I type in Tool Id: 70 to link it back to the tool map event and put abs mode so it shows up for use in the ABS mode skill menu.
Finally, have a way to add the tool or skill to your actor in game. I like to make a treasure chest on the starting map to test it right away.
The change skill command will add it to the actor's list of selectable skills. The set_actor_skill command will make it his active skill and show it in the Tool HUD.
Now, in my playtest, I got the skill from the chest, it shows up in my skill list, and is set as my skill in the tool HUD at the bottom of the screen.
How do tool collisions work (on non-enemy events)?
If you want events to react to tools, simply use collision_id comments on their event page. Anything below the collision_id comments will only happen if the event is hit with a tool with that corresponding event id from the tool map. In the case of this grass, it will only play the leaf flying animation and be erased if hit with the knife tool (6) or the crystal sword tool (51).
How do enemies work?
To designate an event as an enemy, you will need to put an enemy_id comment on its event page. This will link the event to an enemy's stats in the database. This slime has enemy_id : 5, so it would use that enemy database entry for its stats.
Enemies in ABS Mode
In ABS mode, there will also be a comment for event sensor. The number will designate how many tiles away the player has to be before the enemy reacts. If the player is within X tiles, that enemy's self switch turns on. By default this is self switch D, but you can change this in the plugin settings for MOG_EventSensor
The slime's first event page has Autonomous Movement> Move at random. However, when the player is within 3 tiles, it switches to the self switch D event page and its Autonomous Movement sequence changes
To make an enemy use an attack from the tool map put this.act(TOOLID) in its moveroute. This ghost will shoot fireballs (tool ID 53)
Let's look at the plugins.
Do I need all of these plugins to use Chrono Engine?
No, the bulk of the code is in MOG_ChronoEngine, which is almost 12,000 lines long. Everything else is a smaller feature you may or may not need depending on what you want in your game. All of them are showcased in the demo project.
NOTE: The order of the plugins matter! Keep the plugins in the order they are in the demo, or follow the order below! If you are using Cross Engine, follow the order in the plugins section in the first post of the Cross Engine thread.
A quick rundown of every plugin:
Anything that doesn't start with MOG is just an empty file used as a placeholder to organize the plugin list. They're all turned off because they do nothing and you can safely delete them if you'd like.
MOG_TitleSplashScreen: Shows images before the title screen. It's used in the demo to show credits
MOG_ActionName: Shows a banner at the top of the screen with the name of the action when you use it.
MOG_BattleHUD: This is used in Chrono Mode
MOG_BossHP: Creates a large HP bar for the boss
MOG_ComboCounter: Shows combo count for attacks
MOG_DmgPopupEffects: Makes the damage numbers rise or bounce. The damage numbers themselves are created by the main ChronoEngine plugin.
MOG_CharacterMotion: Gives various effects to the map events, like breathing and floating.
MOG_DizzyEffect:
MOG_EventIndicators: Shows small text and icons above events.
MOG_TreasurePopup: Shows small icons and item names whenever you open a treasure chest or pick up an item
MOG_Weather_EX: Creates weather effects. It's used for the floating leaves in the demo.
MOG_PickupThrow: Allows you to create throwable events. This is used for the bomb tool in the demo, but can also be used to make events throwable like the pots, bushes and chickens in Zelda
MOG_ActorHud: Creates a HUD element showing the party leader's stats
MOG_GoldHud: Creates a HUD element showing the amount of gold you have on the map
MOG_CharPoses: Allows you to use different character spritesheets for idling, jumping, and dashing
MOG_EventSensor: Turns on a self switch in an event if it is within X tiles of the player. This is used in the demo to trigger changes in enemy event behavior or start battles
MOG_ChronoEngine: The meat of the project that contains all the code for on map battles and collisions
MOG_ChronoATBHud: Creates the ATB gauge in Chrono Mode
MOG_ChronoEnemyHP: Shows the enemy HP bar
MOG_ChronoCT: Creates the stamina/charge bar system and display. Needs MOG_ActorHUD turned on to work
MOG_ChronoToolHud: Creates the four tool icons you see at the bottom of the screen in the ABS mode demo
How do I build on top of the Chrono Engine demo project?
It's widely recommended to build a game on top of the Chrono Engine demo project since everything is already set up for you, but it can be added to an existing project with a little work.
If you do use the demo project as a base, make sure to update the core RPG Maker Engine files to at least 1.6.2 as the demo comes with v1.5.0. A lot of other MV plugins are designed for v1.6.2 so if you don't update it other plugins may not work.
To update the core files, start a new project then copy that project's core files over to the Chrono Engine demo project at \Master_MV_23_1\ChronoEngine\js.
How do I add Chrono Engine to my existing project?
If you already have an existing project, the easiest way to add it is have your game and the Chrono Engine demo open in separate windows at the same time so you can easily copy and paste what you need from the demo project into your project.
The two things you'll need to copy over is the
tool map and the
database entries of the skills, items, and weapons you want. The entire tool map can be copied over easily by selecting the tool map from the map list in the demo, right click>copy, then pasting it (Ctrl+V) into the map list in your project. From there you can easily delete any events you don't need.
You'll also need to update the Tool Map ID parameter in the MOG_ChronoEngine plugin to the map ID it is in your existing project.
Don't forget to update the images and animations in the tool events for your project. For example, the lantern tool uses animation 128 in the demo project. Animation 128 may not exist, or be something completely different in your project.
Copying over the database entries may be more difficult if you already have existing items, skills, and weapons in your project. You can copy and paste entries from the demo project into the next available slots in your game's database, but you'll need to update what ids the tool map events are pointing to to match the item, skill and weapon ids in your project's database.
Finally, you'll need to add the plugins to your project's plugin list. The only absolutely necessary one is MOG_ChronoEngine, but you probably want some of the other features in the demo project, so refer to the plugin list above to see which ones you need.
NOTES for Chrono Engine in MZ:
MOG_DmgPopupEffects will throw a this.digitWidth is not a function error. You can download a
patched MZ version here
You may get an error after an attack is used "cannot read property length of undefined".
To fix it, go to the End Animation section in MOG_ChronoEngine plugin file, and add ? after the first this._animationSprites as seen below
So the line should read
Code:
if (this._animationSprites?.length > 0) {
This guide is regularly updated!
Want to do more with Chrono Engine? Check out the
Advanced Features guide




 ZSCMALLS 18.5-Inch Portable Monitor
Portable 1080p screen for laptop expansion, travel desks, and compact workstations.
View on Amazon
ZSCMALLS 18.5-Inch Portable Monitor
Portable 1080p screen for laptop expansion, travel desks, and compact workstations.
View on Amazon