



Preserved forum archive. This topic stores the original first post and locally mirrored RPG Maker Web attachments when available. It is posted by the BMMPlay archive account, not by the original creator.
Original Source
- Original title: CharacterFromGeneratorParts.js
- Original author: mogwai
- Original date: March 13, 2017
- Source thread: https://forums.rpgmakerweb.com/threads/characterfromgeneratorparts-js.75904/
- Source forum path: Game Development Engines > RPG Maker Javascript Plugins > JS Plugin Releases (RMMV)
Summary
{ "lightbox_close": "Close", "lightbox_next": "Next", "lightbox_previous": "Previous",
Archived First Post
CharacterFromGeneratorParts.js
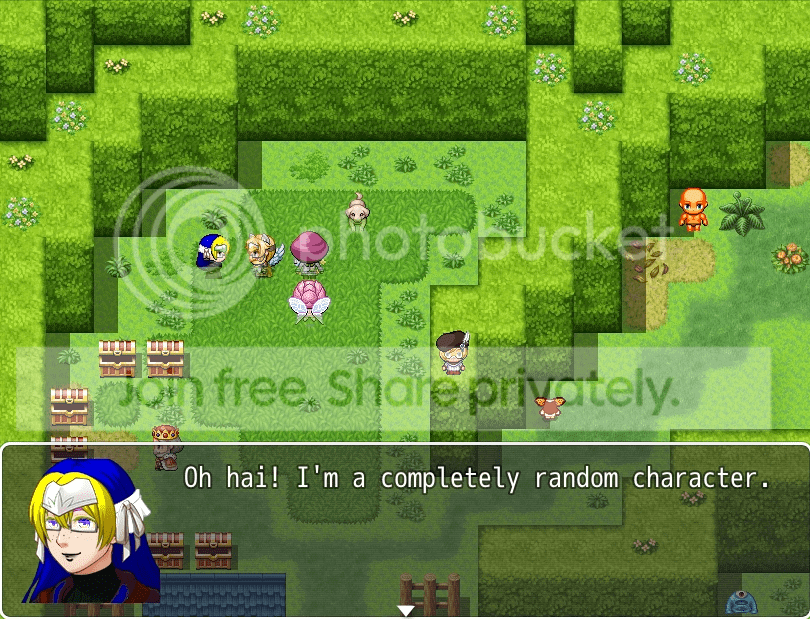
This is script I wrote on request for a completely random disposable character that you would never see again.
This thread: https://forums.rpgmakerweb.com/index.php?threads/randomly-generate-characters-ideas-help.74399
It's over 1,000 lines and it took me over a week, but as a script it does so little and the built-in MV character generator can already do it better, so it makes me feel insignificant about writing all this. There is a lot of description though. I'll just copy paste most of what I posted to @temmie in that thread.
To generate a character, you must set its character image file to one of these. It can just be named these; it doesn't have to be these exact files, but these visually signify the generated characters from the regular ones.
- /img/sv_actors/$Is_Generator_Battler.png for SV Battlers
- /img/characters/$Is_Generator_Char.png for Characters
- /img/faces/$Is_Generator_Face.png for Faces
You'll need to copy the folder called Generator with the part images from your RMMV folder to your game /img/ folder too.
The first and foremost parameter to use is <gender:value> value can be male, female, or kid, or also 0 for male, 1 for female, and 2 for kid. Gender is basically also the body. You can add hue, sat and lum to that tag to change the skin color.
<part:random hue:random sat:random lum:random> random for a value will set any parameter to random based on its attribute. It will be random every time. It may be better to use var() and set a Game Variable to random that way instead.
For example Game Variables #5 - #8 to use its value <part:var(5) hue:var(6) sat:var(7) lum:var(8)>
To add a part to one of these $generator image characters, just list any of these tags in the event comment (flow control Page1) or the Actor Note in the database. It goes <part:number hue:number sat:number lum:number gender:value> Hue, sat, and lum are Hue Saturation and Lightness (Luminance). Gender the attribute of a parameter will uses a trans part from another folder, example a female character with <beard:5 gender:male> can have a beard from the male parts. Those are optional. To use a parameter, all you really need is part name and number. The number is the little p01 - p02 on the generator image.
This is a list of all the default generator parts images unless you've been adding images to it.
PHP:
| - - - - - - - - - - - - - - - - - - - - - - - - -|
|------------------- Folder /TV -------------------|
| Charset Male "Front Hair" <fronthair:1-17> |
| Charset Male "Rear Hair" <rearhair:1-18> |
| Charset Male "Beard" <beard:1-11> |
| Charset Male "Facial Mark" <facialmark:1-8> |
| Charset Male "Beast Ears" <beastears:1-6> |
| Charset Male "Tail" <tail:1-6> |
| Charset Male "Wing" <wing:1-5> |
| Charset Male "Clothing" <clothing:1-23> |
| Charset Male "Cloak" <cloak:1-4> |
| Charset Male "Accessory 1" <accessory1:1-8> |
| Charset Male "Accessory 2" <accessory2:1-8> |
| Charset Male "Glasses" <glasses:1-5> |
| - - - - - - - - - - - - - - - - - - - - - - - - -|
| Charset Female "Front Hair" <fronthair:1-15> |
| Charset Female "Rear Hair" <rearhair:1-20> |
| Charset Female "Facial Mark" <facialmark:1-7> |
| Charset Female "Beast Ears" <beastears:1-6> |
| Charset Female "Tail" <tail:1-6> |
| Charset Female "Wing" <wing:1-5> |
| Charset Female "Clothing" <clothing:1-26> |
| Charset Female "Cloak" <cloak:1-4> |
| Charset Female "Accessory 1" <accessory1:1-7> |
| Charset Female "Accessory 2" <accessory2:1-10> |
| Charset Female "Glasses" <glasses:1-6> |
| - - - - - - - - - - - - - - - - - - - - - - - - -|
| Charset Kid "Front Hair" <fronthair:0-22> |
| Charset Kid "Rear Hair" <rearhair:0-22> |
| Charset Kid "Ears" <ears:2-2> |
| Charset Kid "Facial Mark" <facialmark:3-4> |
| Charset Kid "Clothing" <clothing:0-22> |
| Charset Kid "Accessory 1" <accessory1:1-6> |
| Charset Kid "Accessory 2" <accessory2:1-4> |
| Charset Kid "Glasses" <glasses:1-1> |
| - - - - - - - - - - - - - - - - - - - - - - - - -|
|------------------ Folder /TVD -------------------|
| Fallen Male "Front Hair" <fronthair:1-17> |
| Fallen Male "Rear Hair" <rearhair:1-18> |
| Fallen Male "Beard" <beard:1-11> |
| Fallen Male "Facial Mark" <facialmark:1-8> |
| Fallen Male "Beast Ears" <beastears:1-6> |
| Fallen Male "Tail" <tail:1-6> |
| Fallen Male "Wing" <wing:1-5> |
| Fallen Male "Clothing" <clothing:1-23> |
| Fallen Male "Cloak" <cloak:1-1> |
| Fallen Male "Accessory 1" <accessory1:1-8> |
| Fallen Male "Accessory 2" <accessory2:1-8> |
| Fallen Male "Glasses" <glasses:1-5> |
| - - - - - - - - - - - - - - - - - - - - - - - - -|
| Fallen Female "Front Hair" <fronthair:1-15> |
| Fallen Female "Rear Hair" <rearhair:1-20> |
| Fallen Female "Facial Mark" <facialmark:1-7> |
| Fallen Female "Beast Ears" <beastears:1-6> |
| Fallen Female "Tail" <tail:1-6> |
| Fallen Female "Wing" <wing:1-5> |
| Fallen Female "Clothing" <clothing:1-26> |
| Fallen Female "Cloak" <cloak:1-4> |
| Fallen Female "Accessory 1" <accessory1:1-7> |
| Fallen Female "Accessory 2" <accessory2:1-10> |
| Fallen Female "Glasses" <glasses:1-6> |
| - - - - - - - - - - - - - - - - - - - - - - - - -|
| Fallen Kid "Front Hair" <fronthair:0-22> |
| Fallen Kid "Rear Hair" <rearhair:0-22> |
| Fallen Kid "Facial Mark" <facialmark:3-4> |
| Fallen Kid "Clothing" <clothing:0-22> |
| Fallen Kid "Accessory 1" <accessory1:1-6> |
| Fallen Kid "Accessory 2" <accessory2:1-4> |
| Fallen Kid "Glasses" <glasses:1-1> |
| - - - - - - - - - - - - - - - - - - - - - - - - -|
|------------------ Folder /Face ------------------|
| Face Male "Face" <face:1-12> |
| Face Male "Front Hair" <fronthair:1-17> |
| Face Male "Rear Hair" <rearhair:1-18> |
| Face Male "Beard" <beard:1-11> |
| Face Male "Ears" <ears:1-2> |
| Face Male "Eyes" <eyes:1-27> |
| Face Male "Eyebrows" <eyebrows:1-19> |
| Face Male "Nose" <nose:1-13> |
| Face Male "Mouth" <mouth:1-15> |
| Face Male "Facial Mark" <facialmark:1-8> |
| Face Male "Beast Ears" <beastears:1-6> |
| Face Male "Clothing" <clothing:5-23> |
| Face Male "Cloak" <cloak:1-4> |
| Face Male "Accessory 1" <accessory1:1-8> |
| Face Male "Accessory 2" <accessory2:1-8> |
| Face Male "Glasses" <glasses:1-5> |
| - - - - - - - - - - - - - - - - - - - - - - - - -|
| Face Female "Face" <face:1-7> |
| Face Female "Front Hair" <fronthair:1-15> |
| Face Female "Rear Hair" <rearhair:1-20> |
| Face Female "Ears" <ears:1-2> |
| Face Female "Eyes" <eyes:1-20> |
| Face Female "Eyebrows" <eyebrows:1-10> |
| Face Female "Nose" <nose:1-13> |
| Face Female "Mouth" <mouth:1-13> |
| Face Female "Facial Mark" <facialmark:1-7> |
| Face Female "Beast Ears" <beastears:1-6> |
| Face Female "Clothing" <clothing:5-26> |
| Face Female "Cloak" <cloak:1-4> |
| Face Female "Accessory 1" <accessory1:1-7> |
| Face Female "Accessory 2" <accessory2:1-10> |
| Face Female "Glasses" <glasses:1-6> |
| - - - - - - - - - - - - - - - - - - - - - - - - -|
| Face Kid "Face" <face:1-1> |
| Face Kid "Front Hair" <fronthair:0-22> |
| Face Kid "Rear Hair" <rearhair:0-22> |
| Face Kid "Ears" <ears:0-2> |
| Face Kid "Eyes" <eyes:0-15> |
| Face Kid "Eyebrows" <eyebrows:0-14> |
| Face Kid "Nose" <nose:0-3> |
| Face Kid "Mouth" <mouth:0-16> |
| Face Kid "Facial Mark" <facialmark:1-4> |
| Face Kid "Clothing" <clothing:5-22> |
| Face Kid "Accessory 1" <accessory1:1-6> |
| Face Kid "Accessory 2" <accessory2:1-4> |
| Face Kid "Glasses" <glasses:1-1> |
| - - - - - - - - - - - - - - - - - - - - - - - - -|
|------------------- Folder /SV -------------------|
| Battler Male "Front Hair" <fronthair:1-17> |
| Battler Male "Rear Hair" <rearhair:1-18> |
| Battler Male "Beard" <beard:1-11> |
| Battler Male "Facial Mark" <facialmark:1-8> |
| Battler Male "Beast Ears" <beastears:1-6> |
| Battler Male "Tail" <tail:1-6> |
| Battler Male "Wing" <wing:1-5> |
| Battler Male "Clothing" <clothing:1-23> |
| Battler Male "Cloak" <cloak:1-4> |
| Battler Male "Accessory 1" <accessory1:1-8> |
| Battler Male "Accessory 2" <accessory2:1-8> |
| Battler Male "Glasses" <glasses:1-5> |
| - - - - - - - - - - - - - - - - - - - - - - - - -|
| Battler Female "Front Hair" <fronthair:1-15> |
| Battler Female "Rear Hair" <rearhair:1-20> |
| Battler Female "Facial Mark" <facialmark:1-7> |
| Battler Female "Beast Ears" <beastears:1-6> |
| Battler Female "Tail" <tail:1-6> |
| Battler Female "Wing" <wing:1-5> |
| Battler Female "Clothing" <clothing:1-26> |
| Battler Female "Cloak" <cloak:1-4> |
| Battler Female "Accessory 1" <accessory1:1-7> |
| Battler Female "Accessory 2" <accessory2:1-10> |
| Battler Female "Glasses" <glasses:1-6> |
| - - - - - - - - - - - - - - - - - - - - - - - - -|
| Battler Kid "Front Hair" <fronthair:3-22> |
| Battler Kid "Rear Hair" <rearhair:0-22> |
| Battler Kid "Ears" <ears:2-2> |
| Battler Kid "Facial Mark" <facialmark:3-4> |
| Battler Kid "Clothing" <clothing:0-22> |
| Battler Kid "Accessory 1" <accessory1:1-6> |
| Battler Kid "Accessory 2" <accessory2:1-4> |
| Battler Kid "Glasses" <glasses:1-1> |
| - - - - - - - - - - - - - - - - - - - - - - - - -|
Those folders are the part number ranges, but these parameters in comments/notes will control all 3 character, battler, and face.
Message faces take some extra parameters to change the face parts live. If you are using the $generator face image, to generate a face, end the message with \[face] and that mark will activate the generated face. It generates from the event notes, but you can also add the part parameters in the message after \[face] like <eyes:5><mouth:10> to change their expression. <event:id>or<actor:id> where id is the EV001 number or the Actor 1-4, if that particular person is also a generator char. It doesn't work on regular characters, but use the built in way for those faces.
Straight up <part:number> is a little bit like a vestigial appendix, because a solid PNG already has a solid piece attached. The only good way to get generate a character is with <part:var(number)> like game variable 3, var(3)... so forth...
script download (my wordpress) : http://jakeis.com/rpg_maker_scripts/CharacterFromGeneratorParts.js
script download (as attachment) : https://forums.rpgmakerweb.com/inde...0/&temp_hash=2eb75416ab313a6cd4a5551695cce4fb
demo game: https://drive.google.com/open?id=0B5Wl5t3fnFXGd2JOUHBtdnFBZDA (.zip)
This demo video is a bit wonky because 90% of the characters are generated and I was running screen recording. I don't recommend that many generated characters for your game. I also recommend playing/editing the demo rather than watching this movie. When I watch it it seems to get a little convoluted, like too much information all at once.
There is one more parameter <down> and it will make a TVD fallen character instead of a TV regular character.
There is more in the demo game.
This does not replace the actual character generator for efficiency, but if you come across a random character that you like, you can save all the generated bitmaps to a folder by running this function in the F8 Dev-Tools console.
Code:
generatorSpecs.savePreviewed();
It will only save the ones that are ready. If you've seen a character or face, it will save those, because they are cached.
Downloads / Referenced Files
Log in to download
Log in, then follow the RPG Maker Developers Group to see these download links.
Log in to downloadReferenced Images / Attachments
Creator Claims / Removal
If you are the original creator and want this listing reassigned, edited, or removed, join BMMPlay and contact the moderators with proof that matches the original RPG Maker Web profile, linked GitHub, itch.io page, or another public creator identity.
Replies (0)
No replies yet.
0
replies
2
views
Topic Summary
Loading summary...
