module ViperX # Setting up an array to hold all the main menu pictures Main_Menu_Pics = ["Menu001", "Menu002", "Menu003", "Menu004", "Menu005"] # Set up the graphics for the sub menus Sub_Menus = [] # <- Defines a blank array to start with Sub_Menus[0] = ["Menu001a", "Menu001b", "Menu001c"] # Add Menu 1 SubMenu pics Sub_Menus[1] = ["Menu002a", "Menu002b", "Menu002c"] # Add Menu 2 SubMenu pics Sub_Menus[2] = ["Menu003a"] # Add Menu 3 SubMenu pics Sub_Menus[3] = ["Menu004a"] # Add Menu 4 SubMenu pics Sub_Menus[4] = ["Menu005a"] # Add Menu 5 SubMenu pics # Can't think of a good name so.. SuperSubMenu will have to do. We're not do # doing a secondary sub menu for all the sub menus, so use nil for any menu # we're not setting up. We're using nil for some checks later on in the # Window_Main_PicMenu class. We need our numbers to match up to the Sub_Menu # that it belongs to since we're using the index variable to sort things out. SuperSubMenu = [] SuperSubMenu[0] = nil SuperSubMenu[1] = nil SuperSubMenu[2] = nil SuperSubMenu[3] = ["Menu004a1", "Menu004a2"] SuperSubMenu[4] = ["Menu005a1", "Menu005a2", "Menu005a3"] # Setting up other stuff to customize. Help_Pic = "HelpScreen" Quit_Pic = "MenuLogout" # Sound Settings - ["filename", volumn, pitch] # We're setting these in an arry cause there's a fast way to fill out the info # when we call it later. Open_Sound = ["interfaceopen", 80, 100] Close_Sound = ["interfaceclose", 80, 100] Move_Sound = ["interfaceopen", 50, 100] Confirm_Sound = ["Bin", 50, 100] Cancel_Sound = ["interfaceopen", 80, 100] # This is the default sound but # throwing it in for good measureend#==============================================================================# ** Window_Main_PicMenu#==============================================================================class Window_Main_PicMenu < Window_Selectable #---------------------------------------------------------------------------- # ● upgraded method: initialize #---------------------------------------------------------------------------- def initialize(pic_array) # When we create the window in the Scene_Menu we will pass the picture # arry to the window. We'll make a class variable to store the info. # NOTE: I'll talk about "super" a bit later on, but this is an example # of when when want to run some code BEFORE calling the super. We're # setting a class variable that we use to determine how the window is # created. A class variable means it can be used anywhere in the class and # it has a @ in front of it. @pictures = pic_array # setting the window to cover the screen. The 12's in the sizes are to # account for the window's standard_padding super(-12, -12, Graphics.width + 12, Graphics.height + 12) self.opacity = 0 # Made the windowskin invisible cause it's not wanted hide # Going to start the window as hidden select(0) # select the first item (arrays ALWAYS start at 0) refresh end #---------------------------------------------------------------------------- # ● upgraded method: item_max #---------------------------------------------------------------------------- # We get the class variable "@pictures" and count how many pics are stored # in it with the .size method #---------------------------------------------------------------------------- def item_max # condensed if statement: if @pictures is defined and has a value or it's # set to true, then use it's size value for the item_max, else use 0 # The expanded version of this would look like this: # if @pictures # @pictures.size # else # 0 # end @pictures ? @pictures.size : 0 end #---------------------------------------------------------------------------- # ● upgraded method: refresh #---------------------------------------------------------------------------- def refresh # when you have a def that is already defined from the class we're basing # our new class on, then you can use "super" command to tell it to do # everything that the parent class says do and do what we tell you to # as well. You can see what def refresh does in Window_Selectable to see # what all the super will do before running our code. You can run some # code and then call super as well. Order matters a great deal, sometimes # you will want to run some code before the super is called, but not this # time since the previous def refresh will clear everything in the window # so if we tell it to draw the picture before the super, then when it gets # to the super line, it will wipe everything out. super # Exit out of the def unless the @pictures variable has info in it return unless @pictures # sets the bitmap to the picture in the Graphics/Picture folder. # We're going to use the Window_Select's @index variable to go through our # picture array to get the image to show. The rest of the def is like when # we made pictures with the guild scene script. bitmap = Cache.picture(@pictures[@index]) rect = Rect.new(0, 0, bitmap.width, bitmap.height) contents.blt(0, 0, bitmap, rect) bitmap.dispose end #---------------------------------------------------------------------------- # ● upgraded method: process_cursor_move #---------------------------------------------------------------------------- # This is the normal def, but we're changing the sound played on the last # line #---------------------------------------------------------------------------- def process_cursor_move return unless cursor_movable? last_index = @index cursor_down (Input.trigger?DOWN)) if Input.repeat?DOWN) cursor_up (Input.trigger?UP)) if Input.repeat?UP) cursor_right(Input.trigger?RIGHT)) if Input.repeat?RIGHT) cursor_left (Input.trigger?LEFT)) if Input.repeat?LEFT) cursor_pagedown if !handle?pagedown) && Input.trigger?R) cursor_pageup if !handle?pageup) && Input.trigger?L) # Ok now to explain that fast way to call the info I mentioned. # When playing a sound, it requires you to give the filename, volumn and # pitch. Just like how we set it up in the customize section at the top. # So normally it'd look like this RPG::SE.new("File", 100, 100).play # Now you can't just plug the array in cause it'd look like this: # RPG::SE.new(["File", 100, 100]).play # and you'd get an error. So the * in front of info says to put each # element of the array into this field (basicaly drops the # outter [] brackets. # You could aslo define each part like: # Move_File = "File" # Move_Vol = 100 # Move_Pitch = 100 # and then you'd do this: # RPG::SE.new(ViperX::Move_File, ViperX::Move_Vol, ViperX::Move_Pitch).play # so I think they way we are really do it is the easiest to work with RPG::SE.new(*ViperX::Move_Sound).play if @index != last_index end #---------------------------------------------------------------------------- # ● upgraded method: process_ok #---------------------------------------------------------------------------- # This is the normal def, but we're changing the sound played #---------------------------------------------------------------------------- def process_ok if current_item_enabled? # This plays the sound effect on selecting a choice RPG::SE.new(*ViperX::Confirm_Sound).play Input.update deactivate call_ok_handler else Sound.play_buzzer end end #---------------------------------------------------------------------------- # ● upgraded method: process_cancel #---------------------------------------------------------------------------- # This is the normal def, but we're changing the sound played #---------------------------------------------------------------------------- def process_cancel # This plays the sound effect on canceling a choice RPG::SE.new(*ViperX::Cancel_Sound).play Input.update deactivate call_cancel_handler end #---------------------------------------------------------------------------- # ● upgraded method: update_cursor #---------------------------------------------------------------------------- # changed the def to never use the cursor image. Can look at the orginal def # to compare it to. #---------------------------------------------------------------------------- def update_cursor if @cursor_all cursor_rect.empty self.top_row = 0 elsif @index < 0 cursor_rect.empty else ensure_cursor_visible cursor_rect.empty end end #---------------------------------------------------------------------------- # ● upgraded method: cursor_down #---------------------------------------------------------------------------- def cursor_down(wrap = false) super # do already defined stuff refresh # refresh image shown because there is now a new @index end #---------------------------------------------------------------------------- # ● upgraded method: cursor_up #---------------------------------------------------------------------------- def cursor_up(wrap = false) super # do already defined stuff refresh # refresh image shown because there is now a new @index endend#==============================================================================# ** Window_Logout#------------------------------------------------------------------------------# Basing it off the Window we already made cause it already has the sounds set#==============================================================================class Window_Logout < Window_Selectable #---------------------------------------------------------------------------- # ● upgraded method: initialize #---------------------------------------------------------------------------- def initialize(x, y, w, h) @choices = ["Yes", "No"] # Our choices displayed in the window super(x, y, w, h) self.opacity = 0 # Hiding the windowskin hide # Hide the window till we're ready for it select(0) # Set where the cursor starts refresh # calling the refresh def to drawn items in the window end #---------------------------------------------------------------------------- # ● upgraded method: item_max #---------------------------------------------------------------------------- # This time we're setting the item_max to 2 (Yes and No) #---------------------------------------------------------------------------- def item_max; @choices.size; end #---------------------------------------------------------------------------- # ● upgraded method: col_max #---------------------------------------------------------------------------- # This is the columns setting. I'm taking liberties and assuming a side by # side choice displayed in your message box would look cooler. If you want it # vertical then delete this def and change the window's height setting in the # initialize def accordingly. Deleting this def would use the default setting # for columns, which is set to 1. #---------------------------------------------------------------------------- def col_max; return 2; end #---------------------------------------------------------------------------- # ● upgraded method: draw_item #---------------------------------------------------------------------------- # This is what every window uses when it shows options. It will draw it for # each item in the list. In this case.. it will do this def twice because # that's our item_max size. #---------------------------------------------------------------------------- def draw_item(index) # We have to define the rect area the text can show up. There's two choices # we have that the selection windows use: item_rect and item_rect_for_text. # We're showing text... so lets go with that one. The difference between # them is very minor, it's just the x position changes for things drawn # within the rect. item_rect uses the whole rect area while # item_rect_for_text will start showing things 4 pixels into the rect and # the width is 8 pixels smaller (4 pixels on left/right sides). This is so # that text (or whatever really) isn't drawn on the cursor's border frame. rect = item_rect_for_text(index) # Ok now to show the text. There are two options for this as well. # draw_text and draw_text_ex # draw_text gives us lots of control and settings to play with. # draw_text_ex doesn't have as many settings, but it takes special codes # like the ones you can use in the event editor when using a message box. # ex: \N[x] is the Nth actor's name in the database would be shown. # we're not doing anything fancy and I liked centered choises so.. going # with draw_text #--- # Once again, we are faced with two choices. You can fill out the draw_text # info in two different ways. # draw_text(x, y, width, height, text, alignment) # draw_text(rect, text, alignment) # So.. we have already defined a rect that has an x, y, width, and height # Most folks will use the first way because it gives more exact control # and not all windows will have rects within them. But the later suits # this instance just fine. #--- # One more note/tip: alignment can be 0, 1, or 2. This will make the text # left aligned, centered, or right aligned respectively. # We'll go with centered text. #--- # Last note, since we already defined the text we want to show in the # initialize def, we'll use that variable and the index will pick which # one is shown. "Yes" will show in the first rect, "No" in the 2nd rect. draw_text(rect, @choices[index], 1) end #---------------------------------------------------------------------------- # ● upgraded method: process_cursor_move #---------------------------------------------------------------------------- # Setting the Sound like before #---------------------------------------------------------------------------- def process_cursor_move return unless cursor_movable? last_index = @index cursor_down (Input.trigger?DOWN)) if Input.repeat?DOWN) cursor_up (Input.trigger?UP)) if Input.repeat?UP) cursor_right(Input.trigger?RIGHT)) if Input.repeat?RIGHT) cursor_left (Input.trigger?LEFT)) if Input.repeat?LEFT) cursor_pagedown if !handle?pagedown) && Input.trigger?R) cursor_pageup if !handle?pageup) && Input.trigger?L) RPG::SE.new(*ViperX::Move_Sound).play if @index != last_index end #---------------------------------------------------------------------------- # ● upgraded method: process_ok #---------------------------------------------------------------------------- # Setting the Sound like before #---------------------------------------------------------------------------- def process_ok if current_item_enabled? RPG::SE.new(*ViperX::Confirm_Sound).play Input.update deactivate call_ok_handler else Sound.play_buzzer end end #---------------------------------------------------------------------------- # ● upgraded method: process_cancel #---------------------------------------------------------------------------- # Setting the Sound like before #---------------------------------------------------------------------------- def process_cancel RPG::SE.new(*ViperX::Cancel_Sound).play Input.update deactivate call_cancel_handler endend#==============================================================================# ** Game_Interpreter#==============================================================================class Game_Interpreter #-------------------------------------------------------------------------- # * Open Menu Screen #-------------------------------------------------------------------------- def command_351 return if $game_party.in_battle SceneManager.call(Scene_Menu) Fiber.yield endend#==============================================================================# ** Scene_Map#==============================================================================class Scene_Map < Scene_Base #---------------------------------------------------------------------------- # ● overwrite method: start - changed out the open menu sound #---------------------------------------------------------------------------- def call_menu # This plays the sound effect on opening the Menu RPG::SE.new(*ViperX:pen_Sound).play SceneManager.call(Scene_Menu) Window_MenuCommand::init_command_position endend#==============================================================================# ** Scene_Menu#==============================================================================# Overwriting the default Menu so when esc is pressed it brings up your menuclass Scene_Menu < Scene_MenuBase #---------------------------------------------------------------------------- # ● overwrite method: start #---------------------------------------------------------------------------- # Since this is a custom menu and you don't need the default menu, we are # overwriting the whole scene and making it your own. All scenes need a # def start to get them going. So we are overwriting Scene_Menu's start def. # You can look in the Orginal Scene_Menu to compare the orginal to this one. #---------------------------------------------------------------------------- def start super # Turn the HUD's switch on $game_switches[PR_RRPG_HUD::Switch_Control] = true # Create the windows to handle the menu graphics create_command_window create_submenu_windows create_secondary_submenu_windows create_image create_logout_window end #---------------------------------------------------------------------------- # ● overwrite method: create_command_window #---------------------------------------------------------------------------- # Overwriting this method too, we could create a new one and call it # something new. I just went with the orginal one cause it's easier. #---------------------------------------------------------------------------- def create_command_window # Create the Main Menu window with the array of pictures to use @command_window = Window_Main_PicMenu.new(ViperX::Main_Menu_Pics) # set the window's viewport (@viewport is a class variable set in Scene_Base) @command_window.viewport = @viewport # When the action key (enter) is pressed, run the def command_submenu @command_window.set_handlerok, methodcommand_submenu)) # When esc key is pressed, exit the menu scene and return to the map # the method we called to do this is already defined in Scene_Base @command_window.set_handlercancel, methodreturn_scene)) # Show this window and make it the active window @command_window.show.activate end #---------------------------------------------------------------------------- # ○ new method: create_submenu_windows #---------------------------------------------------------------------------- def create_submenu_windows # We're creating an array of new windows the size of our Sub_Menus array # at the top of the script. For the '|i|' part, the i could be anything you # want, but i is the standard letter used (stands for iteration, since we # are iterating through the array). We'll create a new window for each # Sub_Menus entry. # So the first time the code is called, i = 0, the next time i = 1, on down # the line till it reaches the end of the array. @submenu_windows = Array.new(ViperX::Sub_Menus.size) do |i| # for each window, we pass the picture array realted to it on. 0 for the # first time, 1 for the 2nd, etc Window_Main_PicMenu.new(ViperX::Sub_Menus) end # If you remember, the window class we made for this window will hide itself # when it's started. For the @command_window, we showed it. For these windows # we still want them hidden for now. So we'll just set the viewport. #---- # Since we set the windows up in an array, we can set their viewports all # at once. The .each says for each item in @submenu_windows we're going # to do something to it. |window| is what we're calling each item that's # in the array (because it's an array of windows). But you could name # it anything you wanted.. for example |item| # so for each window in the array of windows, we set the viewport. # we can also set their handlers @submenu_windows.each do |window| window.viewport = @viewport window.set_handlerok, methodsubmenu_commands)) window.set_handlercancel, methodreturn_to_menu)) end end #---------------------------------------------------------------------------- # ○ new method: create_secondary_submenu_windows #---------------------------------------------------------------------------- def create_secondary_submenu_windows # Doing the same thing as the submenu windows but without all the comments @second_submenu_windows = Array.new(ViperX::SuperSubMenu.size) do |i| Window_Main_PicMenu.new(ViperX::SuperSubMenu) end @second_submenu_windows.each do |window| window.viewport = @viewport window.set_handlerok, methodsupersub_command)) window.set_handlercancel, methodreturn_to_submenu)) end end #---------------------------------------------------------------------------- # ○ new method: return_to_menu #---------------------------------------------------------------------------- def return_to_menu # We're going to show and activate the @command_window before hiding the # other windows @command_window.show.activate # We're going to hide all the sub menu windows (it doesn't really matter # which window one was showing). Notice the syntax difference from the def # above when we set the viewport and handler. This is a condensed syntax, # but it's doing the exact same thing. @submenu_windows.each {|window| window.hide.deactivate} end #---------------------------------------------------------------------------- # ○ new method: command_submenu #---------------------------------------------------------------------------- # we'll use this def to control the sub menu window #---------------------------------------------------------------------------- def command_submenu # Since we're now showing the submenu graphics, let's hide the main menu # window that show's the main menu graphics. @command_window.hide.deactivate # setting the index we'll use to determine which submenu window will open @index = @command_window.index # so if the @command_window was at the 0 index (first item in the list) then # the first @submenu_windows will be shown and activated @submenu_windows[@index].show.activate end #---------------------------------------------------------------------------- # ○ new method: submenu_commands #---------------------------------------------------------------------------- def submenu_commands # The following is a case statement. Think of it as a multi branch conditional # event. It checks what the @command_window's index is. When it's 0, then # do x, when it's 1, then do y, when it's 2, then do z, etc on down the line case @command_window.index when 0 # When we're on the first item in the main menu # Open the Item Scene if our submenu index is 0 SceneManager.call(Scene_Item) if @submenu_windows[@index].index == 0 # Open the Skill Scene if our submenu index is 1 SceneManager.call(Scene_Skill) if @submenu_windows[@index].index == 1 # Open the Equip Scene if our submenu index is 2 SceneManager.call(Scene_Equip) if @submenu_windows[@index].index == 2 when 1 # When we're on the 2nd item in the main menu SceneManager.call(Scene_Party) if @submenu_windows[@index].index == 0 SceneManager.call(Scene_Guilds) if @submenu_windows[@index].index == 1 SceneManager.call(Scene_Status) if @submenu_windows[@index].index == 2 when 2 # For this one, there's only one option, so we don't need to check the # submenu's index SceneManager.call(Scene_Quests) when 3 # For this option, we're going to use the secondary submenu. supersubmenu_commands when 4 # Same as 3, opening the secondary sub menu supersubmenu_commands end end #---------------------------------------------------------------------------- # ○ new method: supersubmenu_commands #---------------------------------------------------------------------------- def supersubmenu_commands # Hide active submenu so we can show the secondardy submenu. No need to # redefine the @index as it shouldn't have changed. @submenu_windows[@index].hide.deactivate @second_submenu_windows[@index].show.activate end #---------------------------------------------------------------------------- # ○ new method: supersub_command #---------------------------------------------------------------------------- def supersub_command # same as submenu_commands but without all the comments case @command_window.index when 0 # do nothing cause there's no secondary sub menu when 1 # do nothing cause there's no secondary sub menu when 2 # do nothing cause there's no secondary sub menu when 3 # Note: These will crash the game because they don't exsist yet, much # Like the Scene_Party, because there is no Scene_Party in this demo SceneManager.call(Scene_Quests) if @second_submenu_windows[@index].index == 0 SceneManager.call(Scene_Quests) if @second_submenu_windows[@index].index == 1 when 4 # This is says when the @command_window.index is 4 and if the secondary # sub menu window's index is 0, then do the following 2 lines of code. # We could have just done another case statement here and use the # @second_submenu_windows[@index].index as the item to check if @second_submenu_windows[@index].index == 0 show_image(ViperX::Help_Pic) # Show the Help_Pic Image help_image_control # Tells the game how to handle things now end # closing the if statement if @second_submenu_windows[@index].index == 1 show_image(ViperX::Quit_Pic) @logout_window.show.activate end # closing the if statement SceneManager.call(Scene_Save) if @second_submenu_windows[@index].index == 2 end # closing the case statement end #---------------------------------------------------------------------------- # ○ new method: create_image #---------------------------------------------------------------------------- def create_image # Just another way to show how to handle images. It's a lot like the bitmaps # we make in windows but they are handled a little different. When you make # a free picture outside of a window you'll need to make an object first. # Sprite is the class that handles images, so we make a new Sprite Object # and place it in our normal viewport. # The size of the image will be the size of the viewport. The viewport # we've been using (@viewport) is the size of the screen. You can change # a lot of things for this (See the Help file for more info if you'd like). #--- # Just a note, you could probably make a menu just find using this method. # You could change the bitmap when a key is pressed @image = Sprite.new(@viewport) @image.visible = false # Hide it till we're ready for it # We're going to set the image's z axis (this is where in is place in the # pile of objects drawn on the screen in a given viewport. Set it to 0 # and play test it and you'll see it drawn under the HUD. # You could also set the z axis for the image when the imaged is changed # if you want the images to have different z settings. @image.z = 200 end #---------------------------------------------------------------------------- # ○ new method: show_image #---------------------------------------------------------------------------- def show_image(filename) # Hide the other images to show the new one @second_submenu_windows[@index].hide.deactivate @image.visible = true # Show the image @image.bitmap = Cache.picture(filename) # Set the image end #---------------------------------------------------------------------------- # ○ new method: help_image_control #---------------------------------------------------------------------------- def help_image_control # Setting a loop here. It will repeat everything in the loop over and over # until something breaks the cycle. We're telling the game to run basic # stuff (like checking for key input). Keep doing this until the action or # escape keys are pressed. You can co ctrl+shift+f to search ALL the scripts # in the editor for "def update_basic" if you'd like to see what this def # does. You'll want the one that shows up for Scene_Base (not the Battle one) loop do update_basic break if Input.trigger? # Break the loop if Esc is pressed break if Input.trigger?C) # Break if action key used end # We used the loop to stop this def from continuing until the player was # done reading the help image. Now that they're done (cause they pressed # one of the keys we allowed them to use), continue with the rest of the # code. @image.visible = false # Hide this image again # Now return the control back to the secondary sub menu supersubmenu_commands end #---------------------------------------------------------------------------- # ○ new method: create_logout_window #---------------------------------------------------------------------------- def create_logout_window # We're going to set the windows size and postion here. (x, y, width, height) # Going to start with the width and height, then y position. The x position # will be determined by the windows width (going to right a formula to # center the window). You can adjust them how you like. The height at 48 is # a standard height for one line of text. Font size is 24 by default and # that standard_padding mentioned earlier adds another 24 (12 on top and 12 # on the bottom), so 48 total. # We're creating a local variable "width". Local means it only lives in this # def. As soon as this def is done, the width variable is gone forever. # You can set this width to be bigger or smaller and the windows contents # and position will adjust accordingly. width = 373 # Graphics.width is the screen's resolution size (default is 544 but some # scripts change it, so I always like to use "Graphics.width" instead of # using the default size). x = (Graphics.width - width) / 2 # Create the new window with the x we defined above, y, width we defined, and # a height of 48. @logout_window = Window_Logout.new(x, 228, width, 48) @logout_window.viewport = @viewport # setting the window's z axis to show it on top of the logout image @logout_window.z = 300 @logout_window.set_handlerok, methodconfirm_exit)) @logout_window.set_handlercancel, methodcancel_logout)) end #---------------------------------------------------------------------------- # ○ new method: return_to_submenu #---------------------------------------------------------------------------- def return_to_submenu # this def is called when we esc out of the secondary sub menu. So we hide # the secondary sub menu windows and show the relavent sub menu and # activate it. @second_submenu_windows[@index].hide.deactivate @submenu_windows[@index].show.activate end #---------------------------------------------------------------------------- # ○ new method: confirm_exit #---------------------------------------------------------------------------- def confirm_exit # Note: This is the code for when the action key is pressed on one of the # @logout_window choices. Going to do something depending on which index # was active when the key was pressed. Normally, I'd make the @logout_window # a command window, but.. We can discuss those at a later time if you have # another request that requires one. command_to_title if @logout_window.index == 0 cancel_logout if @logout_window.index == 1 end #---------------------------------------------------------------------------- # ○ new method: cancel_logout #---------------------------------------------------------------------------- def cancel_logout @logout_window.hide.deactivate # Hide and deactivate the choice window @image.visible = false # Hide the image again supersubmenu_commands # Return control to the secondary sub menus end #---------------------------------------------------------------------------- # ○ new method: command_to_title #---------------------------------------------------------------------------- # This is basically a copy of the def found in Scene_End #---------------------------------------------------------------------------- def command_to_title fadeout_all # This fades out the scene (like how a map transfer does) SceneManager.goto(Scene_Title) # Returns to the Title Menu end #---------------------------------------------------------------------------- # ● upgrade method: update #---------------------------------------------------------------------------- def update super # Update or windows inside the array of windows @submenu_windows.each {|window| window.update } @second_submenu_windows.each {|window| window.update } end #---------------------------------------------------------------------------- # ● upgrade method: terminate - upgraded from Scene_MenuBase #---------------------------------------------------------------------------- def terminate super # This plays the sound effect on closing the Menu RPG::SE.new(*ViperX::Close_Sound).play # Turn the HUD switch off $game_switches[PR_RRPG_HUD::Switch_Control] = false # We need to dispose of all the stuff we made so it's not just hanging # out in the player's computer's memory making a memory leak and chewing # up their CPU. A lot of things are disposed of by themself because of the # way Scene_Base is written, but there are exceptions. Windows by themself # are disposed of without us needing to do it. But we didn't set up all the # windows in a normal way. We made a few arrays holding the windows. And # the "trash collecter" that is built into the Scene_Base won't recognize # the windows hidden in the array. So we'll go through the arrays and # dispose of them here. Same for the free images we made (we'll manually # dispose of them too). # Dispose of the windows in the arrays @submenu_windows.each {|window| window.dispose } @second_submenu_windows.each {|window| window.dispose } # Dispose of the Sprite image stuff if @image # Dispose of the @image's bitmap if it has a bitmap @image.bitmap.dispose if @image.bitmap # Now dispose of the @image @image.dispose end endend




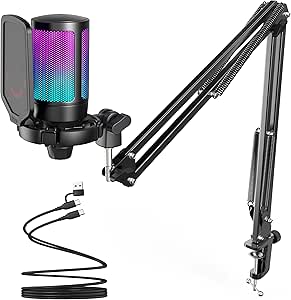 FIFINE Gaming USB Microphone Kit with Boom Arm
USB microphone setup for streams, party chat, podcasts, and creator clips.
View on Amazon
FIFINE Gaming USB Microphone Kit with Boom Arm
USB microphone setup for streams, party chat, podcasts, and creator clips.
View on Amazon