- Download the Plugin:
- Visit the developer's page and download the latest version of the PLK_BattleWindowCustom plugin (v2.4).
- Place the Plugin in Your Project Folder:
- Open your RPG Maker MZ project directory.
- Navigate to the js/plugins/ folder.
- Copy the downloaded PLK_BattleWindowCustom.js file into this folder.
Adding the Plugin to Your Project
- Open RPG Maker MZ:
- Launch RPG Maker MZ and open the project where you want to use the plugin.
- Access the Plugin Manager:
- Go to the menu and select Tools > Plugin Manager, or simply press F10 on your keyboard.
- Add the Plugin:
- Click the "New Plugin" button.
- In the search bar, type PLK_BattleWindowCustom and select the plugin from the list.
- Ensure the plugin is Enabled (the checkbox next to it is checked).
- Basic Configuration (Optional):
- While this plugin primarily uses Plugin Commands for customization, you can set initial parameters here if needed. However, it's generally recommended to configure settings via Plugin Commands within your game events for more flexibility.
Using Plugin Commands
The
PLK_BattleWindowCustom plugin offers several Plugin Commands that allow you to customize battle windows dynamically during gameplay. These commands can be used within the
Event Editor in RPG Maker MZ.
How to Use Plugin Commands:
- Open the Event Editor:
- In your RPG Maker MZ project, navigate to the Map where you want to add the event.
- Double-click on a tile to create a new event or edit an existing one.
- Add a Plugin Command:
- In the List of Commands section, click on "New Command".
- Scroll down and select "Plugin Command".
- Choose the Desired Plugin Command:
- From the Plugin Command dropdown, select the command you want to use (e.g., setActorCommand).
- Enter the Required Parameters:
- Fill in the parameters as needed based on the command's requirements.
Detailed Plugin Commands
1. Set Actor Command Window
Command Name: setActorCommand
Description: Customize the Actor Command Window settings in the battle scene.
Parameters:
- X Position (x): The X-axis position of the window. (Default: 0)
- Y Position (y): The Y-axis position of the window. (Default: 0)
- Width (width): The width of the window. (Default: 300)
- Visibility (visible): Show or hide the window. (true or false) (Default: true)
- Command List (commands): Array of commands to display (e.g., ["attack","skill","guard","item"]). (Default: ["attack","skill","guard","item"])
- Custom Command Names (customNames): JSON object defining custom names for commands. (Default: {"attack":"\\I[9] Attack","skill":"\\I[1] Skill","guard":"\\I[2] Guard","item":"\\I[3] Item"})
2. Set Party Command Window
Command Name: setPartyCommand
Description: Customize the Party Command Window settings in the battle scene.
Parameters:
- X Position (x): The X-axis position of the window. (Default: 0)
- Y Position (y): The Y-axis position of the window. (Default: 0)
- Width (width): The width of the window. (Default: 300)
- Visibility (visible): Show or hide the window. (true or false) (Default: true)
- Command List (commands): Array of commands to display (e.g., ["fight","escape"]). (Default: ["fight","escape"])
- Custom Command Names (customNames): JSON object defining custom names for commands. (Default: {"fight":"\\I[4] Fight","escape":"\\I[5] Escape"})
3. Set Status Window
Command Name: setStatusWindow
Description: Customize the Status Window settings that display player statuses during battle.
Parameters:
- X Position (x): The X-axis position of the window. (Default: 0)
- Y Position (y): The Y-axis position of the window. (Default: 570)
- Width (width): The width of the window. (Default: 816)
- Height (height): The height of the window. (Default: 300)
- Visibility (visible): Show or hide the window. (true or false) (Default: true)
- Maximum Columns (maxCols): The maximum number of columns to display. (Default: 4)
4. Set Other Windows
Command Name: setOtherWindows
Description: Customize the visibility of other windows in the battle scene, such as the Help Window and Message Window.
Parameters:
- Show Help Window (helpWindowVisible): Show or hide the Help Window. (true or false) (Default: true)
- Show Message Window (messageWindowVisible): Show or hide the Message Window. (true or false) (Default: true)
5. Set Command Effects
Command Name: setCommandEffects
Description: Customize the effects of command buttons in the battle windows, such as font sizes, animations, and colors.
Parameters:
- Command Font Size (fontSize): The font size of the command text. (Default: 20)
- Font Size When Selected (selectedFontSize): The font size when a command is selected. (Default: 24)
- Enable Animation (animationEnabled): Enable or disable animations for command selection. (true or false) (Default: true)
- Scale When Selected (animationScale): The scale factor when a command is selected. (Default: 1.1)
- Selected Command Color Index (selectedColorIndex): The color index for the selected command. (Default: 4)
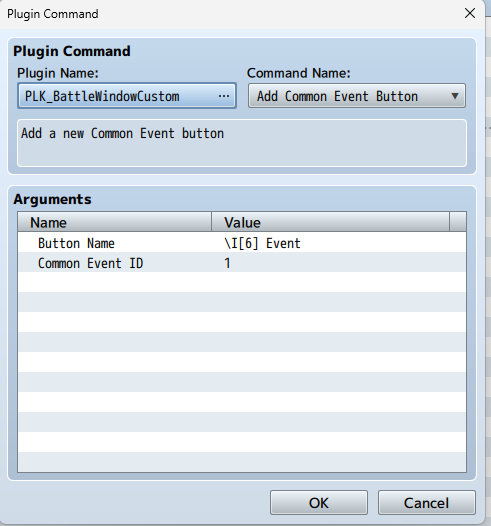
6. Add Common Event Button
Command Name: addCommonEventCommand
Description: Add a new Common Event button to the Actor Command Window.
Parameters:
- Button Name (name): The name of the button. You can include icon codes, such as \I[6] Event. (Default: \I[6] Event)
- Common Event ID (id): The ID of the Common Event to execute. (Default: 1)
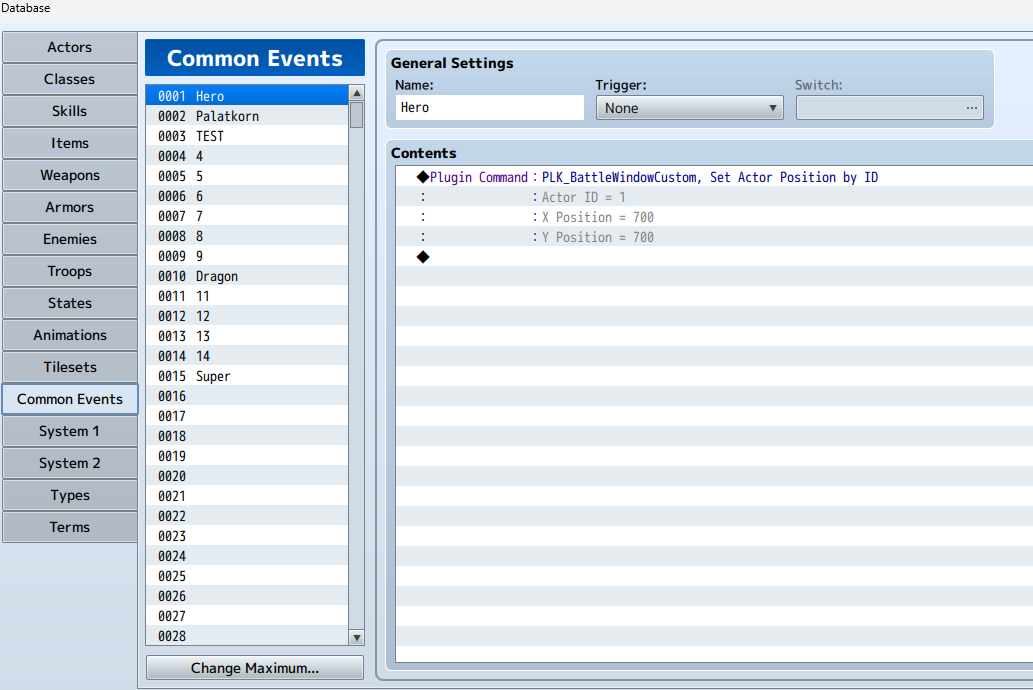
You can add common event command buttons and move things in there as well.
7. Remove Common Event Button
Command Name: removeCommonEventCommand
Description: Remove a Common Event button by specifying its Common Event ID.
Parameters:
- Common Event ID (id): The ID of the Common Event button to remove. (Default: 1)
8. Set Actor Position by ID
Command Name: setActorPosition
Description: Set the position of an actor in the battle scene by their Actor ID.
Parameters:
- Actor ID (actorId): The ID of the Actor whose position you want to set. (Default: 1)
- X Position (x): The X-axis position of the Actor. (Range: -9999 to 9999) (Default: 200)
- Y Position (y): The Y-axis position of the Actor. (Range: -9999 to 9999) (Default: 300)
9. Remove Actor Position
Command Name: removeActorPosition
Description: Remove the position setting of an actor by their Actor ID, reverting them to their default position.
Parameters:
- Actor ID (actorId): The ID of the Actor whose position setting you want to remove. (Default: 1)
Examples of Plugin Command Usage
Example 1: Customize the Actor Command Window
- Open the Event Editor:
- Navigate to the map where you want to add the customization.
- Add a Plugin Command:
- Create a new event or edit an existing one.
- Add a Plugin Command from the List of Commands.
- Select and Configure the Command:
- Choose setActorCommand from the Plugin Command dropdown.
- Enter the following parameters:
- X Position: 100
- Y Position: 200
- Width: 400
- Visibility: true
- Command List: ["attack","magic","defend","item","special"]
- Custom Command Names: {"attack":"\I[9] Attack","magic":"\I[10] Magic","defend":"\I[11] Defend","item":"\I[12] Item","special":"\I[13] Special"}
Example 2: Add a Common Event Button
- Open the Event Editor:
- Navigate to the desired map.
- Add a Plugin Command:
- Create a new event or edit an existing one.
- Add a Plugin Command.
- Select and Configure the Command:
- Choose addCommonEventCommand from the Plugin Command dropdown.
- Enter the following parameters:
- Button Name: \I[6] Special Attack
- Common Event ID: 2
Example 3: Set Actor Position
- Open the Event Editor:
- Navigate to the desired map.
- Add a Plugin Command:
- Create a new event or edit an existing one.
- Add a Plugin Command.
- Select and Configure the Command:
- Choose setActorPosition from the Plugin Command dropdown.
- Enter the following parameters:
- Actor ID: 1
- X Position: 250
- Y Position: 350
Additional Information
- Setting Actor Positions:
- To position actors on the battlefield, ensure that Use Side-view Battle is enabled in Database > System.
- If no position is set for a specific Actor ID, the actor will use the default position settings.
- Using JSON for Custom Command Names:
- Custom command names should be entered as valid JSON. For example:{"attack":"\I[9] Attack","magic":"\I[10] Magic"}
- Ensure that the JSON syntax is correct to avoid parsing errors.
- Refreshing Windows:
- After using a Plugin Command to change settings, the plugin will automatically refresh the related windows in the battle scene if you are currently in Scene_Battle.
- Managing Animations and Colors:
- Customize the selection effects of command buttons, such as font size when selected, color index, and scaling animations using the setCommandEffects Plugin Command.
- Removing Common Event Buttons:
- To remove an unwanted Common Event button, use the removeCommonEventCommand Plugin Command and specify the ID of the Common Event you wish to remove.
We hope this guide helps you effectively utilize the
PLK_BattleWindowCustom plugin to enhance and customize the battle experience in your RPG Maker MZ projects. If you encounter any issues or have further questions, please reach out to the developer or join the RPG Maker community forums for additional support.




 UGREEN Nexode Air 45W USB-C Charger Block
Compact foldable GaN charger for phones, tablets, and light laptop charging.
View on Amazon
UGREEN Nexode Air 45W USB-C Charger Block
Compact foldable GaN charger for phones, tablets, and light laptop charging.
View on Amazon

