


Direction Based Line of Sight Events
BMM_Archive · July 15, 2026

Original Source
- Original title: Direction Based Line of Sight Events
- Original author: The Infamous Bon Bon
- Original date: July 22, 2012
- Source thread: https://forums.rpgmakerweb.com/threads/direction-based-line-of-sight-events.3452/
- Source forum path: Game Development Engines > RPG Maker Tutorials > RMVXAce Tutorials
Summary
Introduction I made this mostly for touch encounter games to help add a little personality to the touch encounters. I also think that this can be utilized for puzzles and stealth missions in games. This tutorial was made with the default scripts. There may be incompatibility with some scripts, particularly pixel movement scripts in which case you would have to completely rewrite the Conditional Branch script calls using the syntax of those scripts. Another that comes to mind would be an 8 directional movement script in which case you may...


Archived First Post
I made this mostly for touch encounter games to help add a little personality to the touch encounters. I also think that this can be utilized for puzzles and stealth missions in games.
This tutorial was made with the default scripts. There may be incompatibility with some scripts, particularly pixel movement scripts in which case you would have to completely rewrite the Conditional Branch script calls using the syntax of those scripts. Another that comes to mind would be an 8 directional movement script in which case you may need to take the concepts presented here and expand them to include the additional directions.
You can download the project file here. I recommend you play through the test game to get a feel of the events before you read the tutorial.
Glossary of Terms used in Script Calls
$game_player - this used to get information about the player
(compared values).abs - is used to get the absolute value between them. Absolute values are always positive.
Some uses:
$game_map.events[@event_id].x - this gets the X coordinate value of the currently running event's position on the map
$game_map.events[@event_id].y - this gets the Y coordinate value of the currently running event's position on the map
$game_player.x - this gets the X coordinate value of the player's position on the map
$game_player.y - this gets the Y coordinate value of the player's position on the map
$game_map.events[@event_id].direction - this gets the value of which direction the currently running event is currently facing.
$game_player.direction - this gets the value of which direction the player is currently facing
Direction Key:
- 2 is down
- 8 is up
- 4 is left
- 6 is right
|| - when used, is basically a line break and can be said to be the same as "or". If this is used in a conditional branch script call that means any of the conditions will be enough to satisfy the conditional branch.
The X/ Y Coordinate Plane and Relative Values
Protected download
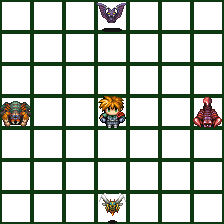
I'll use the above image to illustrate some examples:
- the X value of the spider is less than the X value of Ralph
- the X value of the scorpion is greater than the X value of Ralph
- the Y value of the bat is less than the Y value of Ralph
- the Y value of the hornet is greater than the Y value of Ralph
Protected download
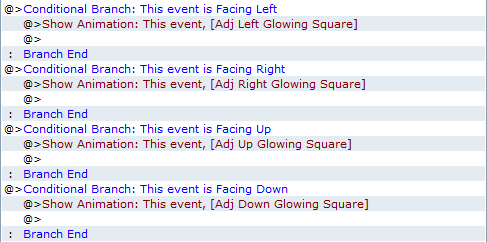
Nothing special and can be erased if you don't want to give the player a visual cue. These are really simple animations I made with an image taken from one of the RTP animations (can't remember which one now), so if you want to use it go ahead.
Protected download
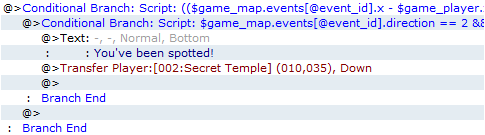
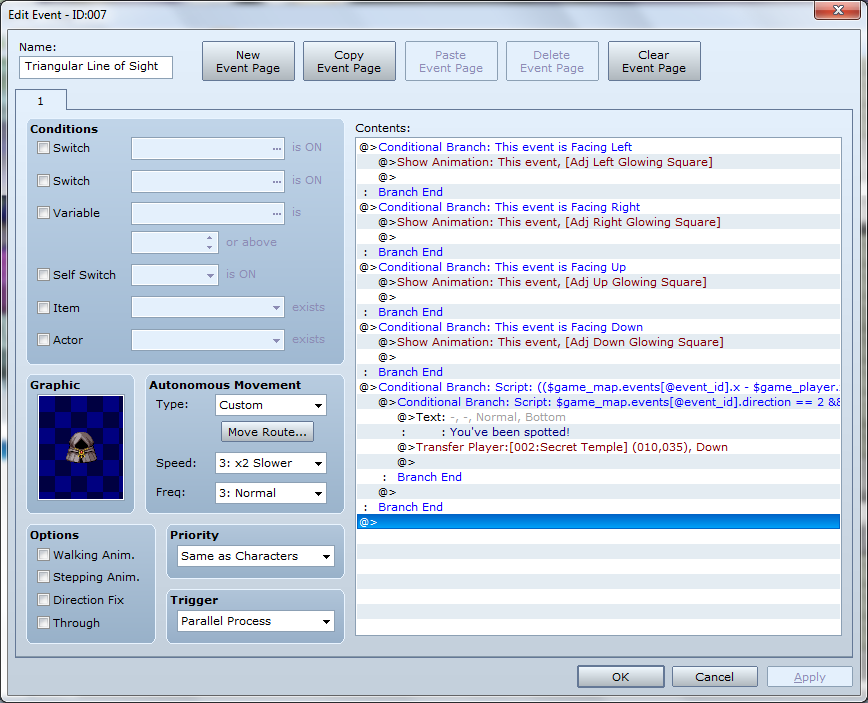
In all three of these events there are two conditional branches used. The first conditional branch defines the range and the second conditional branch provides the limitations based on the direction the event is facing. The Script Calls for the Conditional Branches can't be seen of course so they are expanded and explained below, but the second conditional branch is the same for all three:
Protected download
This script call checks which direction the event is facing and if the player is in the relative correct direction from the event, this condition is met. For example if the event is facing right (.direction == 6) and the player's x coordinate is greater than the event's (aka to the right of the event) this condition will be satisfied. If you use a less than/ greater than or equal to sign on the second part of each possible condition the range is changed.
Note that all of these are parallel process events. They are also just script calls, so no variables need to be changed. Remember these are pretty bare bones. You can add a lot of eventing to this to make puzzles rooms, stealth missions, more interesting touch encounters, etc.
1) Triangular Line of Sight Event
Protected download
The First Conditional Branch's Script Call:
Protected download
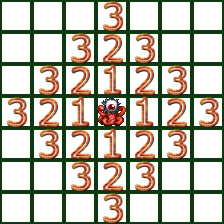
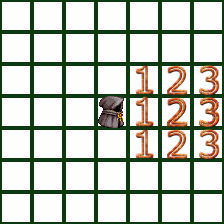
This script call compares the player's x coordinate and the event's x coordinate along with the player's y coordinate and the event's y coordinate on the map and then adds them together to determine how far the player is from the event. It is currently set to 1 which mean this conditional branch is satisfied when the player is within one square of the event. This is separated out so you can easily adjust the range of the event's line of sight.
Protected download
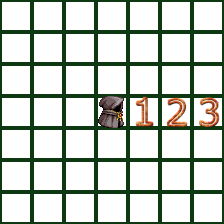
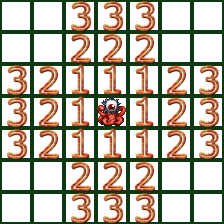
If used without any other conditions this is what the event's line of sight will be depending on the value that you use. Kind of handy if you have an event that doesn't need to be facing a specific direction to see the player. If set to 2 the event can see all squares marked 1 and 2. If set to 3 the event can see all squares marked 1, 2, and 3.
The Second Conditional Branch Script Call:
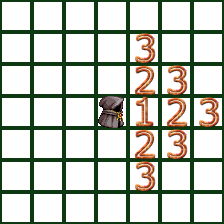
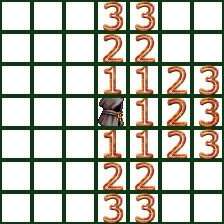
With both conditions combined this is what the event's line of sight is (when facing right):
Protected download
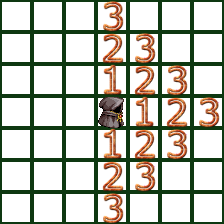
Notice I used a greater than sign and not a greater than or equal to sign if you do this is what the events line of sight ends up being:
Protected download
This can be used if you want to give the event peripheral vision.
2) Basic Line of Sight Event
Protected download
This event is similar to the previous one, but the first conditional branch is different.
The First Conditional Branch Script Call:
Protected download
This script call evaluates whether one of two possible conditions is met:
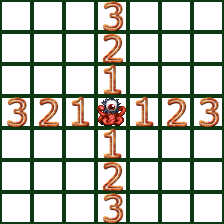
- by comparing the event's Y coordinate with the player's Y coordinate and if the absolute value between them is less then the defined range (in this example 3) and if the event's X coordinate is the same as the player's X coordinate
- by comparing the event's X coordinate with the player's X coordinate and if the absolute value between them is less then the defined range and if the event's Y coordinate is the same as the player's Y coordinate
Protected download
The Second Conditional Branch Script Call:
Combined, this is what the range ends up looking like, when facing right:
Protected download
When you use an or equal to sign then this is what the line of sight for facing right is:
Protected download
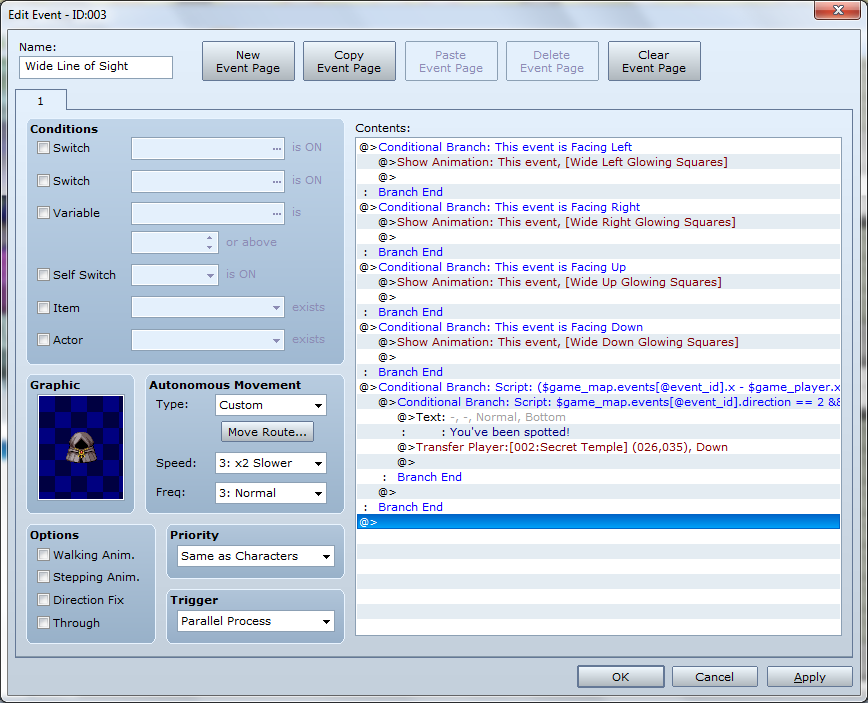
3) Wide Line of Sight Event
Protected download
The First Conditional Branch Script Call:
Protected download
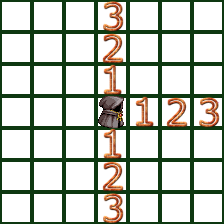
This is similar to the Basic LoS script call, but the second part of either condition has been changed from the X or Y having the same value to being within 1 which makes the LoS wider. Its not suggested that you make the second parts value higher than the first parts because this makes for some weird line of sight. This is what it looks like without the second conditional branch with its current settings:
Protected download
The Second Conditional Branch Script Call:
Combined, this is what the range ends up looking like, when facing right:
Protected download
When you use an or equal to sign then this is what the line of sight for facing right is:
Protected download
4) Not Touching Event
Protected download
Protected download
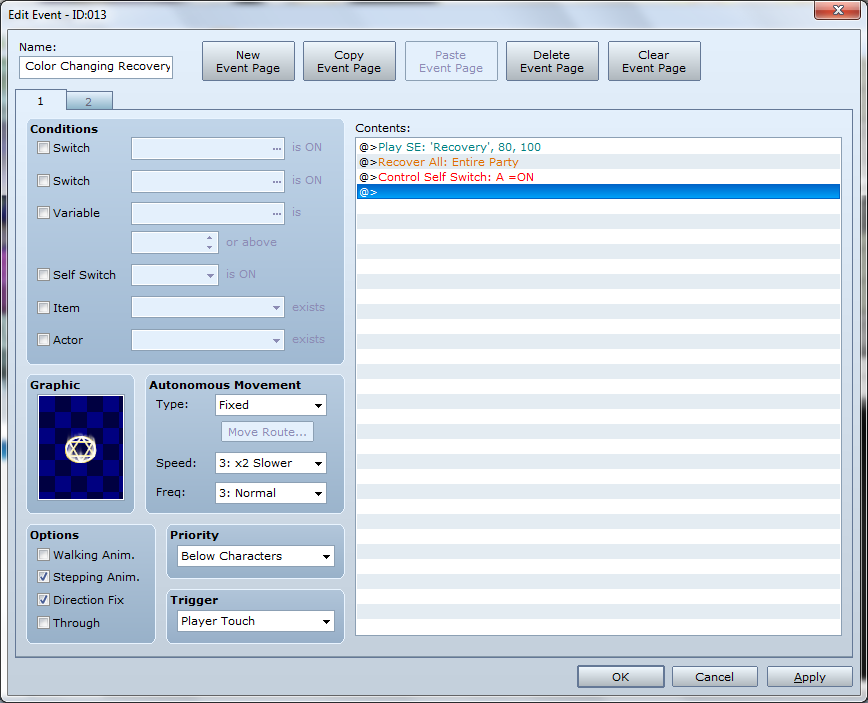
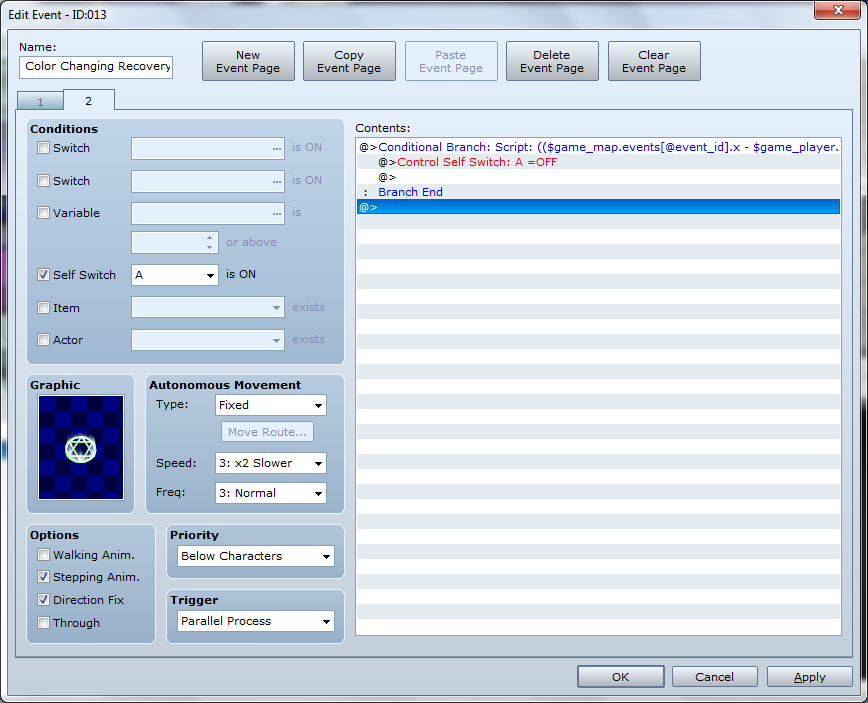
This script call checks to see if the player is touching the event and when the player isn't the Self Switch A is turned Off, returning it to the yellow magic circle graphic.
Part 2: Complicated Line of Sight Examples
These four examples combine the Simple Line of Sight Examples or use more complicated lines of sight with eventing to provide various effects. Its assumed that you read Part 1 because I won't be explaining concepts from that part again.
1) Chase/ Tag Event
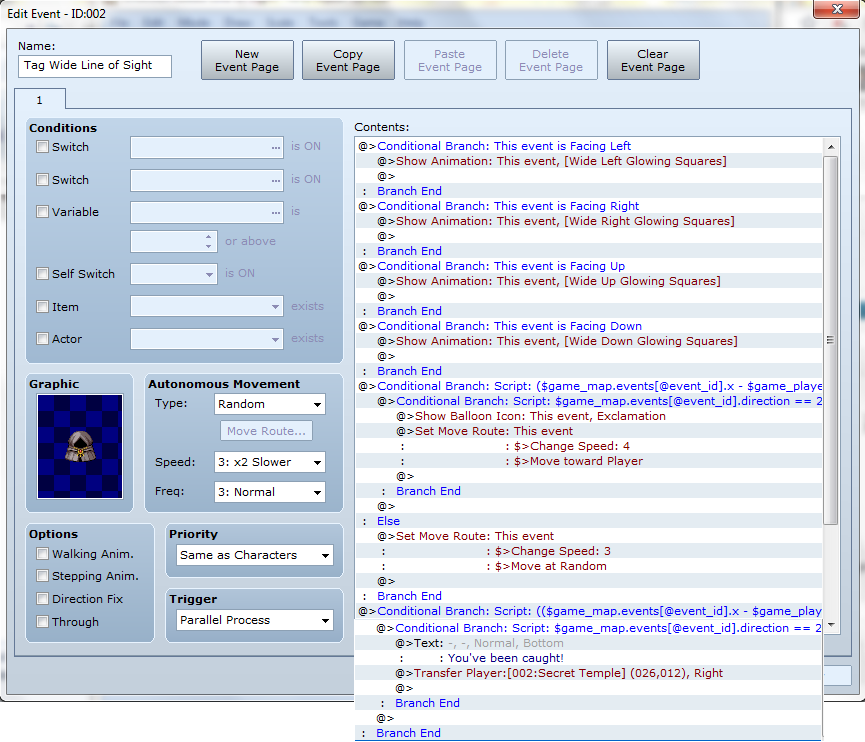
#444444">Protected download#444444">This event varies from the others because it was made to move. This event could be used for kids playing tag with the player for example and other things. Let's look at the parts:
#444444">Protected download
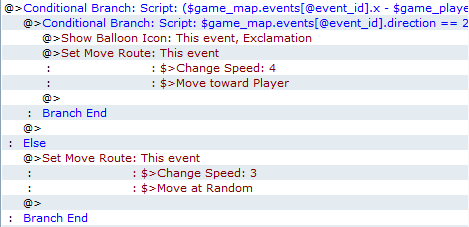
#444444">This uses the Wide Line of Sight script calls, and if the player is in range, the event will move towards the player after speeding up. If the player isn't in range the event will return to normal speed and go back to moving randomly. I did it this way so the player could run out of the event's range and the event would stop pursuing.
#444444">Protected download
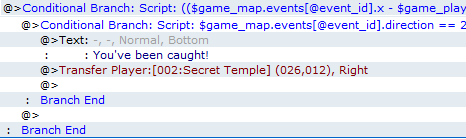
#444444">This utilizes the Triangular Line of Sight script calls with the Range script call set to 1. This is just like the earlier Triangular Line of Sight example.
2) Assassination Event
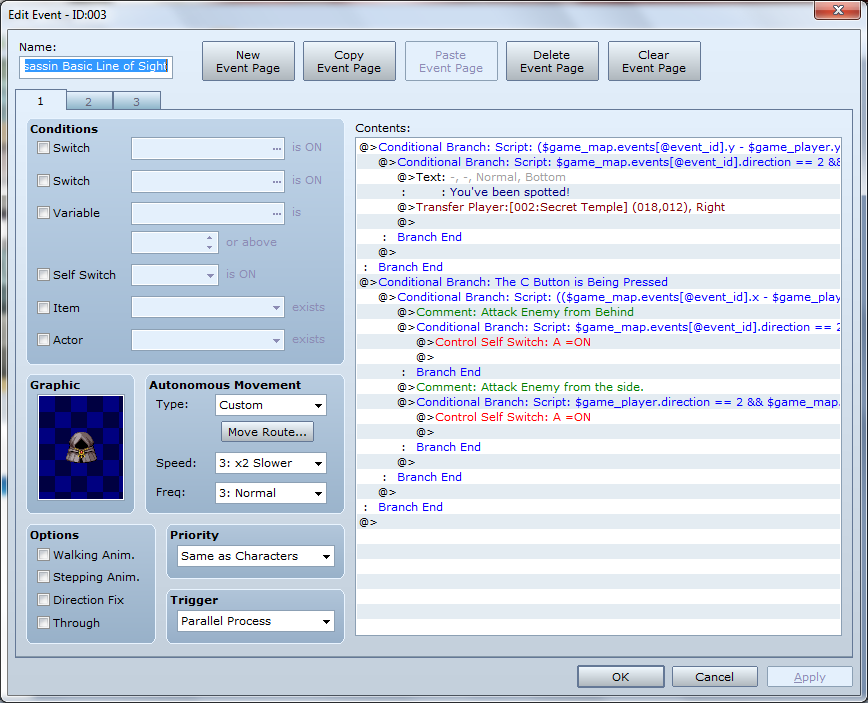
#444444">Protected download
#444444">Protected download
#444444">This is just the Basic Line of Sight example from Part 1.
#444444">Protected download
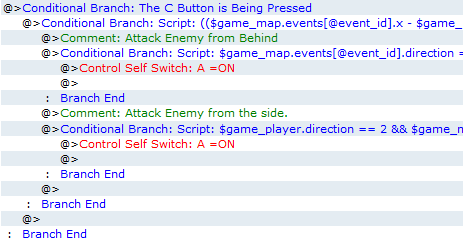
#444444">The basic purpose of this section is to allow the player to hit the C Button (usually Enter, Space Bar, Z) and the player can attack from behind or from the side. I separated these out so you could do different things, but I was being lazy so they both do the same thing.
#444444">The first conditional branch is a simple button press conditional branch.
#444444">The second conditional branch uses the Triangular Line of Sight Range script call, but this time the Range is actually the player's range and not the event's.
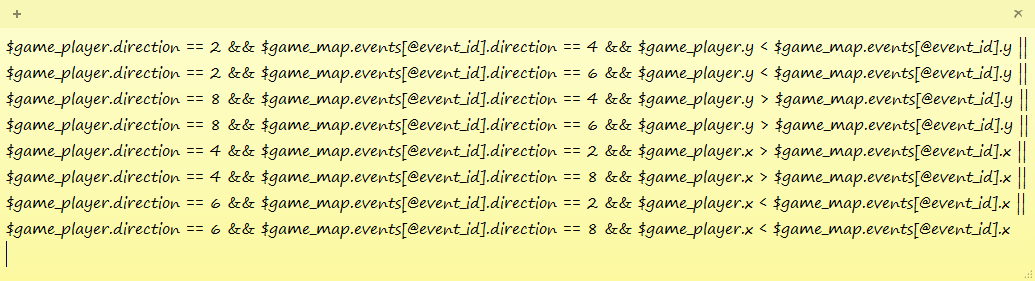
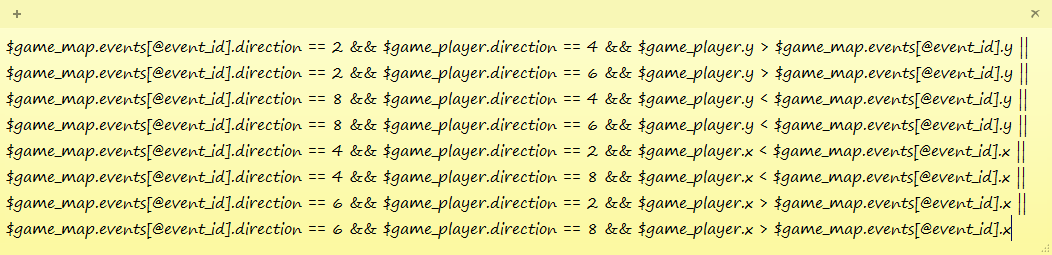
#444444">The third conditional branch determines whether the player is behind the event, of course you can't see it:
#444444">Protected download
#444444">When the event and the player are facing the same direction and are within one square of each other (because of the second conditional branch), then one is behind the other, which is why the third part of each condition checks that the player is behind the event.
#444444">The fourth conditional branch determines whether the player is to the side of the event, here it is:
#444444">Protected download
#444444">When the player is facing the event and within one square, if the player is facing a perpendicular direction then this is satisfied.
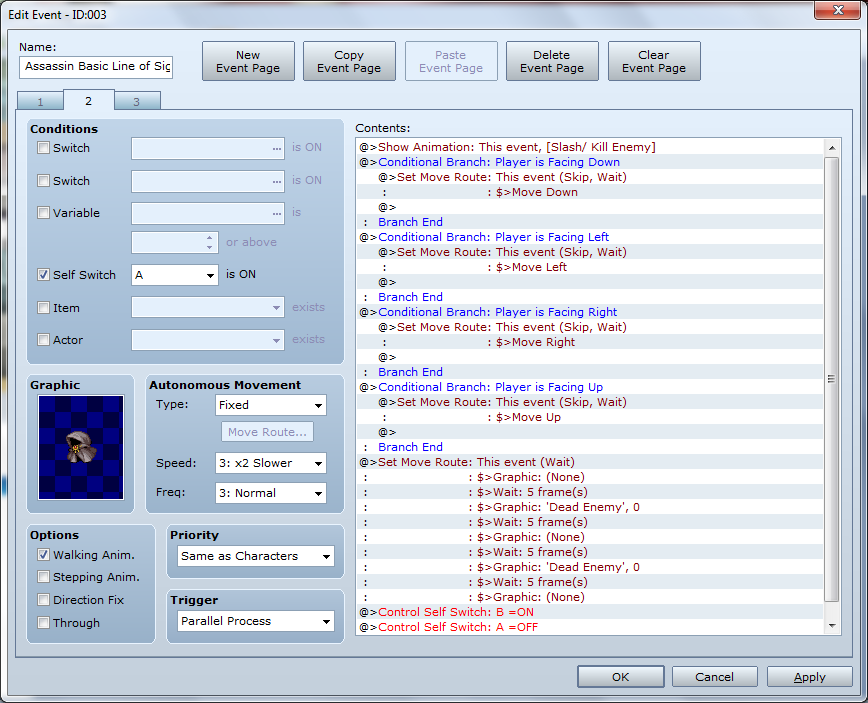
#444444">Of course when all of this is satisfied the Self Switch A is turned on, which triggers page 2 of the event:
#444444">Protected download
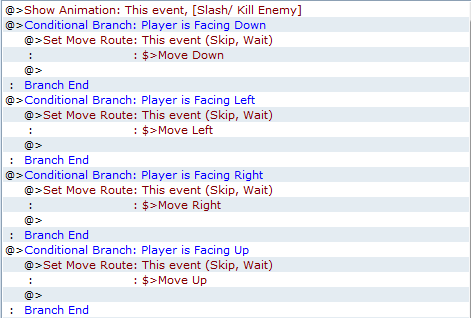
#444444">This page is all about the enemy dying visually on the screen.
#444444">Protected download
#444444">First it shows an animation. I created the animation from the slash and darkness animations, so feel free to use this if you want to.
#444444">Then we have a series of conditional branches. These check which direction the player is facing so that the event has the appearance of being knocked back while the animation is playing.
#444444">Protected download
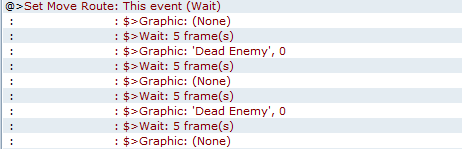
#444444">This is just a move route that turns the image on and off to give the blinking effect on the screen. If you use a different animation you might extend or shorten this to go with the animation.
#444444">Protected download
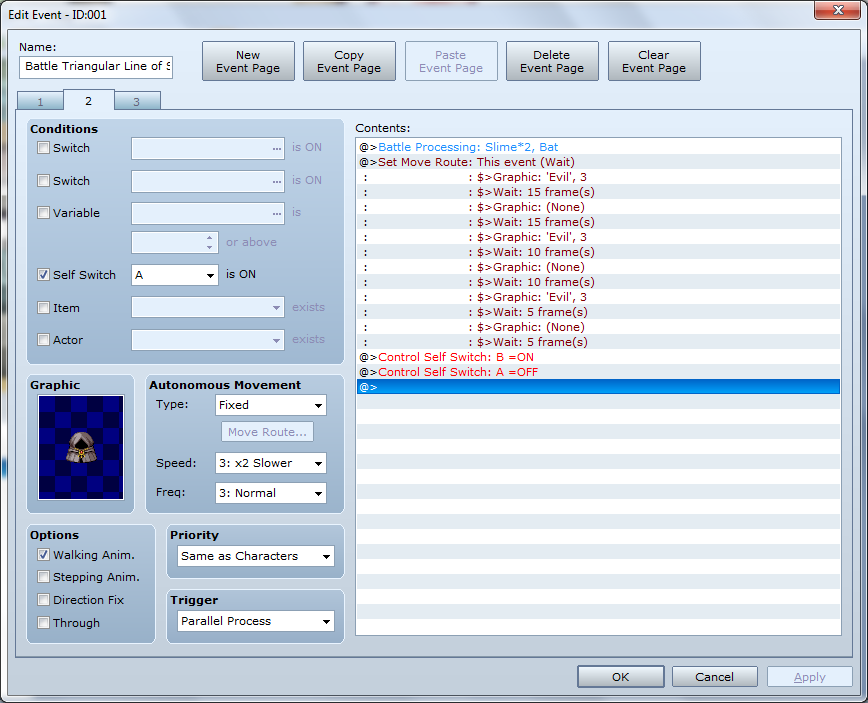
#444444">At the end it turns Self Switch B on and A off which brings up the 3rd page which is blank, so the event no longer matters. Turning Self Switch A off in this event makes it easier to turn the event back on with the transfer from the room event.
#444444">Protected download
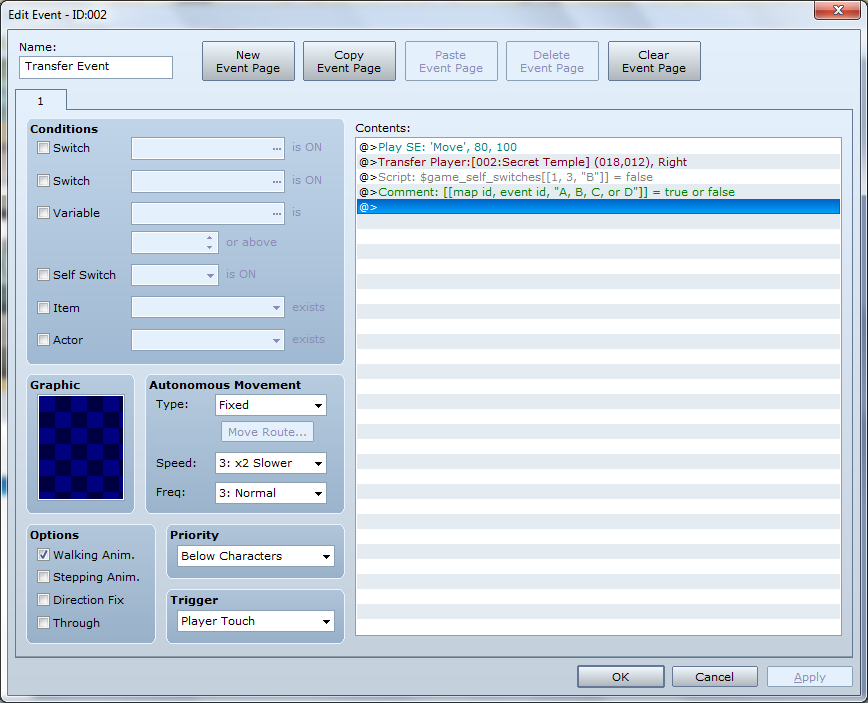
#444444">This is a standard transfer event with a script call added which can be used to turn the event back on as the player leaves the room. The example here is set for map id 1, event id 3, it effects Self Switch B, and the false turns the switch off.
#444444">Its handy particularly for puzzles/ touch encounters you want to reset when the player leaves the room or if you want, you can use this to create a reset switch in the room as another example.
3) Surprise Battle Event
#444444">Protected download
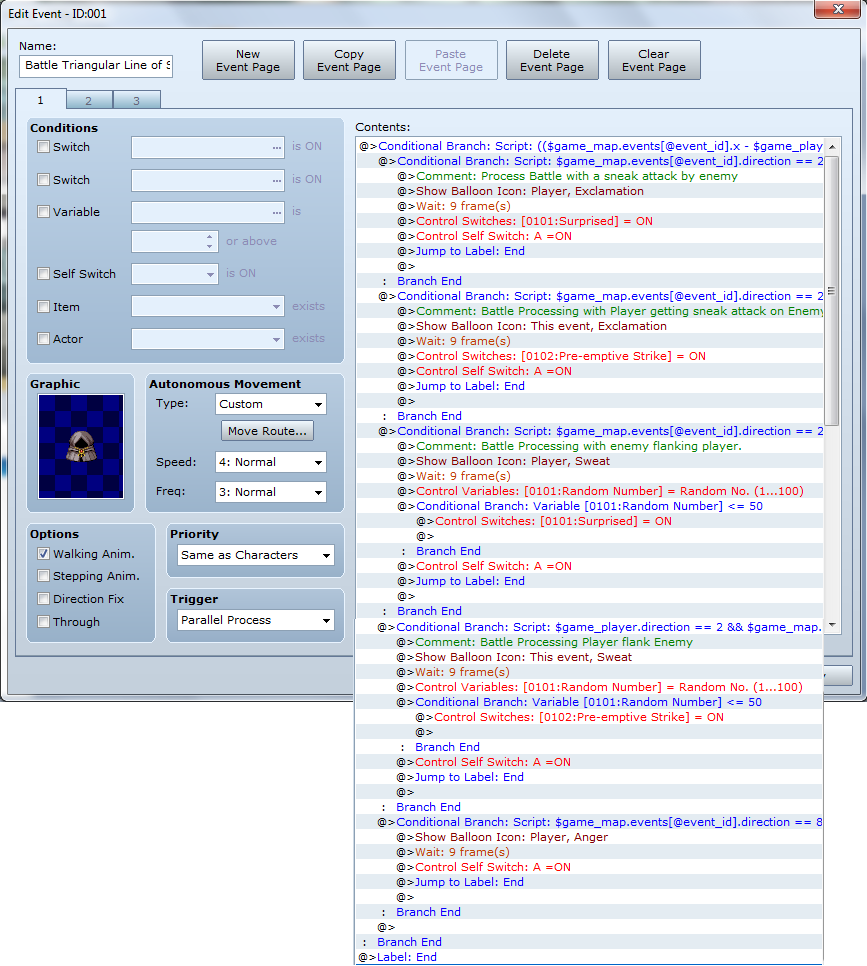
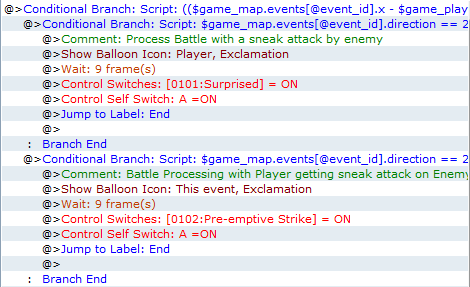
#444444">This event uses line of sight with a particular emphasis on the direction the player and event are facing when the range condition is satisfied. It will show a different Balloon Icon on the player or event depending on whether the event and player are facing each other when the battle is initiated, one initiates the battle on the other from behind, or one initiates the battle from the other's side. The Wait command is used primarily to give the appearance that the player and event are closer together when the battle transition actually occurs, basically its a timing issue that I thought looked better, on screen, by adding a little wait.
#444444">This also differs from all the other examples in that it actually uses switches and variables and has components in the database (other than animations), such as Troops, Enemies, and States tabs.
#444444">I'll start by explaining the conditional branches and show the relevant database tabs afterwards.
The Conditional Branches
#444444">Protected download
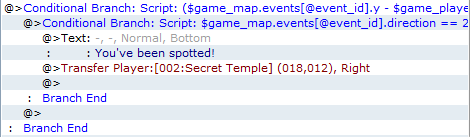
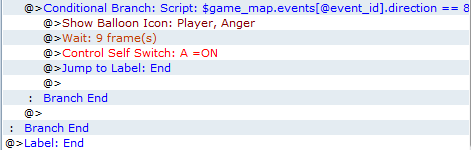
#444444">The main conditional branch is just the triangular line of sight range script call that is the basis of this whole event page. Now the other two are checking whether the player is sneaking up behind the enemy or vice versa. I added comments to these in my event example to help keep things organized. When you have this many nested conditional branches I would highly recommend you do so.
#444444">Protected download
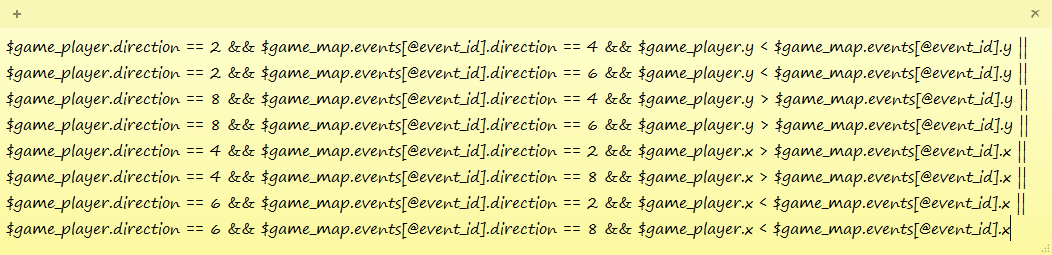
#444444">This is a similar to the Assassination Event above, but if you'll notice the sign are reversed in the third part because this is checking if the event is sneaking up on the player. If this condition is met then the switch I used [0101: Surprised] is turned on and the Ballon Icon appears over the player.
#444444">Protected download
#444444">This is exactly the same as the script call in the Assassination Event. If this condition is met then the switch I used [0102: Pre-emptive Strike] is turned on and the Ballon Icon appears over the event.
#444444">Protected download
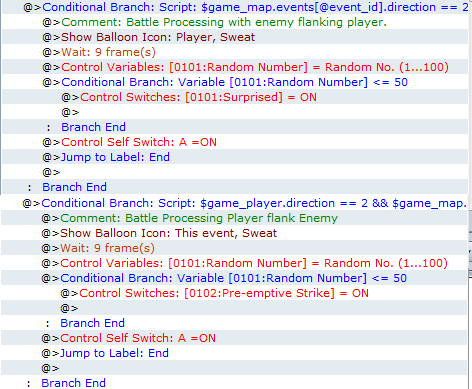
#444444">These conditional branches are checking whether the player initiates combat from the side of the event or vice versa.
#444444">Protected download
#444444">This is similar to the Assassination Event's script call, but the signs in the third part are reversed because this is checking if the event initiates combat from the player's side and if the conditions are met the Ballon Icon appears over the player. Also if the conditions are met then a random number from 1 to 100 is assigned to Variable [0101: Random Number] and the immediately following conditional branch checks to see if the variable is below the value set (this example is 50). If it is then the Switch [0101: Surprised] is turned on.
#444444">Protected download
#444444">This is just like the check in the Assassination Event, which is checking whether the player is initiating battle from the event's side and if the conditions are met the Ballon Icon appears over the event. Also if the conditions are met then a random number from 1 to 100 is assigned to Variable [0101: Random Number] and the immediately following conditional branch checks to see if the variable is below the value set. If it is then the Switch [0102: Pre-emptive Strike] is turned on.
#444444">Protected download
#444444">Protected download
#444444">This conditional branch is checking if the player and event are facing each other when battle is initiated. If so the Ballon Icon appears over the player, but you could have it appear over the event or both if you so desired.
#444444">All of these turn of Self Switch A which leads us to page 2 of the event.
#444444">Protected download
#444444">This is just the Battle Processing and after the battle the event blinks in and out then shuts its self off similar to the Assassination Event.
The Database Changes
#444444">So with the conditional branches I turned on switches depending on how the player and event were oriented when battle was initiated. Here is why:
#444444">Protected download
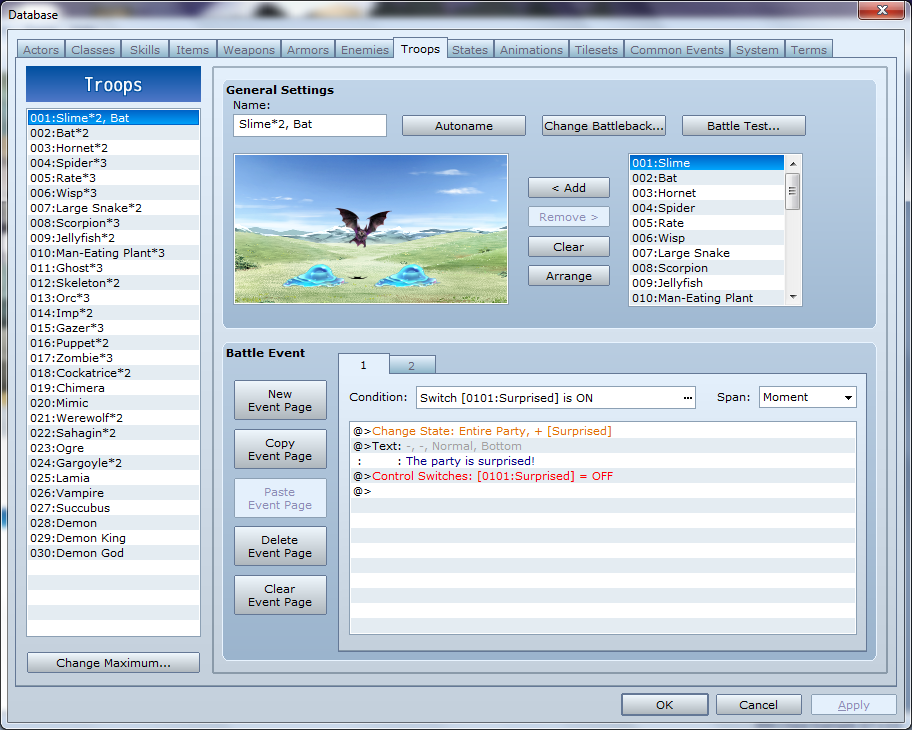
#444444">This troop page is triggered by Switch [0101: Surprised] being on. First, it adds the state Surprised (shown further down) to the entire party. Then, using Show Text displays the message "The party is surprised". Finally, it turns off the switch to clear it out.
#444444">Protected download
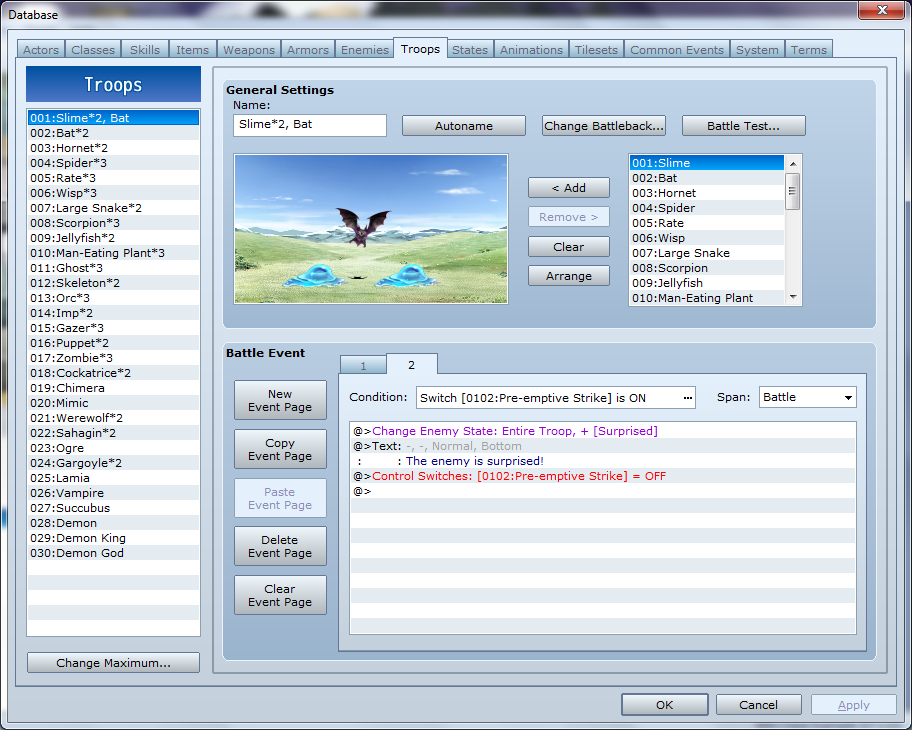
#444444">Similar to the one above, this troop page is instead triggered by Switch [0102: Pre-emptive Strike] being on. First, it adds the state Surprised to the entire enemy troop. Then, using Show Text displays the message "The enemy is surprised". Finally, it turns off the switch to clear it out.
#444444">Note: You will have to add these to each of the troops that you want affected by this. This gives you a lot of flexibility if you want to utilize this to have different states or forced actions per troop. If you want this to happen with all your troops, I would suggest finding a Base Troop script. There are a lot of different versions, so find the one that suits you.
#444444">Protected download
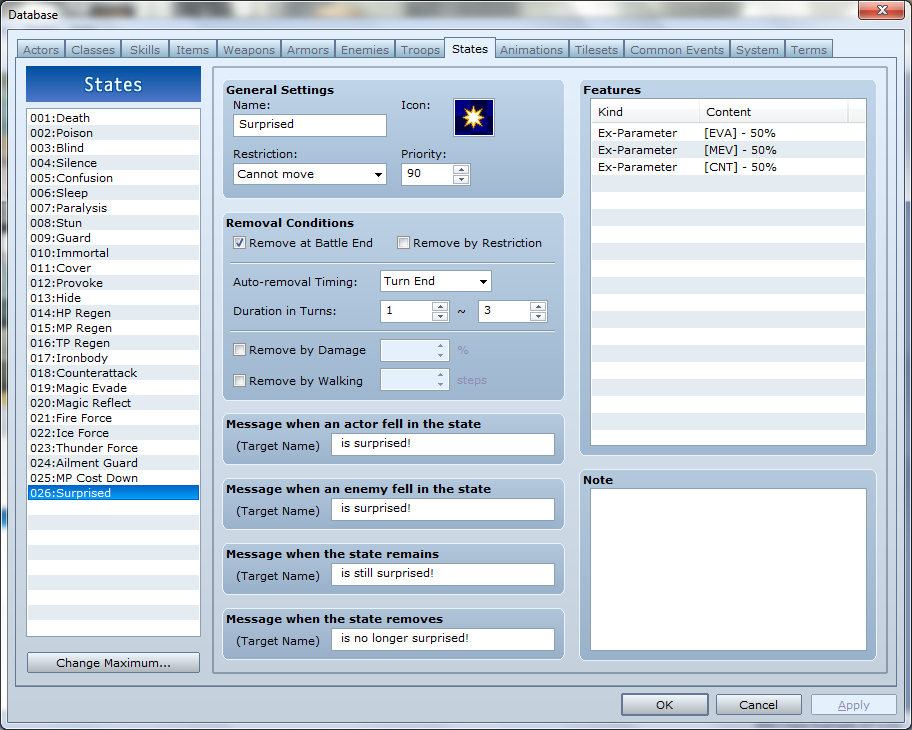
#444444">This is the state Surprised that I created. It has a Restriction of Cannot Move and adds some negative Features. It is set to go away at the end of turn in one to three turns. Of course you are welcome to make the Surprised state however you want.
#444444">Protected download
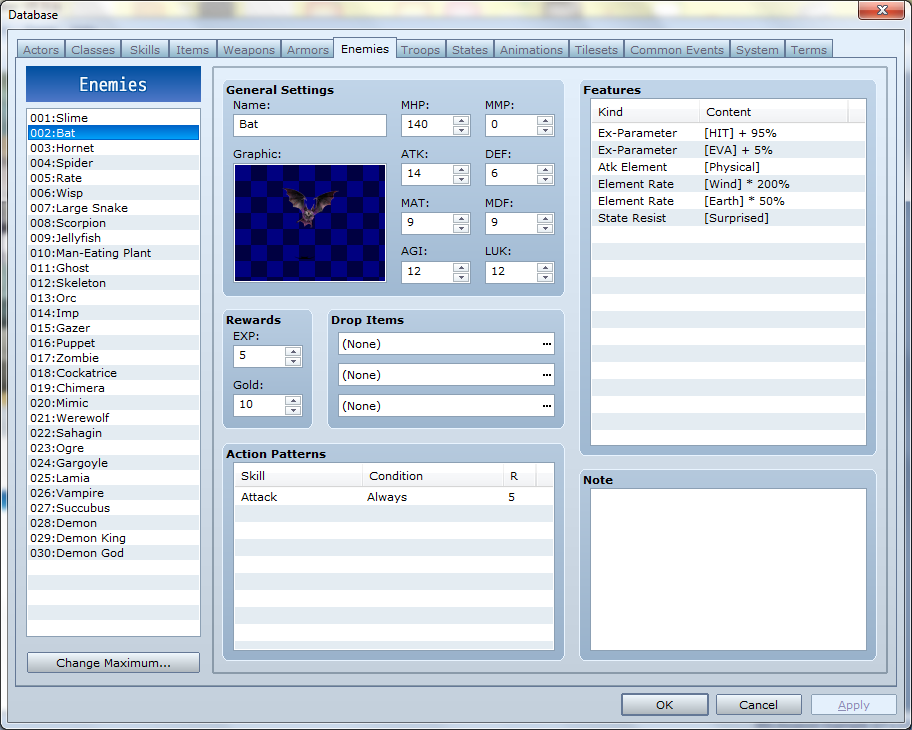
#444444">Now if you played with the Test Game for a bit you may have noticed the Bat enemy is never surprised, that is because one of its Features is State Resist (Surprised). This is one of the advantages of using a state to add surprise because you can make enemies and actors resistant to the Surprise state, which can give you some extra flexibility.
4) Zapper Event
#444444">Protected download
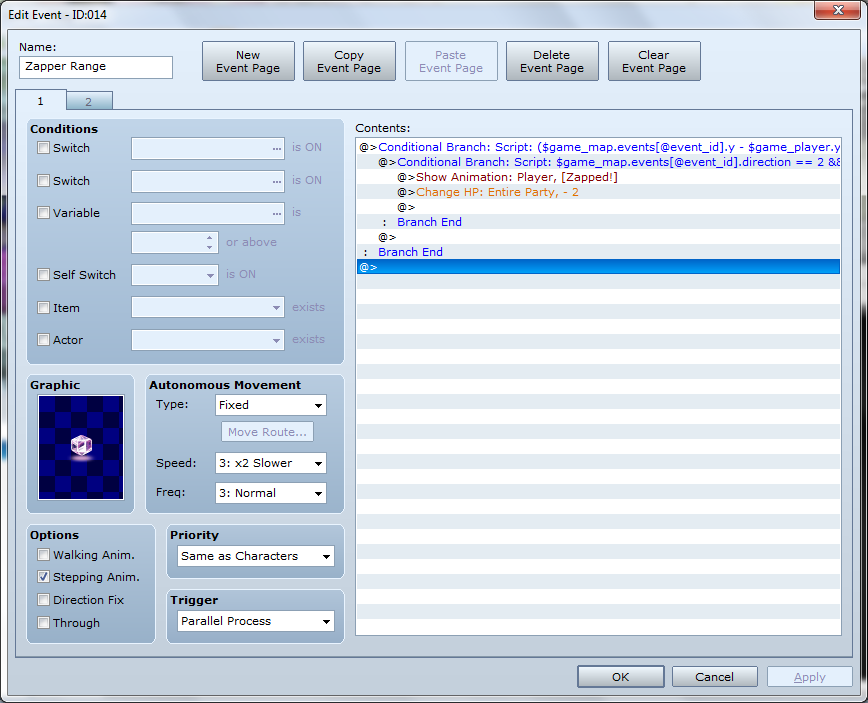
#444444">This event uses a the Basic Line of Sight with the Range set to 5. When the player is in range an animation will play to indicate that the player was damaged and the entire party takes a little damage. The damage is set low because the damage will occur each time the parallel process cycles through. The 2nd page is blank with a Condition: Self Switch A On and the crystal graphic. When this page is active the event is essentially off.
#444444">Protected download
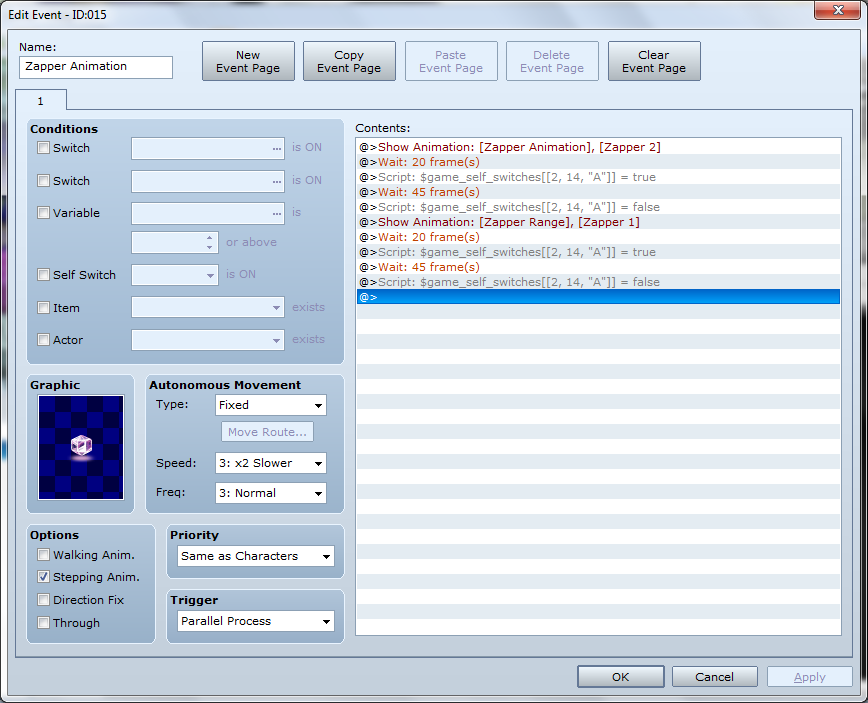
#444444">This event shows an animation, followed by a wait of 20 frames to give the animation to complete. Then it uses the script call described in the Transfer Event of the Assassin Event above to turn the Self Switch A of the Zapper Range event On, which turns the event off. Next it waits 45 frames to give the player a chance to get past unharmed. Finally it uses the script call again to turn the Zapper Range event back on by changing it's Self Switch A Off again. The 2nd part is the same as the first with a different animation.
#444444">I hope you found the examples helpful. Feel free to ask any questions you may have.
I've gotten the question a few times so to clarify: You can use this system/ script (whatever you consider it) in commercial and non-commercial games free of charge as long as you give me credit. So enjoy.
Downloads / Referenced Files
Log in, then follow the RPG Maker Developers Group to see these download links.
Log in to downloadLicense / Terms Note
I've gotten the question a few times so to clarify: You can use this system/ script (whatever you consider it) in commercial and non-commercial games free of charge as long as you give me credit. So enjoy.
Referenced Images / Attachments











Creator Claims / Removal
If you are the original creator and want this listing reassigned, edited, or removed, join BMMPlay and contact the moderators with proof that matches the original RPG Maker Web profile, linked GitHub, itch.io page, or another public creator identity.
Replies (0)
No replies yet.
Topic Summary
Loading summary...
