This tutorial is outdated as it refers to a guide (and a plugin version) that's not longer online. It will NOT work! See also the replies.
Tutorial topic: How to integrate steam achievements (and other steam functions) into your RPG Maker MZ game
Brief description: NekoGakuen Steamworks API is a free plugin for steam integration. It comes with a helpful auto-translated guide ... that leaves quite some room for error. This step-by-step guide builds upon it by explaining some of the more arcane parts and helps with troubleshooting. It's intended for beginners! For the sake of focus, it only deals with Windows and the RMMZ (RPG Maker MZ), even though NekoGakuen can do more than that.
Requirements:
- a finished steam page for your game and a working build (This guide explains the process!)
- a program to zip and unzip files (for example 7-zip)
- an image editing program for the achievement symbols (for example GIMP)
- NekoGakuen SteamworksAPI and a few accompanying downloads that will be detailed later
A request before we start: I'm not a specialist for all of this, but if you have ANY problems with this guide, please leave a comment so I can edit it accordingly! It's only here because I was frustrated with this process myself, so I want to be as clear as humanly possible.
Let's go!
_______
Step 0: Understanding NekoGakuen' files and guide
Perhaps prepare
a handy folder for all the files we will have in a moment.
Download the plugin package from itch. It's pay what you want, so you can click on "No thanks, just take me to the downloads" for now. If you can afford to get some money to NekoGakuen, you absolutely should! But perhaps wait until we get the plugin to work.
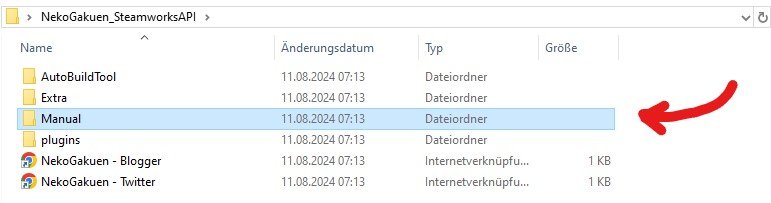
Unzip the download. Open the "Manual" folder.
Protected download
In this folder, you'll find
several guides. Two are in Chinese, but two are English. We need the one for "NWjs".
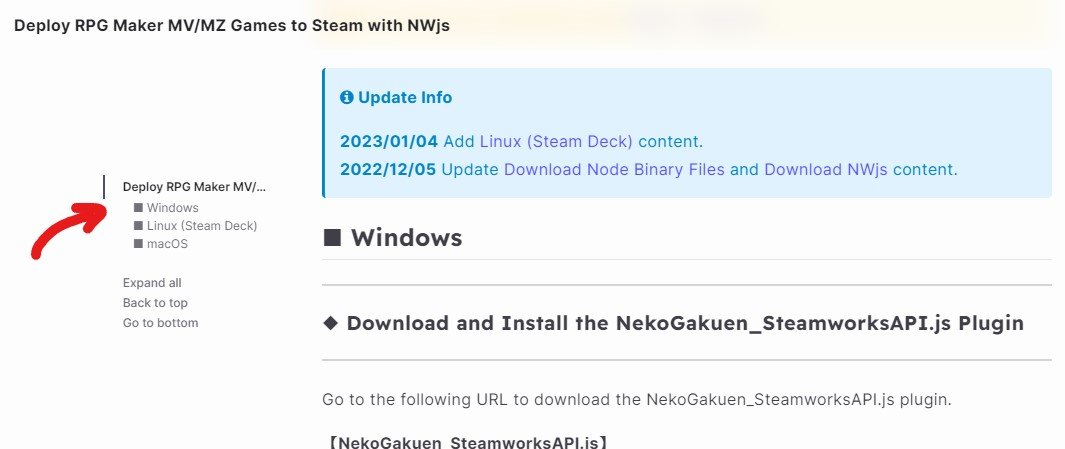
It's this one:
Protected download
Alternatively, you could also simply use
this link.
In the guide, if you click on "Windows" on the left, you will see all the steps of this process.
Protected download
Look out!
Weirdly, achievements on steam can only be tested once they are already online – which means everybody else can unlock them as well.
One solution to this problem is to create a
playtest version of your game. My guide won't go into details, but the
steam documentation helps. Here are some useful things to know:
- It's free to create a playtest.
- In most aspects, a playtest is a second version of your game, only it doesn't simply show up in the store and can't be played by just anybody (unless you want it to).
- While going through the process of creating a playtest, it seems like a big thing, and that's because it can be! But it doesn't have to be. If you don't allow people into your playtest, it's only for you!
- A playtest has its own app ID, apart from the app ID of your game. Don't mix them up!
- It can take Steam some days to unlock your playtest.
- For ease of use and to avoid mix-ups, make sure you name your playtest something including "Playtest".
From here on,
the headlines will exactly follow NekoGakuen's steps, but I will add clarifications and additions where they might be helpful.
Step 1: Download and Install the NekoGakuen_SteamworksAPI.js Plugin
We already have the files.
Follow the guide accordingly.
Look out!
The guide gives directions for
RMMV as well as RMMZ. Don't mix them up!
Look out!
Usually, the
pictures in the guide are very clear. If you are not sure about some options or files, just focus on the ones that are marked red in these pictures!
The
plugin can be found under [...\NekoGakuen_SteamworksAPI\plugins] and is named "NekoGakuen_SteamworksAPI".
It's this one:
Protected download
Before you continue, you need to
set up your achievements on steam's app admin page.
It's here. The guide assumes you already did this.
For each achievement, you need two pictures, usually one in color and one without. To turn a color picture into a grey one, I use the following settings in GIMP: Chroma -100, Lightness -50. The pictures need to be square, with an optimum resolution of 256x256 and a minimum of 64x64.
A simple achievement on steam could look something like this:
Protected download
For simple achievements, you can ignore the progress stats.
Look out!
What NekoGakuen calls "
Achievement ID" everywhere is actually called "
API Name" on steam. This can be confusing, especially when researching online, since steam achievements also had a number called "ID" in the past.
Look out!
In the plugin settings, there is
a function called "Enable Steam Purchase" (Check BuyGame Boolean). It tests if you actually bought your game. If your game opens and closes all the time while testing achievements, setting this function to "Disable" can be a useful step.
Step 2: Using the Plugin Command in the Game Project
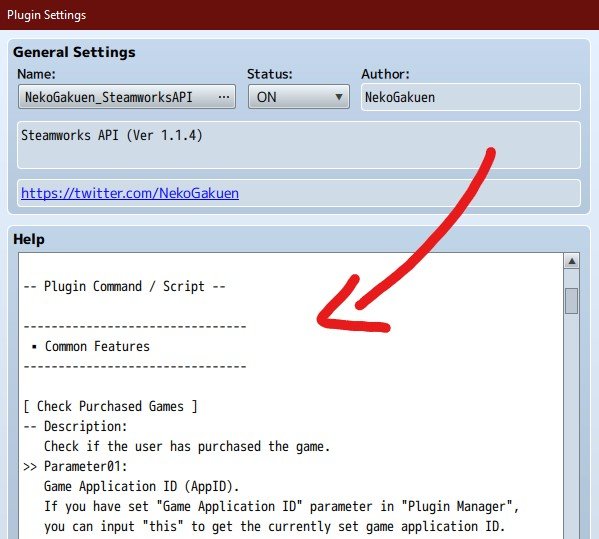
NekoGakuen has
a lot of functions. Make sure to take a look at the help text of the plugin. A lot is explained in there!
Protected download
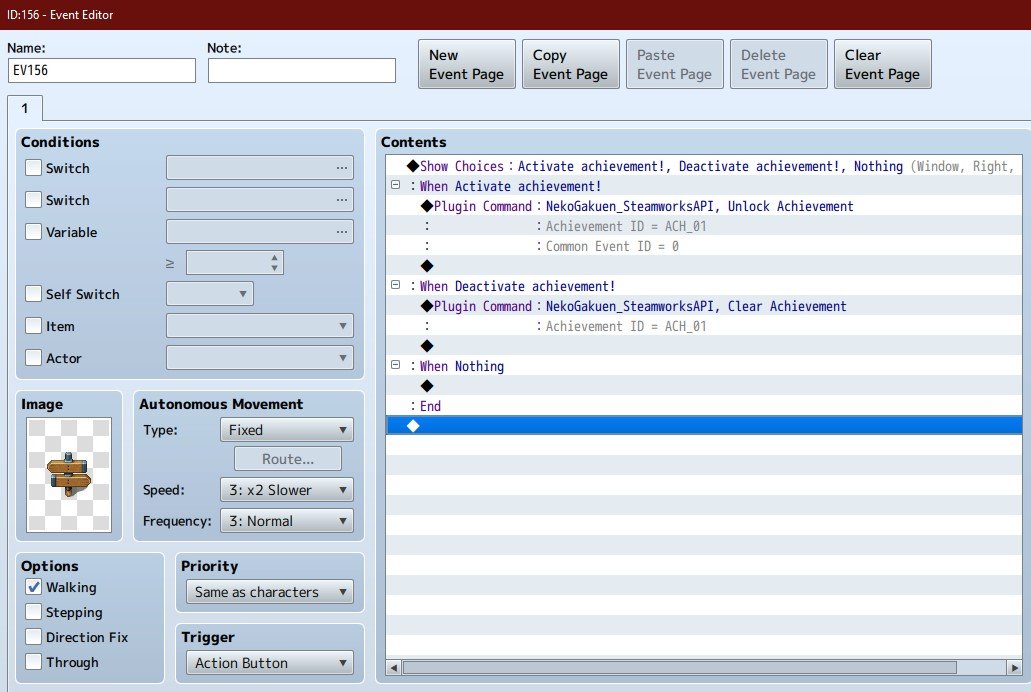
It might also be a good idea to
start with an easily approachable test event before implementing all of your achievements!
It could look something like this:
Protected download
You don't need a
common event for a simple achievement. It's just an option in case something is supposed to happen after the player unlocks the achievement. If you only want the achievement, set the number to 0.
Step 3: Deploy You Game
I don't have a lot to add here.
Look out!
Some people have
reported problems with project files connected to a cloud service (like dropbox). There have even been cases with corrupted projects! So if you want to be on the safe side, don't save your working data in your dropbox folder.
Step 4: Download Steamworks SDK
Step 5: Download greenworks.js
Step 6: Download Node Binary Files
Step 7: Download NWjs
Let's do these steps together, because their interaction might
THE biggest pitfall of the whole process!
Unfortunately it's also the point where NekoGakuen's guide can get a bit confusing (including some inconsistencies), so be ready to reread theirs as well as mine, and perhaps do some troubleshooting!
You don't need to understand all of
these files (I certainly don't!), but essentially they are updated constantly and
they need to fit together. There are different "sets" of fitting versions, and the question of how recent the versions are should be secondary to them working together at all!
One set that should work together well is detailed here:
- Steamworks SDK: download v1.50 from this link
- greenworks.js: download the recent version from this link(the specific version doesn't seem to matter too much here)
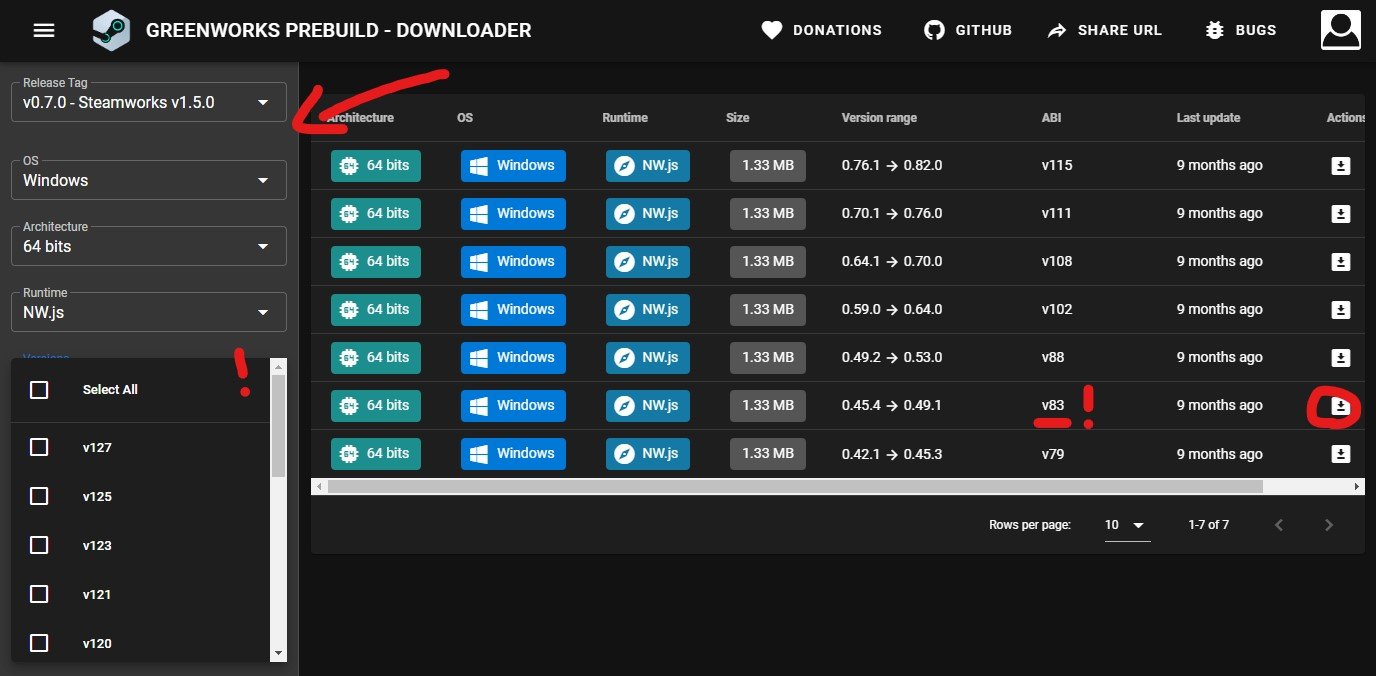
- Node Binary Files: download version v83 (win64) from this link (see below!)
- NW.js: download v0.49.1 (win64) from this link (not the SDK build!)
(If you have other sets that work with NekoGakuen, please comment!)
On how to
find a specific version of the Node Binary Files on the website: Set the categories on the left as in the following picture. If that doesn't work, just play around a bit until your version (for example v83) pops up.
Protected download
You don't need a github account anymore, contrary to what NekoGakuen says.
Step 8: Configure NWjs
To clarify: In this step you take all of your
deployed game files and copy them into the
unzipped NW.js (for example v0.49.1).
Be sure to
understand the pictures from the guide for the correct directions and follow them closely!
I always
rename the nw.exe into Game.exe (as explained in the guide as "non-essential"), just for clarity.
Step 9: Configure Steamworks SDK
In this step as well, just be sure to
understand the pictures from the guide for the correct directions and follow them closely!
Look out!
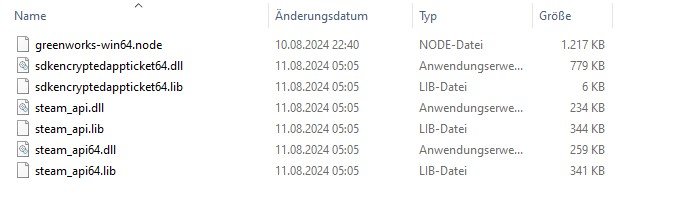
In the guide's pictures you can see that NekoGakuen's Node Binary Files
have another name ("greenworks-win64.node"), and there might be problems if they don't. Just to make sure, rename them.
For example: "
greenworks-nw.js-v83-win32-x64" -> "
greenworks-win64.node"
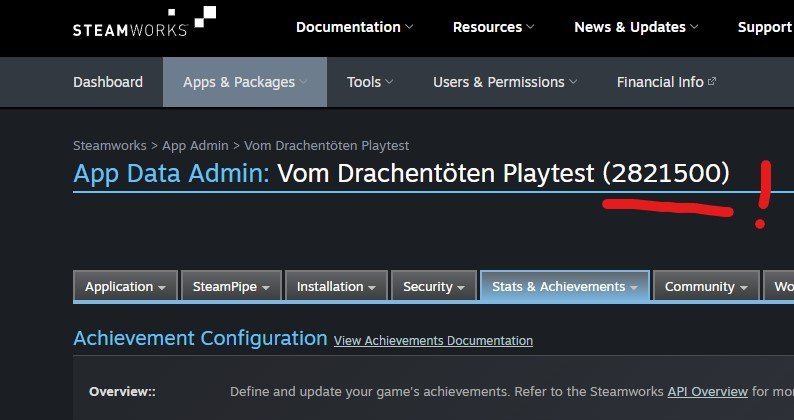
For the app ID, make sure
not to mix up the IDs of your game and your playtest (in case you are using one).
You can find the IDs in the steam app admin panel. It's here:
Protected download
And yes, for RMMZ, in the
package.json, you only need to change one thing: "
rmmz-game" -> "
GameTitleMZ"
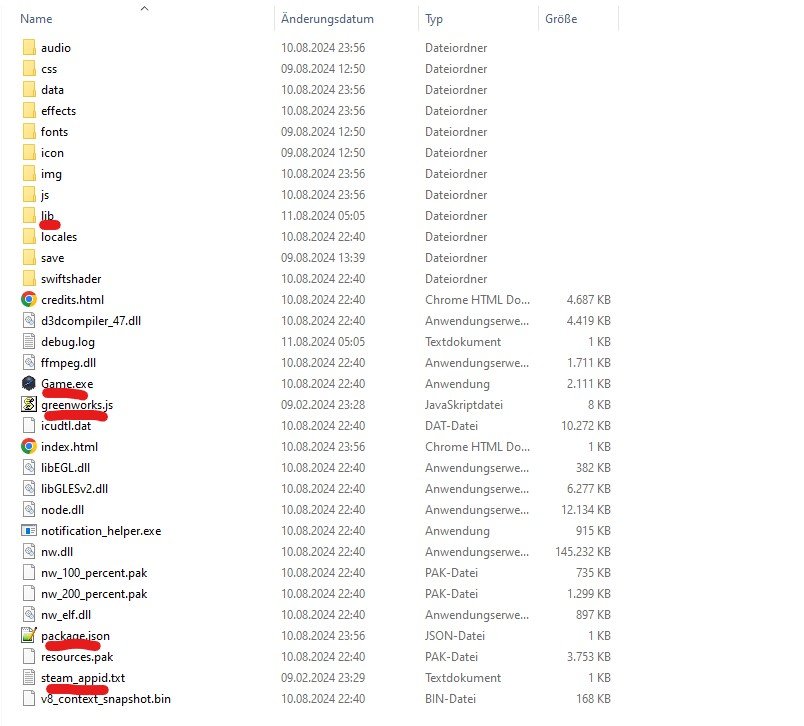
For a
comparison at this point, your game folder should look something like this:
Protected download
And the lib folder:
Protected download
Now you need to
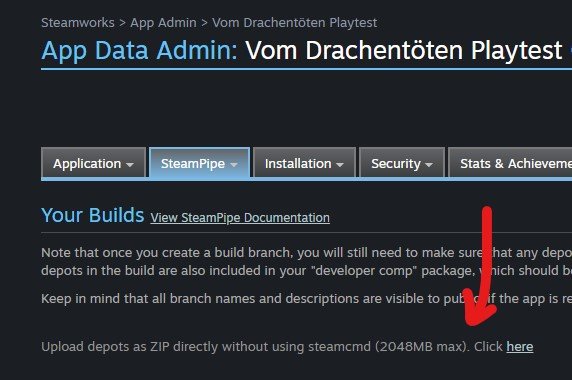
zip and upload your game to steam.
Steam has a
direct upload function for smaller games that works well with the rpg maker and this plugin.
It's here:
Protected download
Look out!
When
zipping the files for this function, make sure
the files are NOT placed in another folder! Inside the zip, you should see the files right away, including the Game.exe etc.
Step 10: Configure Steamworks SDK
Nothing to add here.
In the end,
test if your achievements work and go through the guides again if they don't!
We are done!




 Lexar 1TB Professional Go Portable SSD
Compact portable SSD for fast file transfers, mobile video, and creator storage.
View on Amazon
Lexar 1TB Professional Go Portable SSD
Compact portable SSD for fast file transfers, mobile video, and creator storage.
View on Amazon