, piece#2, piece#3... to make it easier. (on the example pictures piece#11, piece#12...) On the first Common Event (or first page of a normal event, I just like to make the puzzle templates on a CE but it can be done on a map event), control the nine variables you just made, and assign a "screen number" to each of them. The variables CAN'T share the same screen number. The main point of this is that all the pieces of the puzzle (variables) will always have a different number assigned...
How to make a sliding puzzle.
Protected download
Hi everyone, as the title says this is a tutorial to make a sliding puzzle. It needs a couple of events, pictures and a lot of patience, because it has a lot of conditional branches and requires some effort to picture visually where every piece of the puzzle is. Just keep in mind that the more number of pieces you use, the longer the event will be. As an example I will make a 9 pieces puzzle.
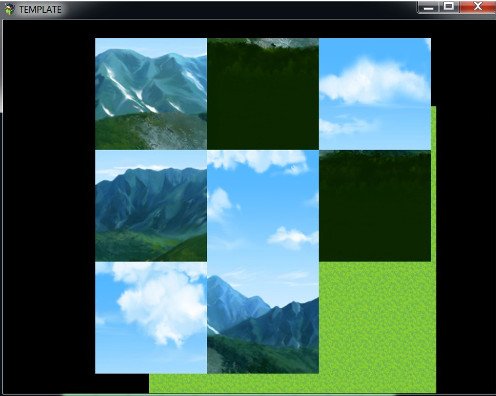
- First take your picture and chop it down into pieces. For this kind of puzzle the pieces need to share the same proportions (I made a square to keep it simple, 187x187cm), if you want to make a sliding puzzle like a klotski I guess you could take this tutorial as a base and modify it according to the different sizes piece by piece.
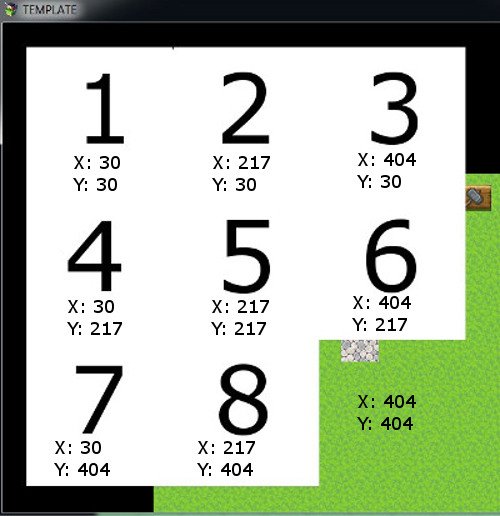
- Then assign a fictional number to the positions of the pieces on the screen ("screen numbers"). This number will represent the X and Y position of every picture(piece) on the screen.
- To know easily which X and Y you should use, just place the upper left piece wherever you like and add its width or height to the next piece. For example, I placed the first one at 30X and 30Y. Since all my pieces measure 187x187cm, the second picture will be at 217X(30+187) and 30Y, the third at 404X(217+187) and 30Y... if you get lost with numbers is easier to visualise the puzzle and write down these coordinates as a reference, since you will need them to move around the pictures. You will have to determinate your own coordinates according to the dimensions of your pieces, and it is advisable to check that the puzzle looks good in game before making the whole event.
Protected download
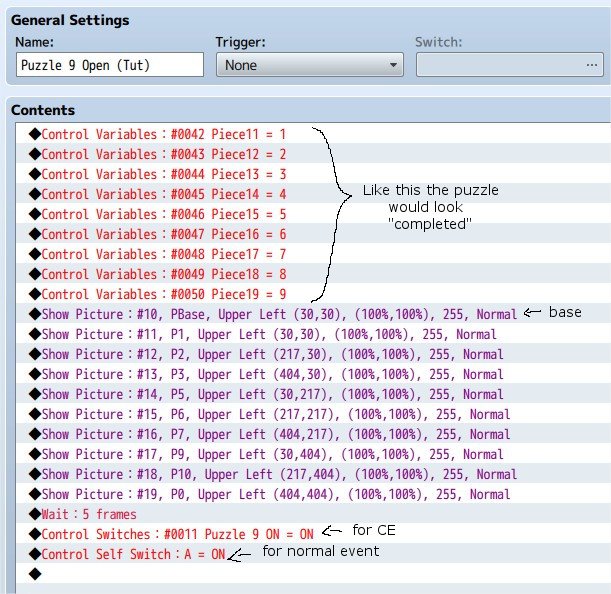
- Now create a variable for every piece of the puzzle, including the "invisible one" (piece#9) (so nine variables). I named them piece#1, piece#2, piece#3... to make it easier. (on the example pictures piece#11, piece#12...)
- On the first Common Event (or first page of a normal event, I just like to make the puzzle templates on a CE but it can be done on a map event), control the nine variables you just made, and assign a "screen number" to each of them. The variables CAN'T share the same screen number. The main point of this is that all the pieces of the puzzle (variables) will always have a different number assigned to them, so they can't coincide on the same spot at the screen.
- Then show all the pictures on their respective positions (X and Y). You can add a base for the puzzle as long as the number of the picture in rpg maker is lower than the number of the pictures of the pieces.
- Finally turn on a switch (or a self-switch if you are making it on a map event) to activate a new autorun common event.
On the following example I show the pictures in their correct positions, making the puzzle look complete. After you are done making the second event (explained ahead) you will have to come back here and disarray the pictures as you want. You could disarray them now but doing it like this has 2 benefits: first, you can use it as a template to make different puzzles, just changing the images and their positions; and second, you can "undo" the puzzle once is functional playing around with the pieces and then writing down their position instead of doing it randomly, thus making sure that the puzzle can be "redone".
Protected download
Now is time to fill the main autorun common event we just created. We will use the variable piece#9 (the invisible one) as the referent/"pivot", because it is the one that will always exchange positions with another piece.
- First make 9 different conditional branches, one for every position or "screen number" the invisible piece can be and make one extra for the Cancel button, to exit the puzzle:
*If (variable) piece#9 = 1 (invisible piece is at upper left position)
*If (variable) piece#9 = 2 (invisible piece is at upper middle position)
*If (variable) piece#9 = 3 (upper right)
*If (variable) piece#9 = 4 (middle left)... etc
*If (variable) piece#9 = 9 (lower right)
*If button Cancel is pressed down....
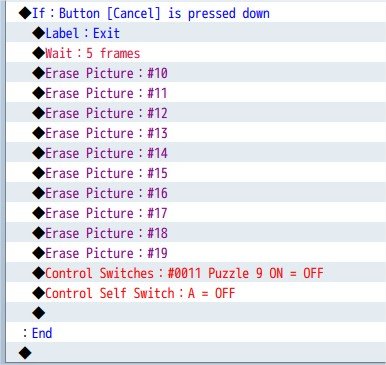
Inside the Cancel conditional
create a label (here named "Exit"), erase all the pictures shown and turn off the switch or the self-switch of this autorun event.
Protected download
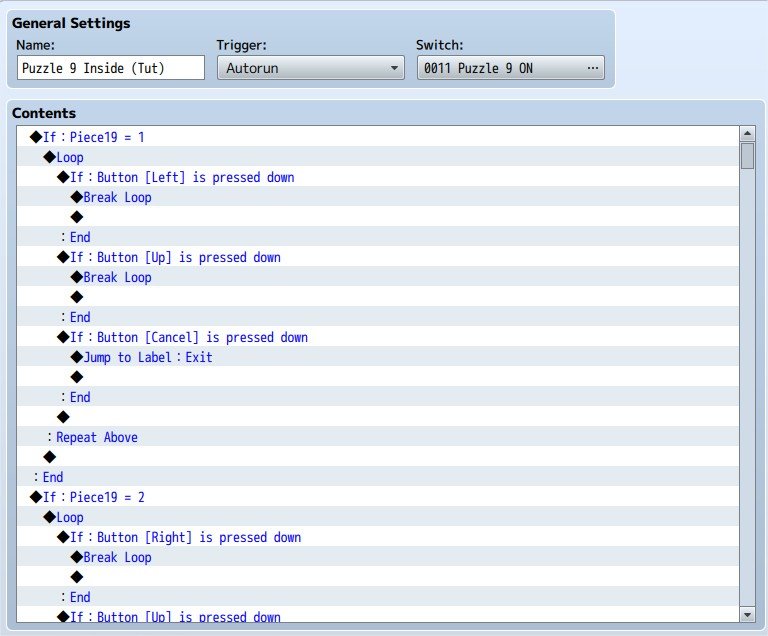
- Now inside every conditional branch (except the cancel one) create a loop. Inside every loop create a new conditional branch for every direction button we need to press in order to move the pieces around, and finally one for the cancel button. Insert a break loop inside every directional button condition and a jump to label "Exit" inside every cancel.
*If (variable) piece#9 = 1 (upper left)
*loop
*If "left" is pressed down
*break loop
*If "up" is pressed down
*break loop
*If "cancel" is pressed down
*jump to label: "Exit".
*If (variable) piece#9 = 2 (upper middle)
*loop
*If "left" is pressed down
*break loop
*If "cancel" is pressed down
*jump to label: "Exit".
*If (variable) piece#9 = 3 (upper right)
*If (variable) piece#9 = 4 (middle left)... etc
*If button Cancel is pressed down....
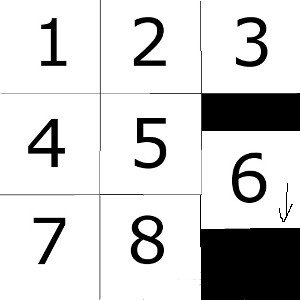
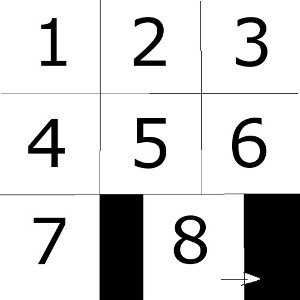
- To know which direction keys you have to use on every conditional branch, you have to keep in mind the puzzle on the screen: for example if the invisible piece is in position 1 (upper left) the pieces next to it can only move to the left or up. If the invisible position is in position 5 (the middle), the pieces can move from every direction. As a guide positions for this puzzle 1, 3, 7 and 9 (corners) will have two direction keys, 2, 4, 6 and 8 will have three and the middle one (5) four keys.
For example in position #9 (*If (variable) piece#9 = 9) you can move the pictures down or to the right:
Protected download Protected download
This is how the event would look for now:
Protected download
- Next step: inside "If direction button X is pressed down" and before the "break loop" you have to make (again) 8 new conditional branches, one for each piece except for the piece#9, and all of them will be set to the same screen number location, always keeping in mind the whole picture of the puzzle and the position of the pictures on the screen (check the example ahead, at the end I will include a full picture).
- We have no way to know what piece of the puzzle will be next to the invisible one when we push the direction buttons, because the player might have moved them all around, so we need to create a command for every single piece (that is why the more pieces you use for a puzzle the longer the event will be).
*If (variable) piece#9 = 1 (upper left)
*loop
*If "left" is pressed down
*If (variable) piece#1 = 2 -> if piece#1 is at upper middle
*If (variable) piece#2 = 2 -> if piece#2 is at upper middle
*If (variable) piece#3 = 2
*If (variable) piece#4 = 2
*If (variable) piece#5 = 2
*If (variable) piece#6 = 2
*If (variable) piece#7 = 2
*If (variable) piece#8 = 2
*break loop
*If "up" is pressed down
*If (variable) piece#1 = 4 -> if piece#1 is at middle left
*If (variable) piece#2 = 4 -> if piece#2 is at middle left
*If (variable) piece#3 = 4
*If (variable) piece#4 = 4
*If (variable) piece#5 = 4
*If (variable) piece#6 = 4
*If (variable) piece#7 = 4
*If (variable) piece#8 = 4
*break loop
*If "cancel" is pressed down
*jump to label: "Exit".
*If (variable) piece#9 = 2 (upper middle)
*loop
*If "left" is pressed down
*break loop
*If "cancel" is pressed down
*jump to label: "Exit".
*If (variable) piece#9 = 3 (upper right)
*If (variable) piece#9 = 4 (middle left)... etc
*If button Cancel is pressed down....
- Finally inside those new conditional branches we will move the pictures and modify the variables accordingly: for example if variable piece#9 (the invisible one) is at position 1 (30X, 30Y) and variable piece#3 is at position 2 (217X, 30Y), we will switch their locations with "move picture" command (send picture#3 to 30X, 30Y and send picture#9 to 217X, 30Y), then set the variable piece#9 to 2 and set the variable piece#3 to 1. (I suggest changing the time to move the pictures to 10 frames and set a small waiting time after it instead of "waiting" for the picture to finish moving. Either way the first picture to move should never have a waiting time, so the two of them can move at the same time.)
*If (variable) piece#9 = 1 (upper left, 30X 30Y)
*loop
*If "left" is pressed down
*If (variable) piece#1 = 2 -> if picture#1 is at upper middle (217X, 30Y)
-Move picture#9 to 217X, 30Y
-Move picture#1 to 30X, 30Y
-Wait X frames
-Control variable piece#9 =2
-Control variable piece#1 = 1
*If (variable) piece#2 = 2 -> if picture#2 is at upper middle
-Move picture#9 to 217X, 30Y -> as you can see this one is the same in every condition.
-Move picture#2 to 30X, 30Y
-Wait X frames
-Control variable piece#9 =2
-Control variable piece#2 = 1
*If (variable) piece#3 = 2
*If (variable) piece#4 = 2
*If (variable) piece#5 = 2
*If (variable) piece#6 = 2
*If (variable) piece#7 = 2
*If (variable) piece#8 = 2
*break loop
*If "up" is pressed down
*If (variable) piece#1 = 4 -> if picture#1 is at middle left (30X, 217Y)
-Move picture#9 to 30X, 217Y
-Move picture#1 to 30X, 30Y ->now these are the ones that are the same as above.
-Wait X frames
-Control variable piece#9 =4
-Control variable piece#1 = 1
*If (variable) piece#2 = 4 -> if picture#2 is at middle left
-Move picture#9 to 30X, 217Y
-Move picture#2 to 30X, 30Y
-Wait X frames
-Control variable piece#9 =4
-Control variable piece#2 = 1
*If (variable) piece#3 = 4
*If (variable) piece#4 = 4
*If (variable) piece#5 = 4
*If (variable) piece#6 = 4
*If (variable) piece#7 = 4
*If (variable) piece#8 = 4
*break loop
*If "cancel" is pressed down
*jump to label: "Exit".
*If (variable) piece#9 = 2 (upper middle)
*loop
*If "left" is pressed down
*break loop
*If "cancel" is pressed down
*jump to label: "Exit".
*If (variable) piece#9 = 3 (upper right)
*If (variable) piece#9 = 4 (middle left)... etc
*If button Cancel is pressed down....
Once you have done one full conditional branch you will see a very schematic pattern, and is easy to copy-paste most of the branches just modifying the coordinates and the variables keeping in mind the puzzle screen positions (the most important part).
This is how the full first conditional branch would look in the rpg maker event:
- Finally, once we have filled all the conditional branches of the event, we need to add another command to let the game know that the puzzle is "done" when playing. On the last conditional branch tree (*If variable piece#9 is = 9) we will do an "ultimate" condition: if piece#8 = 8, if piece #7 = 7, if piece#6 =6.... as in: if every piece is where it is supposed to be, we will turn on a new switch, or modify another variable, or make whatever we want as a prize for completing the puzzle (for example opening a secret door, or making an npc to give you a special item). Then we will erase all the pictures shown, break the loop and turn off the autorun switch. Optionally we could turn on a new switch or self-switch to make it impossible to access the puzzle again to repeat it.
This is how it would look like:
Now that the puzzle is done you can
go back to change the initial position of your pieces on the first common event. If you want to check the puzzle freely just change any number in the "ultimate condition" (for example piece#1 = 1000) so the completion switch won't turn on.
And that is it
If you have any doubt or need more examples let me know.




 WD_BLACK 2TB SN750 NVMe Internal Gaming SSD
High-capacity NVMe storage pick for expanding a gaming PC or performance setup.
View on Amazon
WD_BLACK 2TB SN750 NVMe Internal Gaming SSD
High-capacity NVMe storage pick for expanding a gaming PC or performance setup.
View on Amazon