Upper Autotiles
2016.08.06
by Shaz
Introduction
This plugin allows you to use autotiles on the B-E tabs, and on the two upper mapping layers.
How to use
There are several steps required to create, add, set up, use and customize autotiles. The following spoilers detail all steps.
Step 1: Create your Autotiles
Create a folder under /img for your autotiles. I don't recommend you put them in the img/tilesets folder (if you do, when you're creating tilesets, these will also be shown in the lists, making it harder to set up your tileset with
real tilesheets). Set the plugin parameter for the autotile folder.
Each autotile will have its own image. There is no combining lots of autotiles into a single sheet the way MV does by default. This means your autotiles can be different shapes and sizes, and have different numbers of animation frames.
Each autotile should follow the 2x2 or 2x3 standard layout for MV autotiles. Animation is done by placing autotiles side by side for as many frames as needed. Animation flows in a left to right direction, not a back and forth direction like the A1 tiles and spritesheets. You can have as many frames as you want.
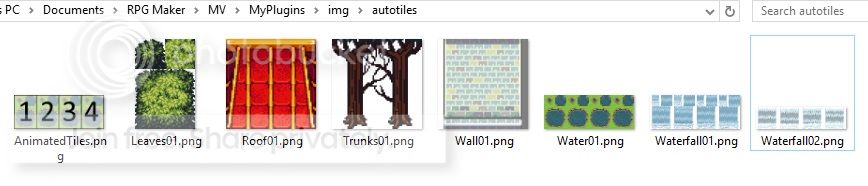
Some examples of autotiles (I'm not providing the resources as they are not mine, and I'm not even sure if some of them are okay to share):
Step 2: Update B-E tilesheet image with autotile representation
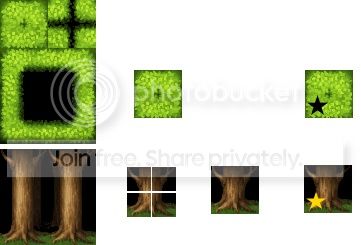
Reduce your autotile to a 48x48 tile that can be added to the B-E tilesheet.
This is easily done by grabbing the top left tile of a 2x3 autotile, or by grabbing the 24x24 chunk from the 4 corners of a 2x2 autotile and combining them.
I suggest you consistently use some kind of marker to make it obvious in the editor that these will be turned into autotiles when playing the game. I've been putting a bright yellow star in the lower right corner of my tiles. Pick something and stick with it for all B-E autotiles - it'll make it easy for you to see what they do, and if you ever have to come to the forum to ask for help with something, this will help us recognize that you're using this plugin and might explain some weird things we might otherwise question.
Copy this 48x48 image and pop it into the B-E tileset wherever you want the autotile to go.
Step 3: Add notes to tileset to define B-E autotiles
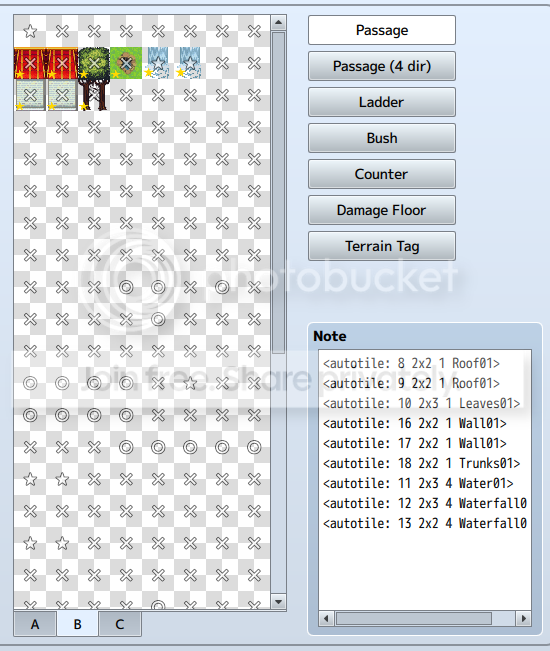
Set up your autotile flags - whatever you use on the B-E tab is what will be used by the autotile. Keep the passage setting to O, X or star if you don't want unexpected results.
For each autotile you've added, add a new line to the Tileset notes box defining the autotile:
<autotile: tileId size frames filename>
where tileId is the id of the B-E tile (see below)
size is either 2x2 or 2x3 and indicates how big the autotile is
frames is how many frames of animation there are - for a single autotile with no animation, this will be 1
filename is obviously the name of the image file - leave off the extension
example:
<autotile: 8 2x3 1 Leaves01> - tile 8 (first tile in the second row on B tab) is a 2x3 autotile with just 1 frame, using the Leaves01 image.
<autotile: 16 2x2 4 Waterfall02> - tile 16 (first tile in the third row on B tab) is a 2x2 autotile with 4 frames of animation, using the Waterfall02 image.
How do you find the tile Id easily?
Do this BEFORE you add the <autotile> tag to the note!
Create a new map and set your starting location.
Use the B-E tile to draw on the map - just a single tile will do.
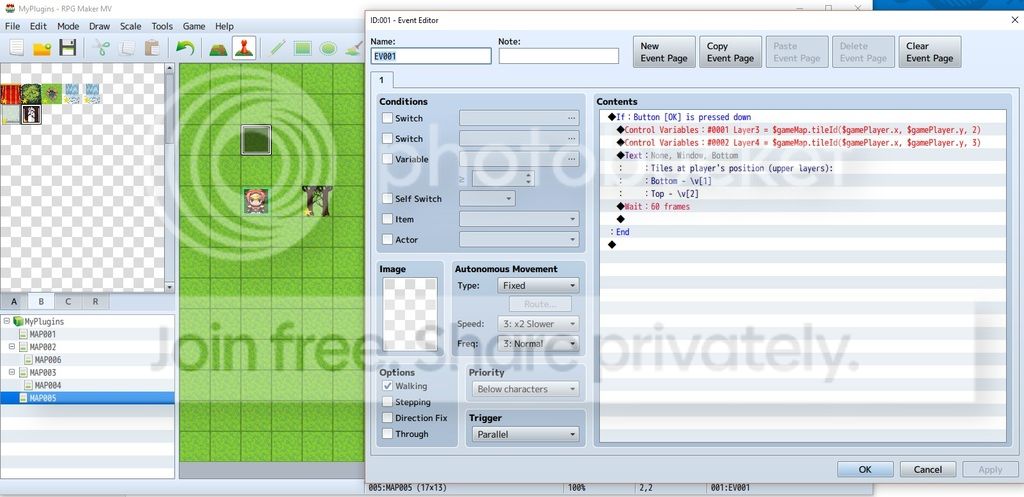
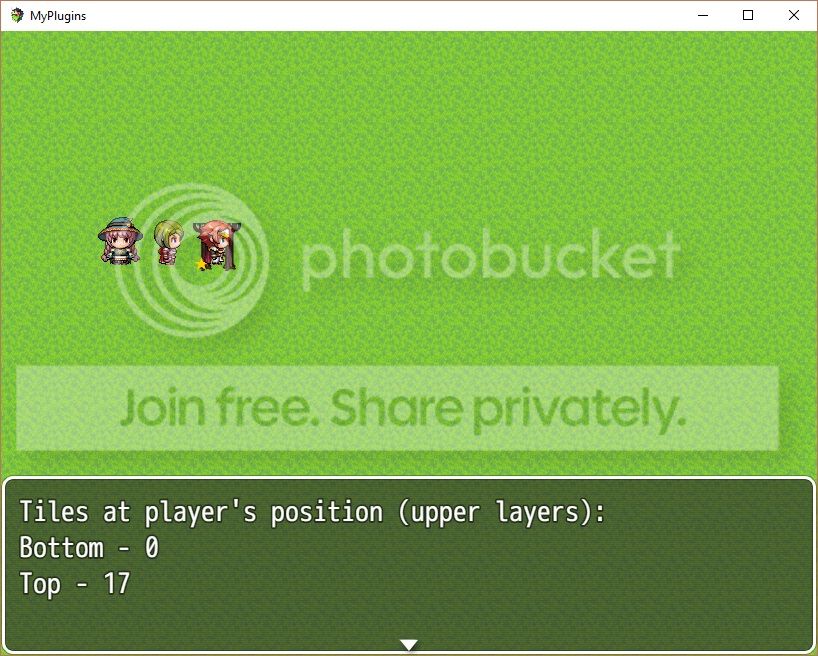
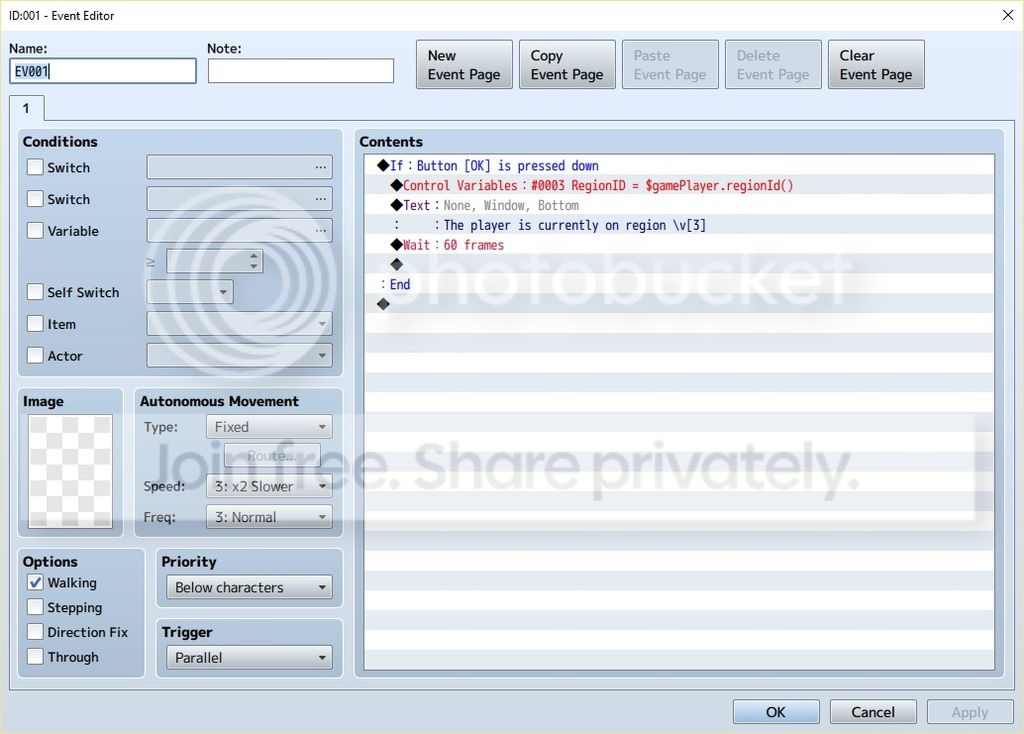
Add the following event, run the game, walk onto the tile (you might need to use Control to override passability), and press space or enter.
Spoiler
If you've only drawn with one tile on the upper layer, it will be the 'Top' one. If you've drawn with two different tiles, you'll have a 'Bottom' tile Id (the first tile you drew with) and a 'Top' tile Id (the second tile you drew with).
Step 4: Mapping
Now just map with your tiles.
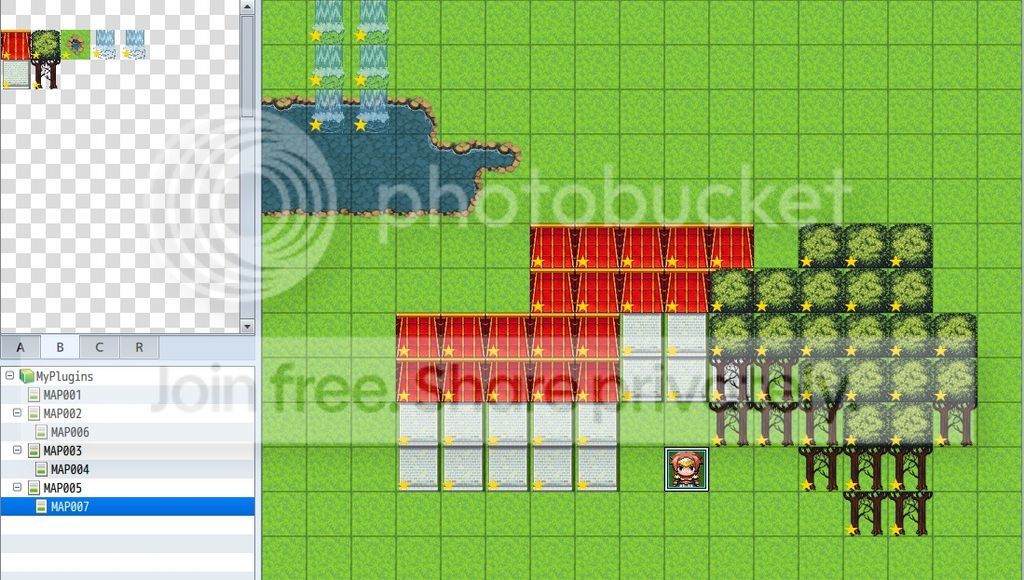
It'll look a little weird in the editor, as it's just going to put the same tile on all the squares you draw on, without reshaping them (remember, the editor doesn't do B-E autotiles - the magic only happens when you play the game).
Because you've got two upper layers, you can draw two levels of tiles if you want to. They can both be autotiles, or a mix of autotiles and regular tiles.
Play the game and see how it looks.
Spoiler
The water here is from the A1 tile. Everything else is from the B tab, set up for autotiles.
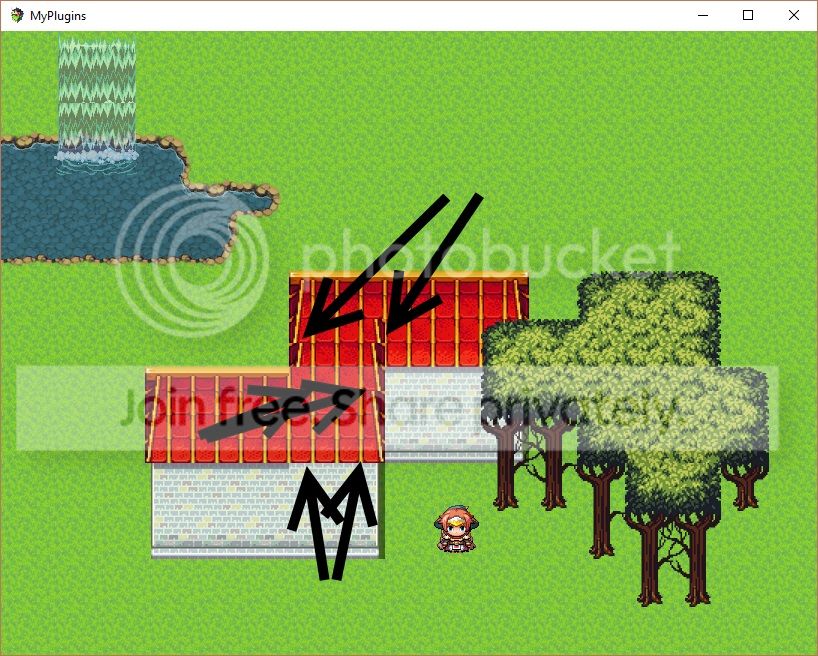
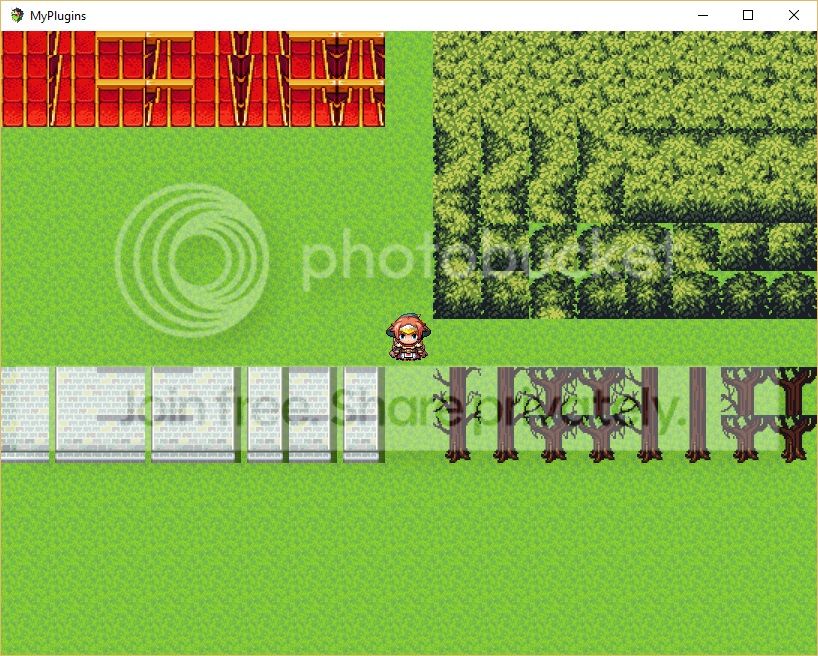
And here's how it looks when playing.
Now, there's some funky roof stuff going on there, and you should expect to see this when you use this plugin. Don't panic - it's totally expected, and totally fix-able.
What's happened here is that I drew the house at the back in full, and then drew the house at the front in full. Those 4 roof tiles on the right side of the lower house have wall tiles behind them that belong to the back house. At this stage, the autotile patterns are just being calculated automatically based on what's around them. We need to do something to tell it those are two different houses, and the roof at the back and the front should be kept separate, as should the walls of the back house and the front house. We'll take care of that in the next step.
The waterfall looks a bit funky too - it's not tiling seamlessly. That's okay - it's the autotile I used, not the script (it's one formatted for XP and slightly modified just so I could show some animation, so it doesn't tile seamlessly in MV).
Step 5: Adjust (shift-map) using regions
So, we want to fix those weird-looking roof and wall tiles.
Using regular autotiles, you'd just draw in an out-the-way spot and use shift-copy/shift-paste to grab the exact tiles you wanted and put them where they needed to go. But MV doesn't do autotiles on the B-E tabs, so that's not an option available to us. Instead, we can use regions to force a similar effect.
Now, a 2x3 autotile can produce up to 48 different individual tiles, depending on what's on the surrounding tiles (a 2x2 autotile can give you up to 16). If you have RMXP, it's easy to see this by double-clicking on the autotile on the palette. To simulate XP's ability to select one of the 48 patterns, or MV's shift-mapping technique, we'll use regions (48 of them) to represent each of the possible patterns.
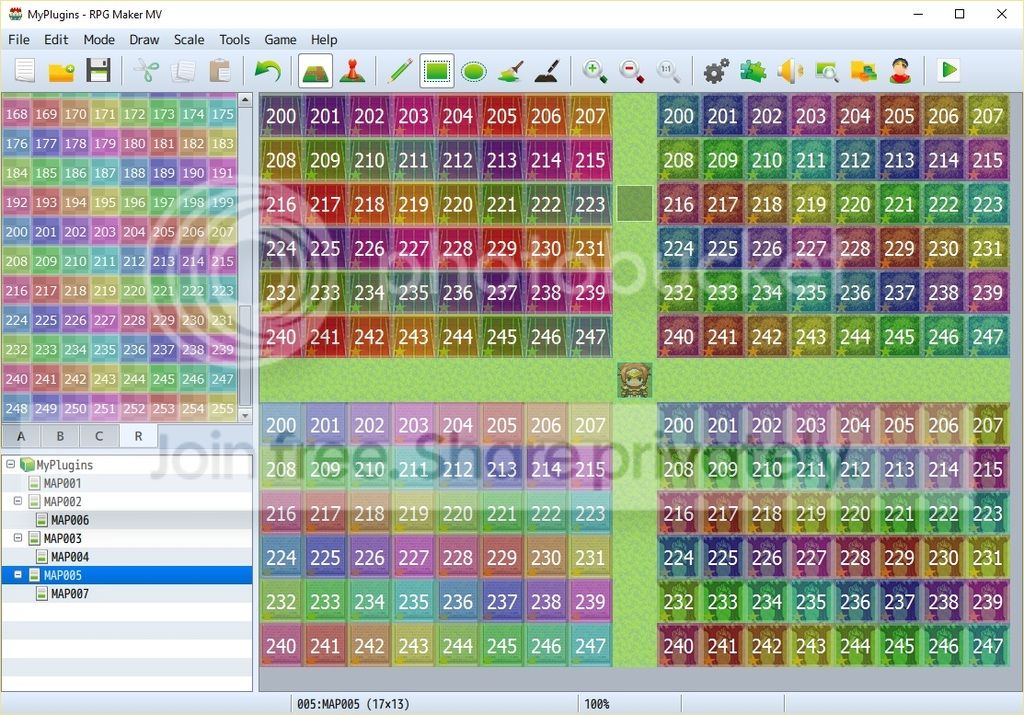
Select a group of 6 full rows of regions, and put the starting region id into the plugin parameter. 6x8=48 regions, and each one will represent an individual tile pattern. Drawing over the tiles with one of those region ids will force it to draw that particular pattern in the game rather than basing the pattern on the surrounding tiles.
How do you determine the region id easily?
Do this AFTER you add the <autotile> tag to the note!
Create a new map and set your starting location.
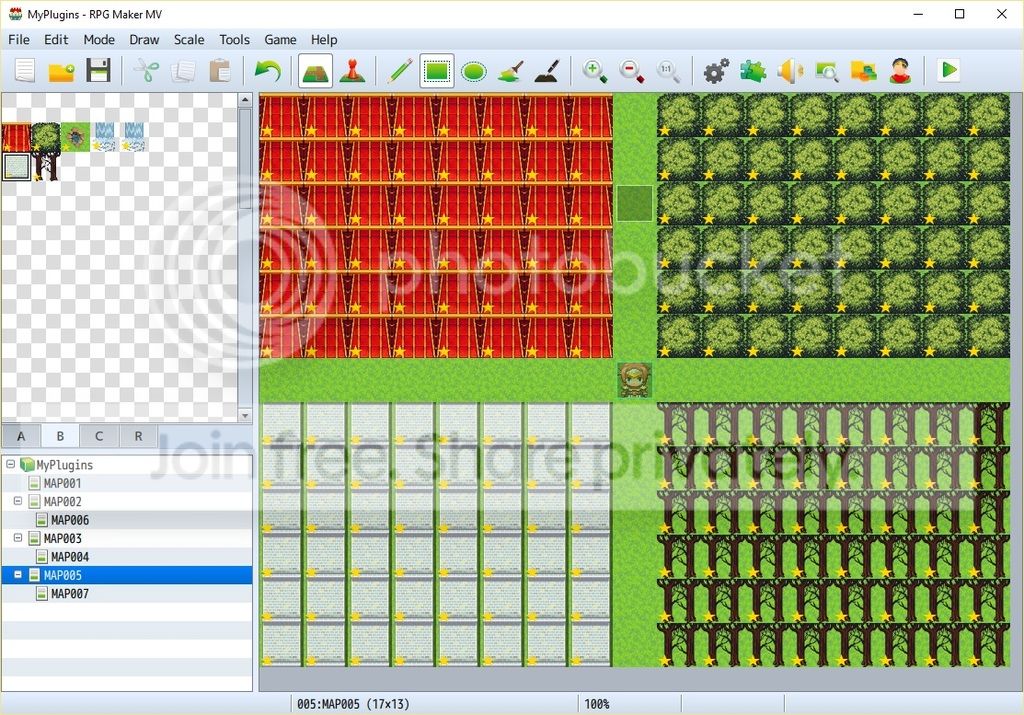
Use the B-E tile to draw on the map - a block of 8 columns x 6 rows.
Spoiler
Now grab that block of 6 rows of autotiles, and draw with them over the top of your tiles (gotta
love how you can do that with just a couple of clicks rather than one-at-a-time!).
Add the following event, run the game, walk onto the tile (you might need to use Control to override passability), and press space or enter.
Note how the 2x3 autotile produces more individual tile patterns than the 2x2 autotiles?
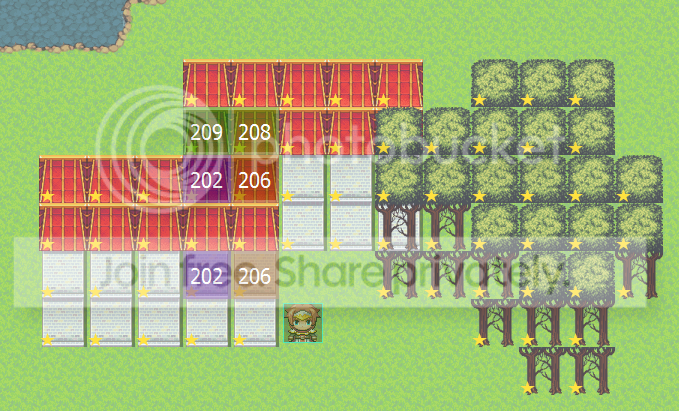
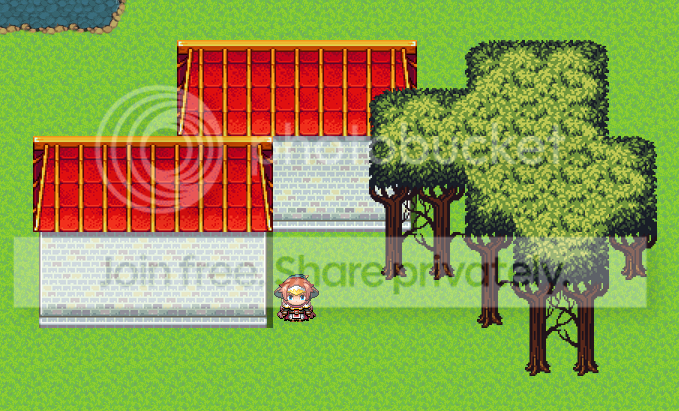
Experimenting a bit (walking onto the tiles, checking the region id, and testing with that region id), it looks like the roof on the top house can be fixed using regions 209 for the corner and 208 for the next piece, and that both the roof and the wall of the bottom house can be fixed with region 206 on the corner and 202 beside it. So popping those regions onto the tiles on our map and testing gives us some results. Much nicer!
There is an alternative that might
reduce the amount of mucking around you need to do with regions, but may not eliminate it entirely. That is to define a second tile in the tileset for both the roof and the wall of the house - using exactly the same settings, but just a different tile Id. Then map one house with one set of roof/tile pieces, and map the other house with the other set. As long as the same B-E tile is not used side by side, the autotiles won't be joined.
Plugin
Download from pastebin
The plugin MUST be saved as UpperAutotiles.js
Credit
Shaz
Terms
Free for use in commercial games
Compatibility
This plugin overwrites the functions TileMap._paintTiles and TileMap._drawAutotile. It will NOT be compatible with other plugins that overwrite either of these functions. It MAY work with other plugins that alias these functions, if this plugin comes above them in the plugin list.
Notes
- Plugins do NOT affect the editor. You can specify a B-E tile to behave as an autotile, but it will only do so while playing the game. The editor will treat it as a regular B-E tile.
- As the editor does not accommodate autotiles on the B-E layer, there is no shift-mapping. The workaround is to use regions to override the default autotile pattern selection.
- If using two B-E autotiles on the same tile, with a region id, the region id will affect both tiles (two upper tile layers but only one region id - can't tell which layer the region applies to)
- You cannot draw A tiles (fences, long grass, etc) on top of B-E autotiles. The B-E tiles will be replaced, just like any other B-E tile if you draw over them with an A tile.
- All tile settings for the autotile will be exactly as for the original B-E tile. Passage should be X, O or star. Strange things will happen if you try to use 4-dir passage on B-E autotiles and fill an area with them.
Have fun! Post if you run into trouble!






 UGREEN Nexode Air 45W USB-C Charger Block
Compact foldable GaN charger for phones, tablets, and light laptop charging.
View on Amazon
UGREEN Nexode Air 45W USB-C Charger Block
Compact foldable GaN charger for phones, tablets, and light laptop charging.
View on Amazon